Skip to content
Parallax Learn

Parallax Learn

  • Welcome
  • Tutorials
        • Tutorial Series head tag

          Tutorial Series
        • Tutorial Series

          The special, classroom-ready series pages are organized collections of tutorials for our most popular hardware and/or languages. The tutorials for each topic are conveniently accessible from a single page, shown in the order it is recommended that they be completed.
        • Robotics Series Head tag

          Robotics Series
        • Robotics Series

          • Artificial Intelligence
          • Cybersecurity: Radio Data tutorialCybersecurity
          • cyber:bot + Python
          • cyber:bot + MakeCode
          • Boe-Bot Tutorial SeriesBoe-Bot
          • Arduino Shield-Bot
          • ActivityBot with C TutorialsActivityBot + C
          • ActivityBot with BlocklyProp Tutorial SeriesActivityBot + BlocklyProp
          • Scribbler 3 Tutorial SeriesScribbler 3
        • Electronics & Programming Series Head tag

          Electronics & Programming Series
          • BS2 Board of Education Tutorial SeriesBS2 Board of Education
          • Propeller C-Language BasicsPropeller C Basics
          • FLiP Try-It Kit C Tutorial SeriesFLiP Try-It Kit + C
          • FLiP Try-It Kit BlocklyProp TutorialsFLiP Try-It Kit + BlocklyProp
          • Badge WX Tutorial SeriesBadge WX
          • Propeller BlocklyProp Basics and ProjectsPropeller BlocklyProp Basics
          • View All Tutorial Series »
        • Browse Tutorials
        • Browse Tutorials

          Individual tutorials sorted by robot or kit, and language.
        • By Robot or Kit
          • ActivityBot
          • SumoBot WX
          • Boe-Bot
          • Shield-Bot
          • cyber:bot
          • Badge WX
          • ELEV-8
          • ARLO
        • By Language
        • By Language

          • Propeller C
          • Arduino
          • BlocklyProp
          • PBASIC
          • Python
          • MakeCode
          • View All Tutorials »
  • Educators
  • Reference
  • Downloads
  • Home
  • All Courses

ePaper Display with BlocklyProp

Curriculum

  • 1 Section
  • 6 Lessons
  • Lifetime
Expand all sectionsCollapse all sections
  • ePaper Display with BlocklyProp
    6
    • 1.0
      Connect and Test the ePaper Module
    • 1.1
      ePaper Fonts and Color
    • 1.2
      Coordinates and Overlapping Text
    • 1.3
      Displaying Numbers
    • 1.4
      Displaying Shapes
    • 1.5
      Bitmap ePaper Image from SD Card

Coordinates and Overlapping Text

To use the ePaper module, it is important to understand its coordinate system.  Most computer graphics, displays, and terminals follow a similar convention; the top-left corner is the origin.

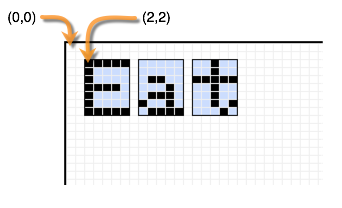
Look carefully at the graphic below.  The display in the graphic shows a single black pixel in each corner of the screen.  The grey text closest to each pixel represents that pixel’s coordinates.  The top-left pixel is in row zero and column zero. You could also say that its x/y position is (0,0).  Since the display is 128 pixels wide, and the first pixel is zero, the rightmost pixel is in column 127.

When we refer to the coordinates of a pixel, we use the notation (x,y), where x is how far across from left to right, and y is how far down from top to bottom.

The cursor is the point where the ePaper module begins printing text or numbers.  If you set the cursor to (0,0), it will print text beginning at the top-left corner.  If you set the cursor to (2,2), it will begin printing text 2 pixels left and 2 pixels down from the top-left corner:


ePaper Coordinates Test Program

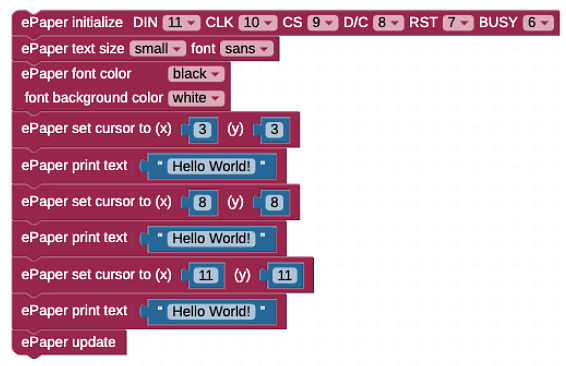
This test program prints the Hello World message three times, using different starting coordinates each time.

  • Log into BlocklyProp and make a new project for your board.
  • Build and save the program shown below:

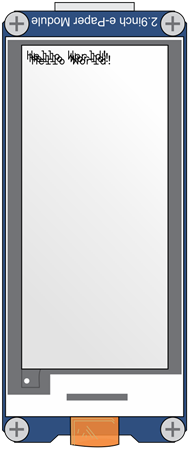
  • Click the Run once button. The ePaper should display:


How it Works

The program prints Hello World! three times, starting at different coordinates. Since the second and third prints’ coordinates were close to the first, the three printings are overlapping and look like they blend together.


Did You Know?

What happens when different combinations of font and background color are written close to each other?  — It depends!

  • If both the background and font is set to black, the text background will overlap and look like it blends together.
  • If both the font and the background are set to white, the text will not be visible on the screen, even if it’s over a shape.
  • If the font is set to black and the background to white, the text written last will cover the previous text.
  • If the font is set to white and the background is set to black, the text written last will also cover the previous text.


Printer-friendly version
ePaper Fonts and Color
Prev
Displaying Numbers
Next

DISCUSSION FORUMS | PARALLAX INC. STORE

About | Terms of Use | Feedback: learn@parallax.com | Copyright©Parallax Inc. 2024

© 2026 Parallax Learn • Built with GeneratePress