Index Array Variables
A great use of for loops is performing operations on elements in an array variable. The for loop can increment through the array’s index values to access each element of the array in succesion. (See the Array Variables lesson for a refresher.)
- Click SimpleIDE’s Open Project button.
- If you’re not already there, navigate to …\SimpleIDE\Learn\Examples\C Intro\Basics.
- Open Index Array Variables.side.
- Set the power switch to position 1 if it isn’t already (if applicable for your board).
- Click the Run Project with Terminal button, and verify that it prints each of the p array variable’s elements.
/*
  Index Array Variables.c

  Use a for loop to display all the elements in an array.
*/

#include "simpletools.h"                      // Include simpletools

int main()                                    // main function
{
  int p[] = {1, 2, 3, 5, 7, 11};              // Initialize the array
  for(int i = 0; i < 6; i++)                  // Count i from 0 to 5
  {
    print("p[%d] = %d\n", i, p[i]);           // Display array element & value
    pause(500);                               // 1/2 second pause
  }
}
How it Works
First, the main routine sets up an integer array named p with six elements, 1 followed by the first five prime numbers.
Next comes a for loop with a start index of int i = 0, a condition of i < 6, and an increment of i++.
Now, take a close look at the print statement in the for loop’s code block. It prints two items each time through the loop: the value of the i variable displayed as a p index, and the value the element in the p array that has an index equal to i.
So, the first time through the for loop, print(“p[%d] = %d\n”, i, p[i]) becomes print(“p[%d] = %d\n”, 0, p[0]). That prints “p[0] = 1” in the SimpleIDE Terminal.
The second time through the loop, i++ increments the value of i, so the print statement becomes print(“p[%d] = %d\n”, 1, p[1]).
The for loop continues to count up through 5, displaying all the array’s elements, ending with “p[5] = 11”.
Did You Know?
sizeof — C has a unary operator called sizeof that returns the number of bytes consumed by an object in memory, such as an array.
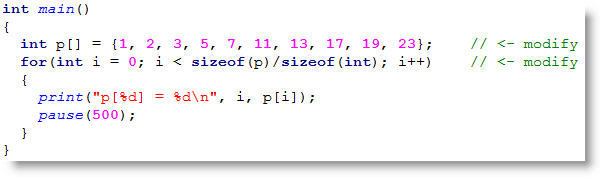
In the example program above, we knew our array had 5 elements, so we used i < 6 as the for loop’s condition to access all of the elements in the p array. But what if we didn’t know how many elements were in the p array? Here’s a for loop that would work:
for(int i = 0; i < sizeof(p)/sizeof(int); i++)
Here, sizeof(p) gets the total number of bytes in the array. sizeof(int) gets the number of bytes used by one int element in the array. So, sizeof(p)/sizeof(int) equals the number of elements in the array.
Try This
- Save a copy of your project.
- Add several more prime numbers as elements in the p array.
- Modify the for loop using the sizeof trick as the condition parameter.
- Run it, and see that it works.
Your Turn
- Write a program that multiplies each array element by 100 and then stores the result back to the array element. Then, have a second loop display all the values. If you did it right, that second loop should display 100, 200, 300, 500, 700, 1100, etc.