Navigate to Center on Object Coordinates (Python)
In earlier lessons, you plotted an object’s (X, Y) coordinates on the micro:bit’s LED display.
Now you’ll use those same coordinates to steer the cyber:bot so the trained color target stays centered in the HUSKYLENS camera’s view.
This is your first feedback-control program—your robot will automatically adjust its direction and speed to keep what it “sees” centered in its field of vision.
Parts List
Use the same setup as before:
-
cyber:bot robot (assembled and tested)
-
HUSKYLENS with microSD card installed
-
5 × AA batteries (fresh or fully charged NiMH)
-
I²C wiring connection (from previous activity)
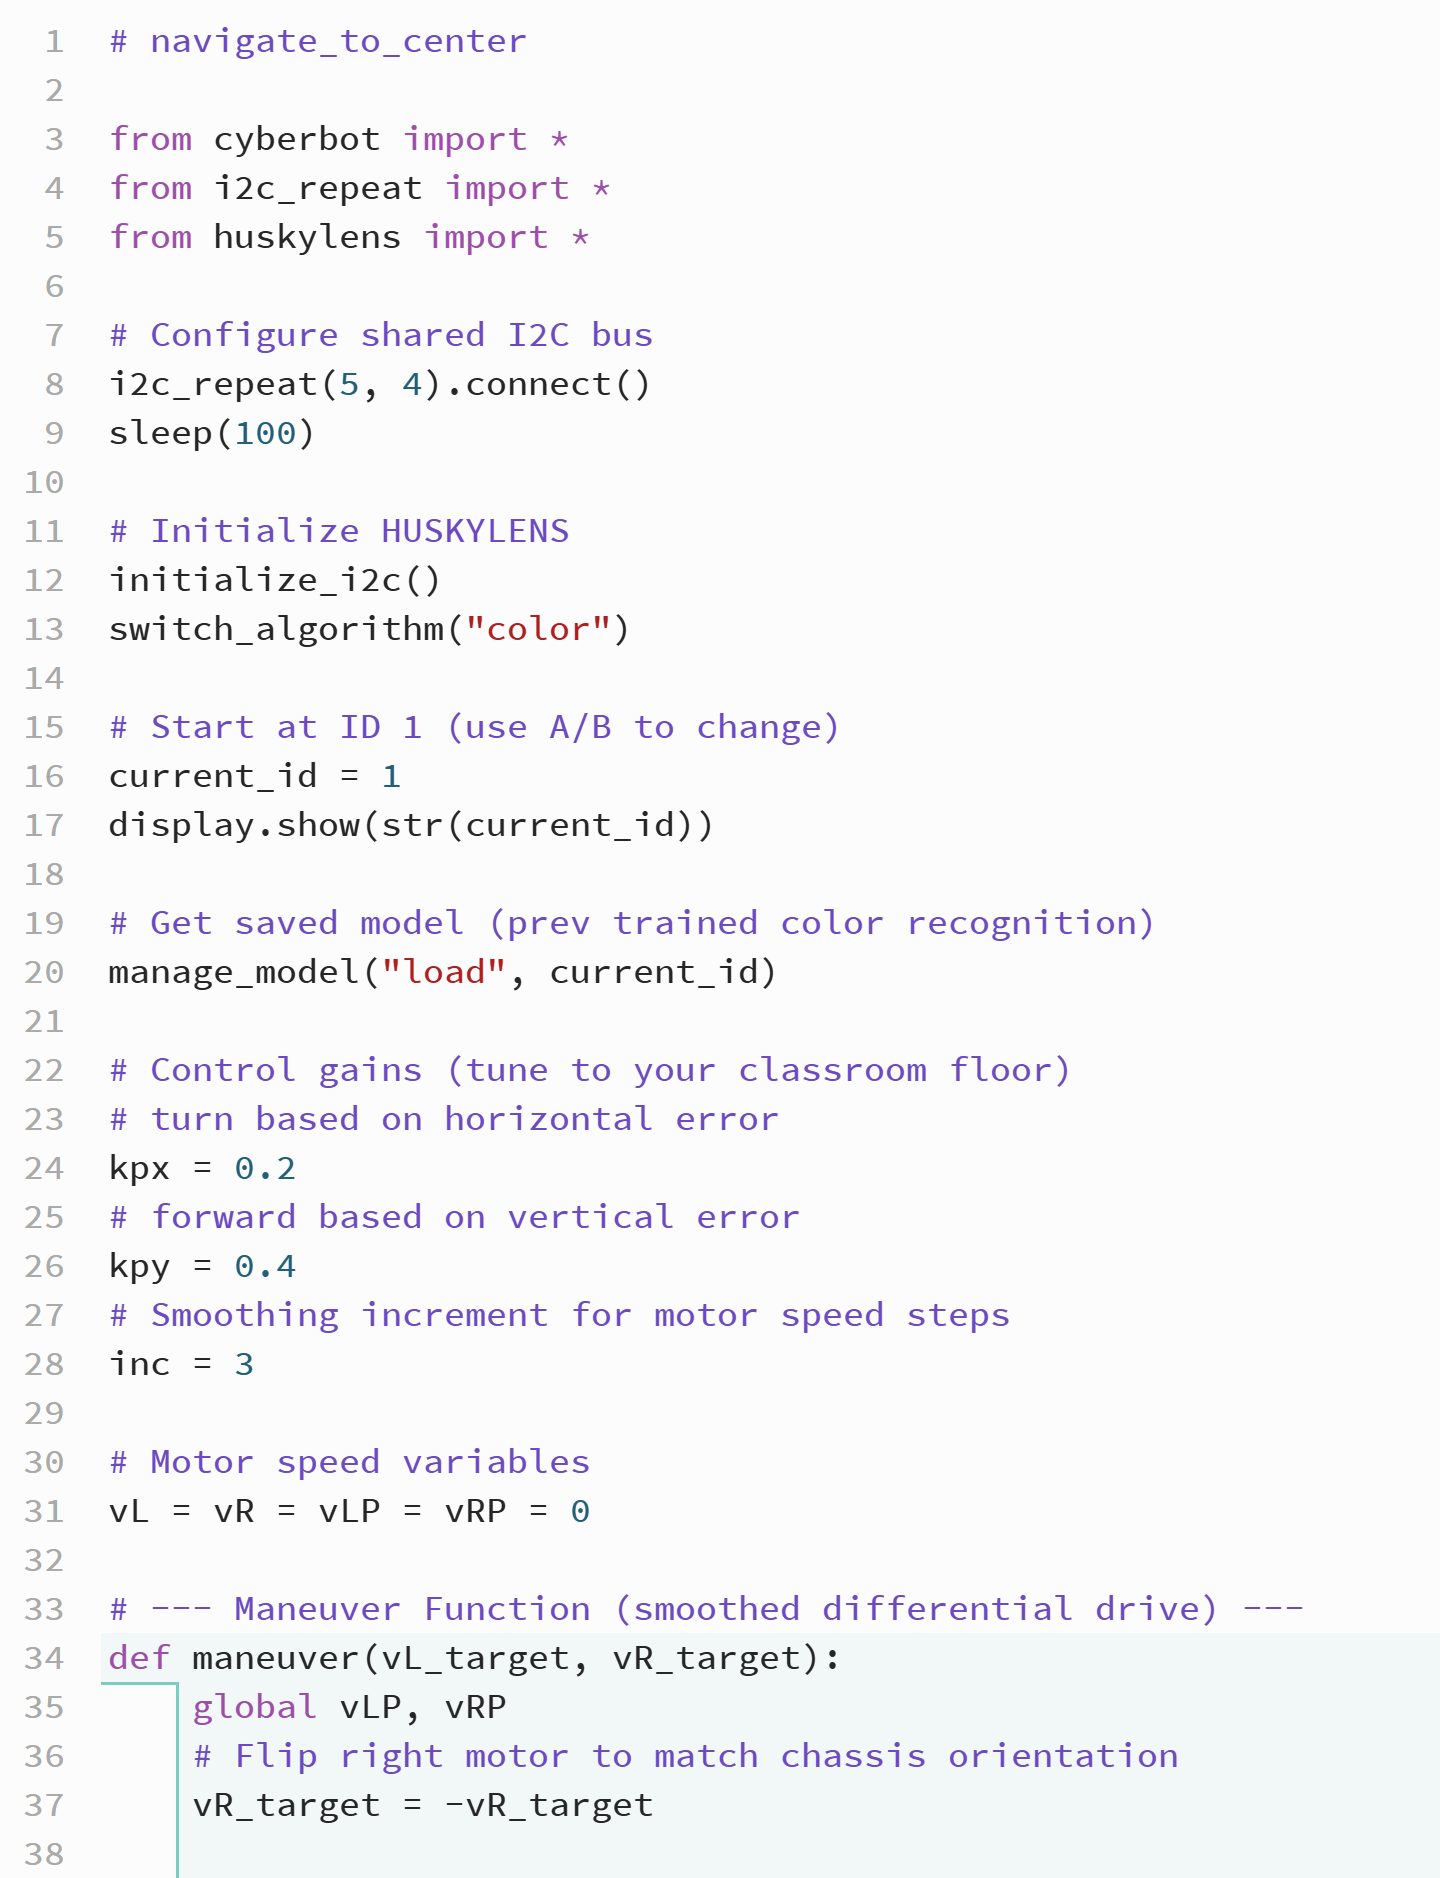
Script: navigate_to_center.py
This program reads the color target’s position from the HUSKYLENS and moves the cyber:bot to keep that target centered in the camera view.
The code uses simple proportional control to calculate how much to turn and drive forward, and it smooths out movement for steady tracking.
✓ Open the micro:bit Python Editor.
✓ Load your previous project (show_object_xy).
✓ Update the project name to navigate_to_center.
✓ Replace the script contents with the version below.
✓ Click Save, then Send to micro:bit to load it onto your board.
Tests
This test verifies that the cyber:bot turns and drives in response to the object’s position in the HUSKYLENS view.
Safety First:
✓ For initial tests, lift the wheels off the table or place the robot on a test stand.
✓ Keep fingers clear of wheels and servo horns.
Set Up:
✓ Confirm that a color has been trained and saved as Color:ID1 on the microSD card.
✓ Ensure the HUSKYLENS is in Color Recognition mode (the script sets it automatically).
✓ Power the robot with five fresh AA batteries and set the switch to position 1 (center).
Wheel Direction Test (off the ground):
✓ Move the trained color to the left of center — the right wheel should move forward while the left slows or stops (turn left).
✓ Move the color to the right — the left wheel should move forward (turn right).
✓ Move the color above center — both wheels should move forward.
✓ Move the color below center — both should slow or reverse slightly (back up).
✓ If turning looks inverted, verify that the right motor is flipped in the maneuver() function.
Drive Test (on the floor):
✓ Place the robot on the floor with the trained color target ahead at a safe distance.
✓ The robot should steer toward the target and attempt to center it.
✓ If the robot oscillates or drives too quickly, reduce kpy.
✓ If it turns too sharply, reduce kpx.
✓ Adjust inc for smoother motion: smaller for steadier motion, larger for quicker response.
Did You Know
This script demonstrates proportional control — the foundation of robotics motion feedback.
When an error (difference between where you want to be and where you are) is multiplied by a proportional constant (the gain), it produces a control signal that adjusts movement.
If the object is far from center, the correction is large; if it’s close, the correction is small.
Why smoothing matters.
The maneuver() function uses incremental speed changes to keep motion stable. This prevents the robot from jittering due to tiny, rapid changes in camera readings — a common real-world robotics issue known as sensor noise.
How It Works
The script begins by importing the cyberbot, i2c_repeat, and huskylens modules.
The i2c_repeat(5, 4).connect() statement sets up shared I²C communication between the micro:bit, the cyber:bot board, and the HUSKYLENS.
After a short sleep(100), initialize_i2c() starts communication with the HUSKYLENS, and switch_algorithm("color") sets it to color recognition mode.
The variable current_id identifies which color model the robot will track.
The manage_model("load", current_id) command loads that color’s model from the microSD card.
Two control constants, kpx and kpy, define how strongly the robot turns or moves forward based on horizontal and vertical “errors” — differences between the object’s detected position (x, y) and the screen center (160, 120).
The inc variable defines how quickly motor speeds can change, providing smoothing for steady motion.
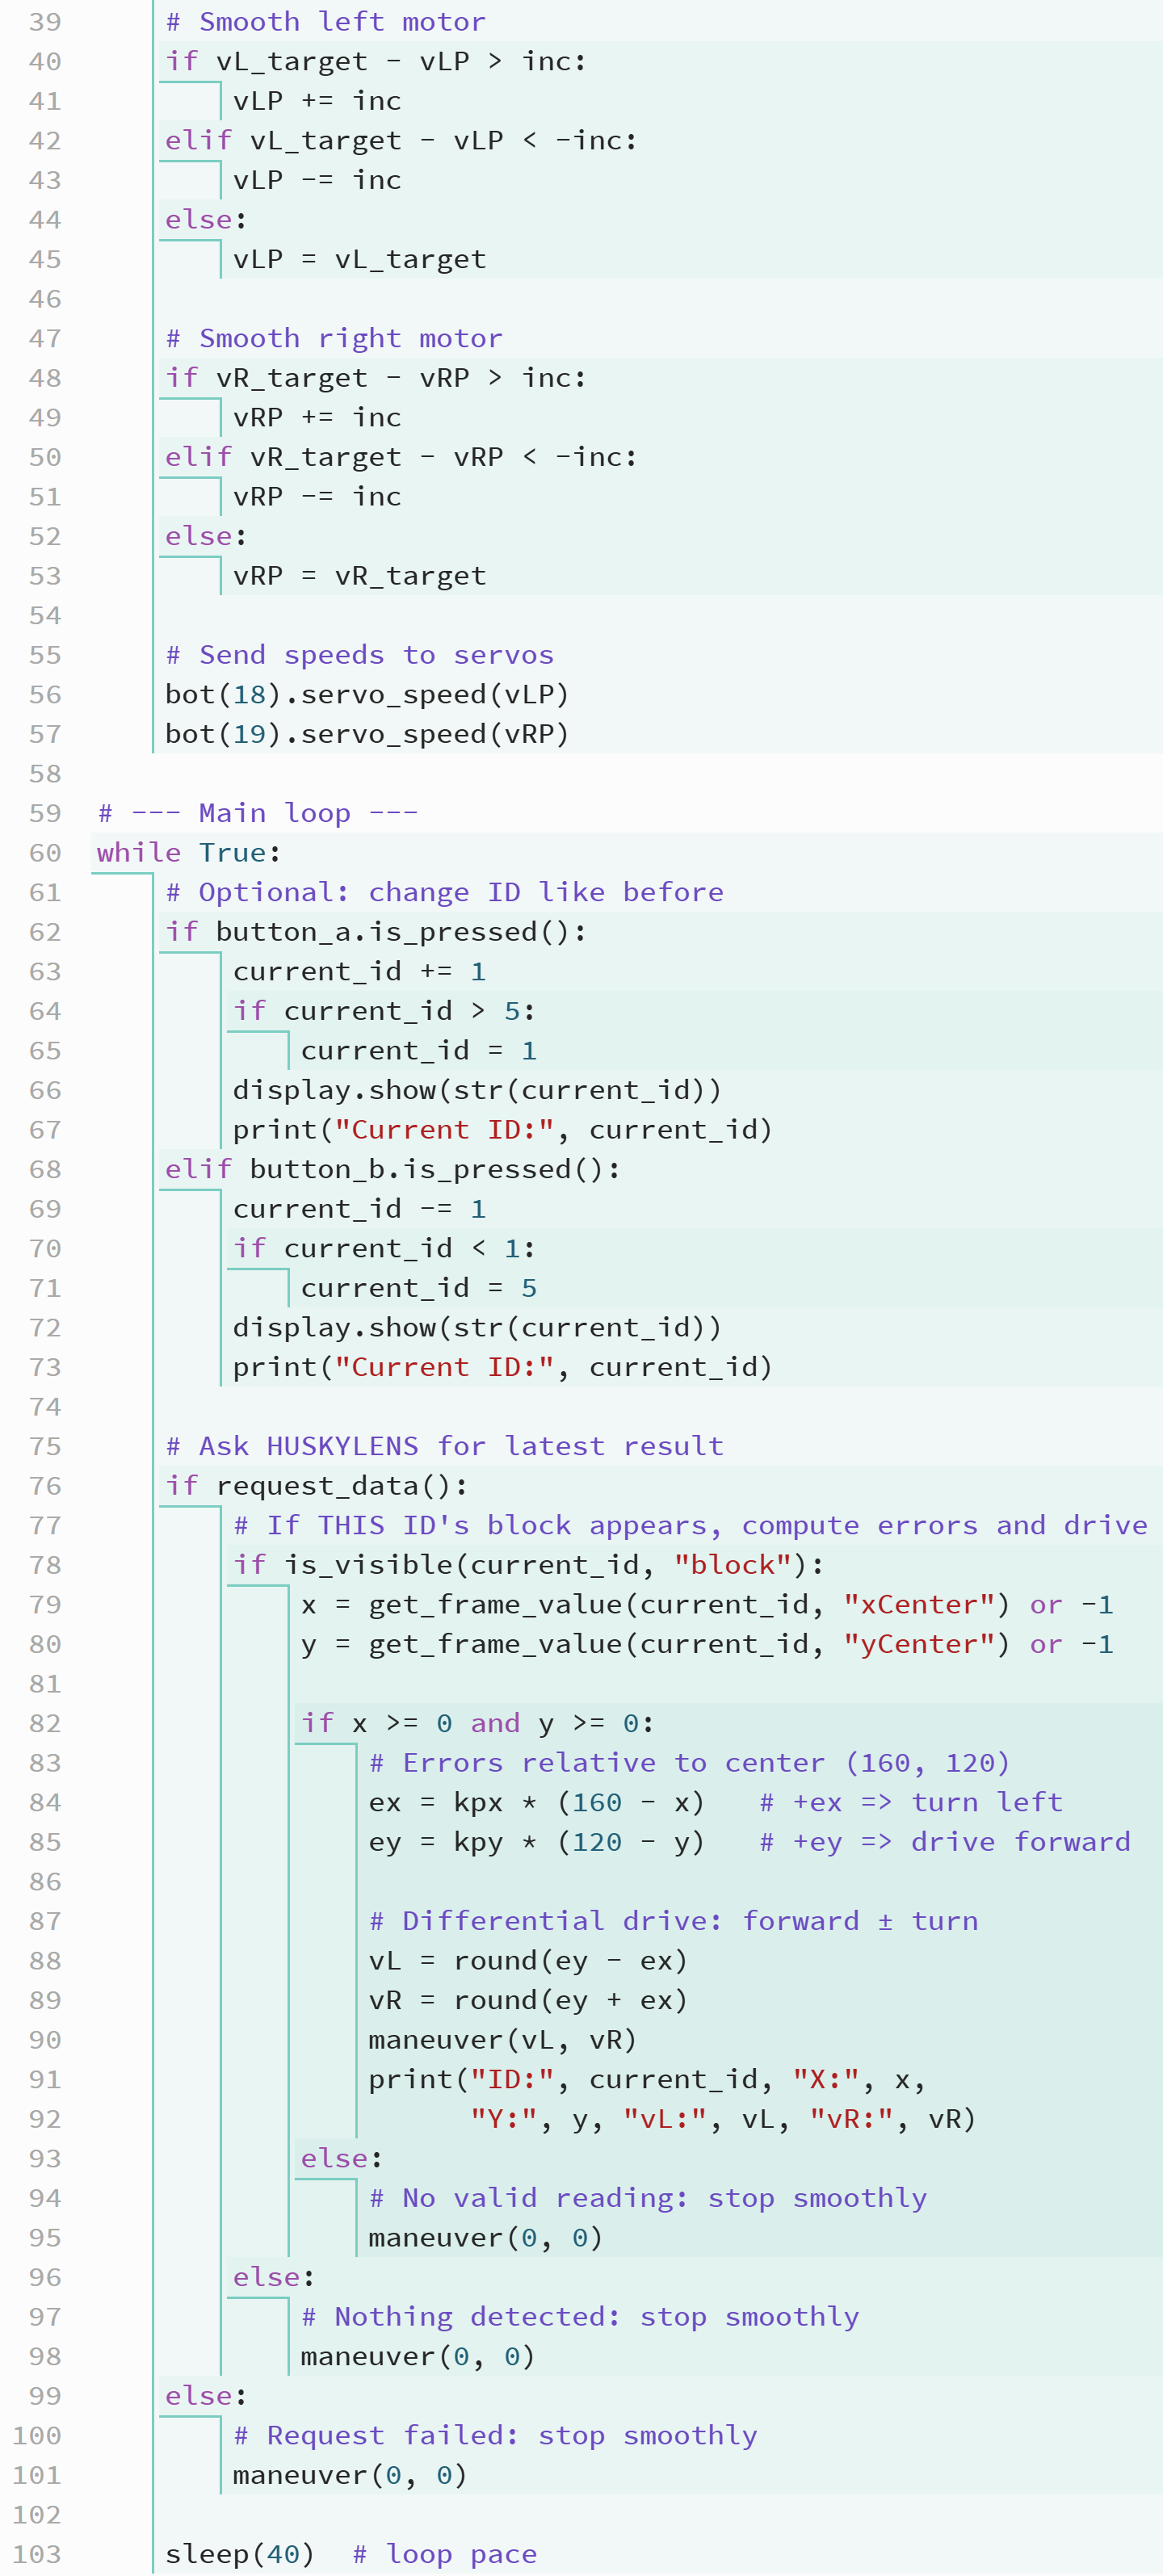
During each loop cycle, the program:
-
Reads the object’s coordinates using
get_frame_value(). -
Calculates the horizontal error (
ex) and vertical error (ey). -
Computes new wheel speeds using differential drive math (
vL = ey - ex,vR = ey + ex). -
Calls
maneuver(vL, vR)to apply smoothed speed adjustments to the servo motors.
The maneuver() function prevents abrupt direction changes by increasing or decreasing each wheel speed in small increments.
If the target leaves the field of view, the robot slows smoothly to a stop.
Together, these features create a proportional control system that reacts gently and keeps the target centered in the HUSKYLENS view.
Your Turn
Now that your cyber:bot can follow a color target, let’s make its motion more precise.
Try experimenting with the control constants and smoothing value to balance accuracy and smoothness.
✓ Increase kpy to make the robot move forward faster toward the target.
✓ Increase kpx to make it turn more aggressively toward center.
✓ Adjust inc to fine-tune how gradually the robot changes speed.
Can you find a balance where the robot centers the target quickly but doesn’t overshoot or oscillate?
Questions, Exercises, Projects
Questions
Answer the following questions to review the key concepts in this activity.
-
What does the
kpxvariable control in this script?
It controls how strongly the robot turns left or right based on the object’s horizontal position. -
What does the
kpyvariable control?
It determines how strongly the robot moves forward or backward based on the object’s vertical position. -
What is the purpose of the
incvariable?
It limits how quickly motor speeds change, preventing jittery movement. -
Why is the
maneuver()function needed instead of directly callingservo_speed()?
It smooths the motion by gradually changing wheel speeds and ensures the right motor direction is corrected for the chassis. -
What is meant by the term “feedback loop” in this program?
The robot continually reads camera data, computes errors, and adjusts motion based on those errors in real time. -
How does proportional control help the robot center the color target?
It scales motor commands according to how far the target is from center — larger errors cause stronger corrections, smaller ones cause gentler adjustments.
Exercises
Try these exercises to explore how control parameters affect robot performance.
-
Experiment with the
kpxvalue.
Increase or decrease it to see how turning responsiveness changes. Observe what happens if it’s too high or too low. -
Change
kpyto a smaller number (for example, 0.2).
Notice how reducing this gain slows the robot’s forward motion and makes its tracking steadier. -
Modify
incto a larger value (for example, 6).
This allows faster acceleration but can make the robot less stable when following small movements. -
Add a debug print statement that also shows error values
exandey.
Useprint("ex:", ex, "ey:", ey)to monitor the robot’s control response in real time.
Projects
Apply what you’ve learned to design and test more advanced control behaviors.
-
Target Centering with Distance Zones
Expand the program so the robot slows down when the color target is near the center of the HUSKYLENS view and speeds up when it’s farther away.
Hint: Use the size of the detected block (width or height) as a rough measure of distance, and adjustkpybased on that value. -
Smooth Stop and Resume
Modify the code so that when the color target disappears, the robot doesn’t stop immediately but gradually slows to a halt.
Hint: Instead of callingmaneuver(0, 0)right away, reduce target speeds step by step until both motors reach zero.*
Solutions
Questions
-
What does the
kpxvariable control in this script?
It controls how strongly the robot turns left or right based on the object’s horizontal position. -
What is the purpose of the
incvariable?
It limits how quickly motor speeds change, preventing jittery movement. -
What is meant by the term “feedback loop” in this program?
The robot continually reads camera data, computes errors, and adjusts motion based on those errors in real time.
Exercises
-
Experiment with the
kpxvalue.
Increasingkpxmakes turns sharper but can cause oscillation; reducing it makes turns slower and smoother. -
Modify
incto a larger value (for example, 6).
This lets the robot accelerate and decelerate faster, but motion may become twitchy on uneven surfaces.
Projects
-
Target Centering with Distance Zones
Measure the detected block’swidthorheight. When these values are small (target far away), use a higherkpyto move faster. As they increase (target closer), reducekpyto slow down for precise centering.