Navigate to Center on Object Coordinates
Navigate to Center on Object Coordinates
You’ve seen how to plot an object’s (X,Y) on the micro:bit’s 5×5 LED display. Now you’ll use those same coordinates to steer the cyber:bot so the trained target stays centered in the HUSKYLENS view.
Entering the Script
- Open the MakeCode editor.
- Start from your previous project (Show Object XY) so the HUSKYLENS and cyber:bot extensions are already present.
- If you need to reopen it, click Import on the MakeCode home page and choose your saved file.
- Use the Name field next to Download to name this project: Navigate to Center.
- Update your program so it matches the script below.
- Click the Save (floppy disk) icon.
- Click Download to load it onto your micro:bit.

Test the Script
Safety first
-
For initial tests, lift the wheels off the table or place the robot on a test stand so you can observe wheel directions without the robot driving away.
-
Keep fingers clear of the wheels and servo horns.
Set up
-
Make sure you have a color:ID1 trained and stored in the microSD card’s number 1 model.
-
Ensure the HUSKYLENS is in Color Recognition mode (this script sets it, too).
-
Power the robot with fresh batteries; switch in position 1 (center).
Check wheel directions (off the ground)
-
Hold the trained color left of center in the camera view.
-
The left wheel should slow/stop and the right wheel should rotate forward so the robot would turn left toward center.
-
-
Move the color right of center — the turn should reverse.
-
Move the color above center — both wheels should move forward.
-
Move the color below center — both should reduce speed (or reverse if gains are higher) to “back up” toward center.
-
If turning looks inverted, verify that right motor is flipped (done in
maneuver()).
-
Drive test (on the floor)
-
Place the robot on the floor with the color target ahead at a safe distance.
-
The robot should steer toward the target and try to center it in the camera view.
-
If it oscillates or drives too fast, reduce
kpy(forward gain). If it turns too sharply, reducekpx(turn gain). -
For smoother motion on different floors, adjust
inc(speed smoothing step). Smaller values for smoother but more sluggish operation, larger values for more responsive but more jittery operation.
How it Works
This script runs as a feedback loop. Each cycle, the HUSKYLENS reports the position of the tracked object in camera coordinates (x, y). The program compares those coordinates to the center of the image (160, 120). The difference is called the error. Two proportional control gains, kpx for horizontal error and kpy for vertical error, scale these differences into steering and forward drive signals.
From these calculations, the program produces left and right wheel speeds. The maneuver function then applies those speeds to the robot’s motors — but with one important adjustment: it only allows the speeds to change by a small step (the inc value) each loop. This smoothing keeps the robot from jittering when the HUSKYLENS measurements bounce around slightly.
As a result, the cyber:bot gradually adjusts its motion to center the object on the HUSKYLENS screen and hold it there, without twitchy corrections.
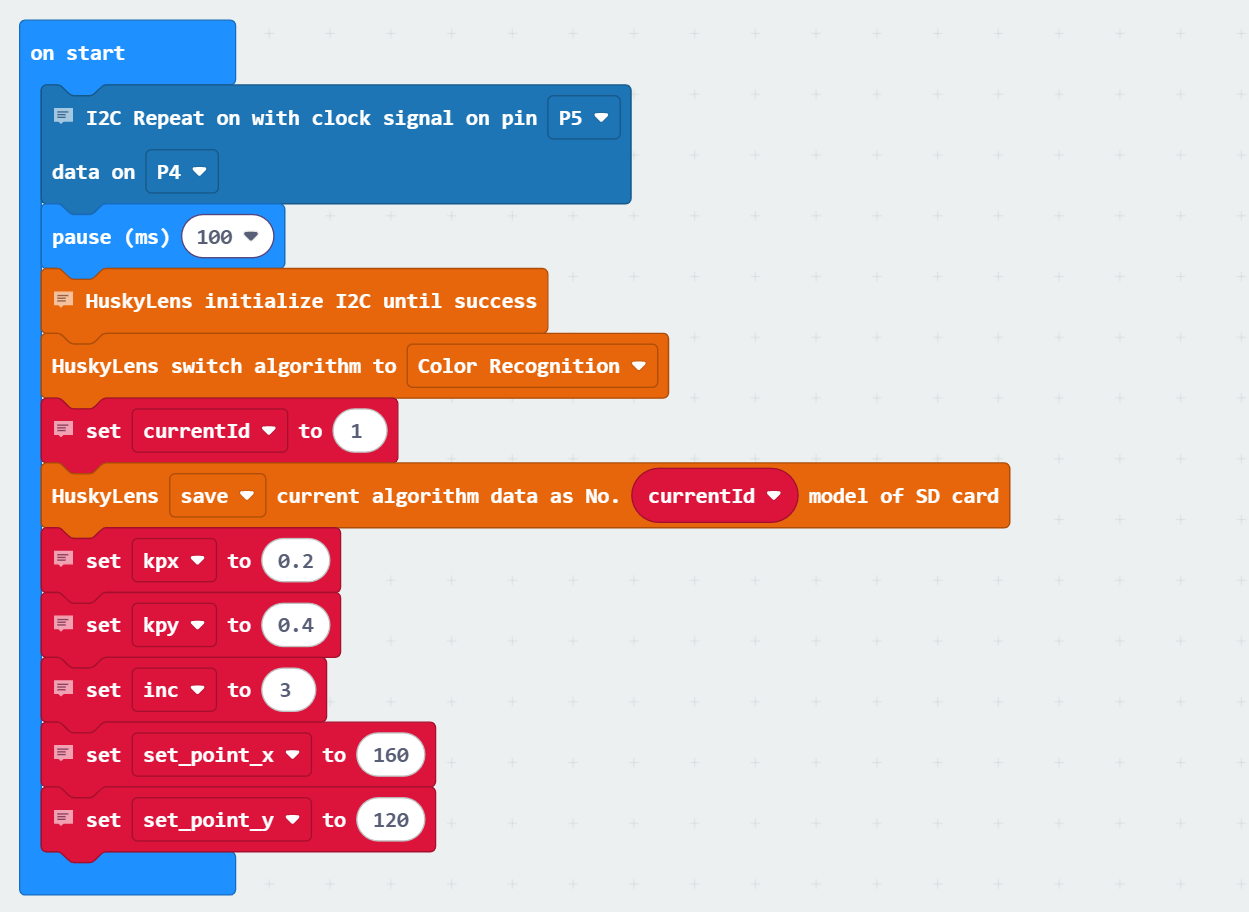
On start setup
-
cyber:bot → I2C Repeat on (clock signal on pin P5 data on P4) — shares the I²C bus with the HUSKYLENS.
-
Basic → pause (ms) (100) — gives hardware time to settle.
-
HUSKYLENS → HuskyLens initialize I2C until success — starts communication.
-
HUSKYLENS → HuskyLens switch algorithm to (color recognition) — chooses the mode we’ll track.
-
Variables → set (currentId) to (1) — start with ID 1.
-
Variables (script) — set (kpx) to (0.20), set (kpy) to (0.40) (control gains), set (inc) to (3) (speed smoothing step), set (vLP) to (0), set (vRP) to (0) (remembered wheel speeds), set (set_point_x) to 160 (center pixel x coordinate) , set (set_point_y) to 120 (center pixel y coordinate).
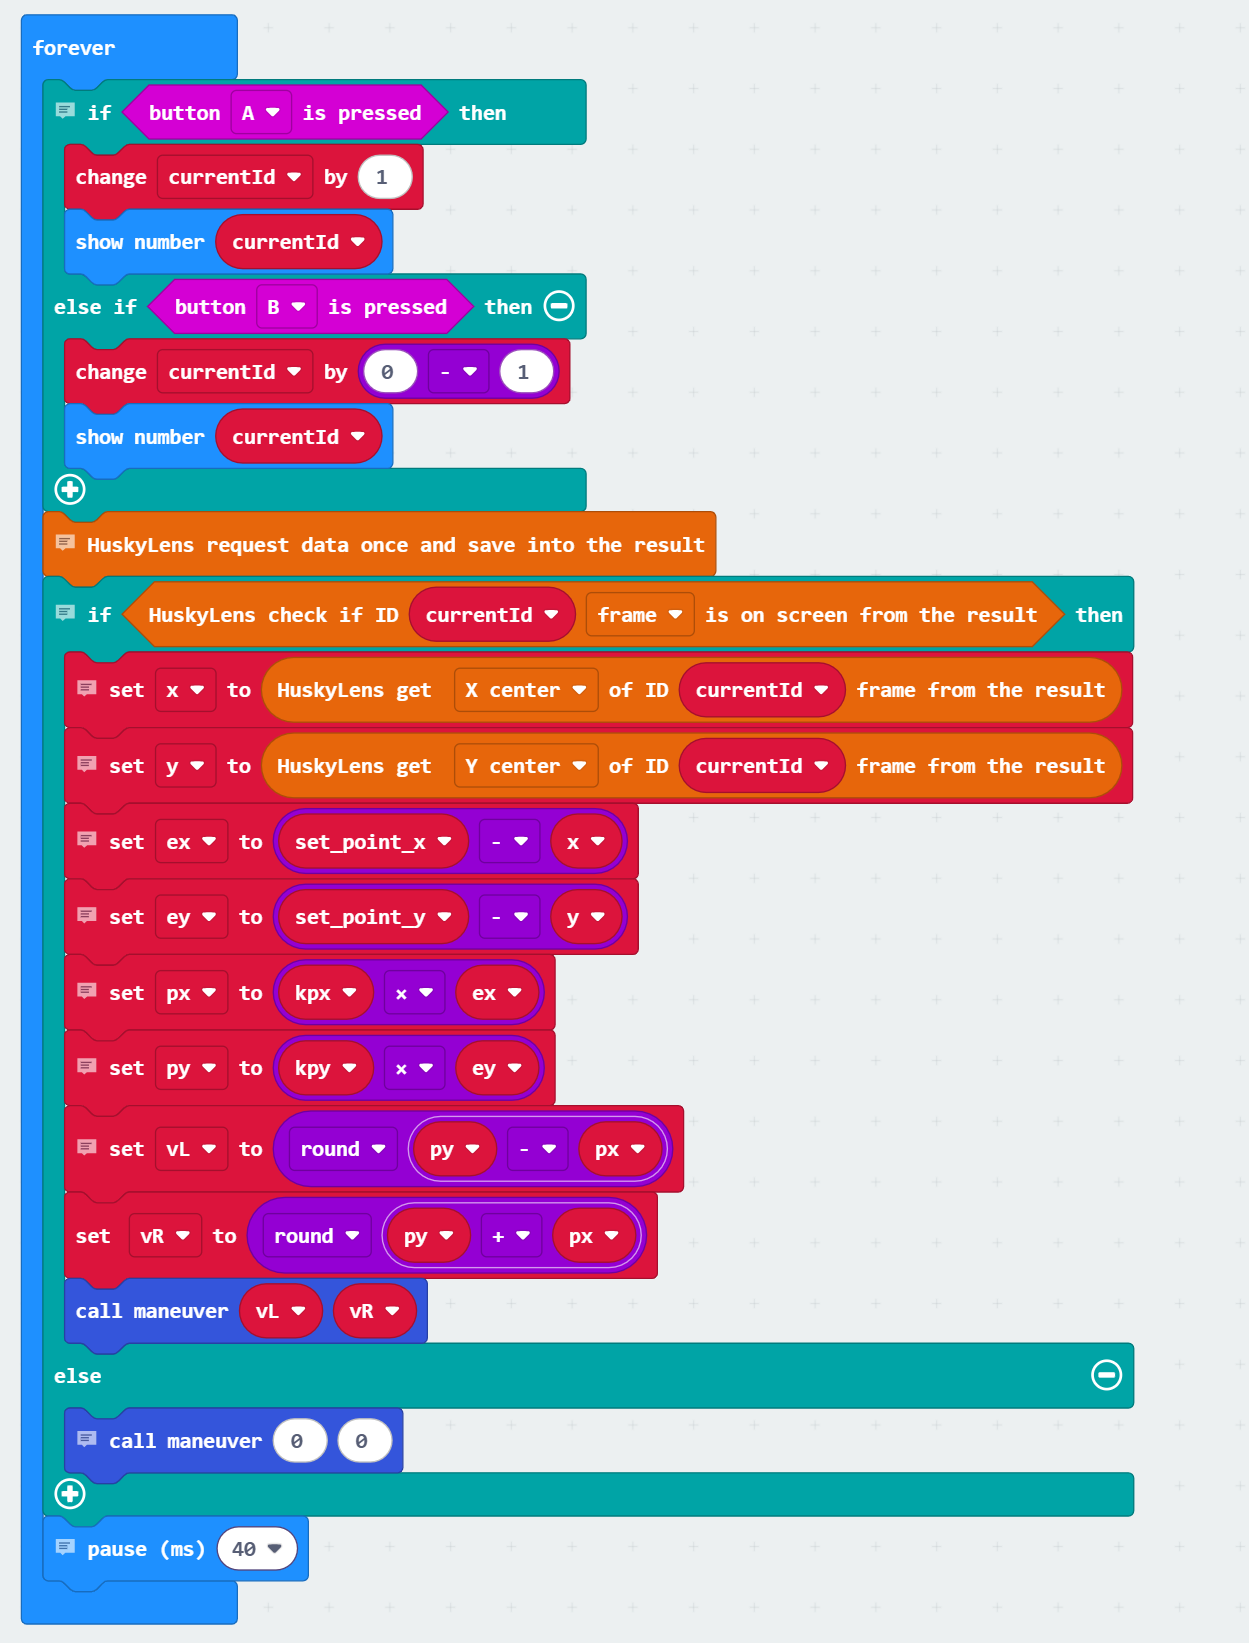
Inside the forever loop
-
if <button A is pressed>
→ Variables → change (currentId) by (1), then Basic → show number (currentId). -
else if <button B is pressed>
→ Variables → change (currentId) by (–1), then Basic → show number (currentId). -
(after button checks) HUSKYLENS → HuskyLens request data once — updates detections.
-
if <HUSKYLENS ID (currentId) appears as (block)>
→ HUSKYLENS → read (xCenter) of ID (currentId) intox(0…320).
→ HUSKYLENS → read (yCenter) of ID (currentId) intoy(0…240).
→ Math: compute horizontal error for each axis. For left/rightex = (160 - x)and forward/backwardey = kpy*(120 - y).
→ Math: scale error terms to values useful for servo servo control. These are called the proportional terms. For left/rightpx = (kpx * ex)and forward/backwardpy = (kpy - ey).
→ Math: set up the influence of px and py on wheel speeds. set left speedvL = round(py - px)and right speedvR = round(py + px).
→ Call function — maneuver(vL, vR) to apply flip + smoothing + servo outputs. -
else
→ Call function — maneuver(0, 0) to stop smoothly when nothing is detected. -
Basic → pause (ms) (40) — sets the loop pace.
Function: the maneuver(vL, vR) function (script)
-
Flip right motor —
vR = -vRso the right wheel turns the correct direction for this chassis. -
Smooth left speed — move vLP toward
vLby at most inc each call (prevents jerky motion). -
Smooth right speed — move vRP toward
vRby at most inc each call. -
Send speeds to servos — cyber:bot → set servo speed (P18, vLP) (left wheel) and set servo speed (P19, vRP) (right wheel).