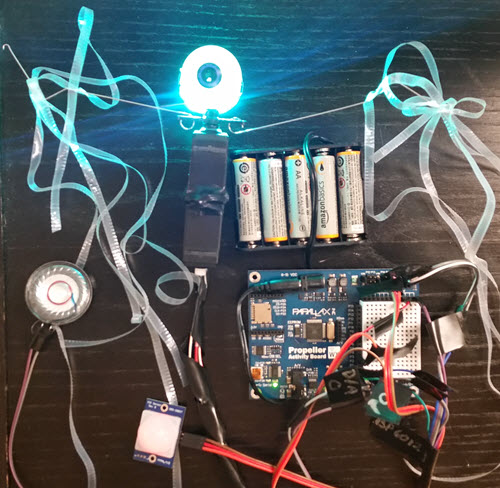
Skip to content
Parallax Learn

Parallax Learn

  • Welcome
  • Tutorials
        • Tutorial Series head tag

          Tutorial Series
        • Tutorial Series

          The special, classroom-ready series pages are organized collections of tutorials for our most popular hardware and/or languages. The tutorials for each topic are conveniently accessible from a single page, shown in the order it is recommended that they be completed.
        • Robotics Series Head tag

          Robotics Series
        • Robotics Series

          • Artificial Intelligence
          • Cybersecurity: Radio Data tutorialCybersecurity
          • cyber:bot + Python
          • cyber:bot + MakeCode
          • Boe-Bot Tutorial SeriesBoe-Bot
          • Arduino Shield-Bot
          • ActivityBot with C TutorialsActivityBot + C
          • ActivityBot with BlocklyProp Tutorial SeriesActivityBot + BlocklyProp
          • Scribbler 3 Tutorial SeriesScribbler 3
        • Electronics & Programming Series Head tag

          Electronics & Programming Series
          • BS2 Board of Education Tutorial SeriesBS2 Board of Education
          • Propeller C-Language BasicsPropeller C Basics
          • FLiP Try-It Kit C Tutorial SeriesFLiP Try-It Kit + C
          • FLiP Try-It Kit BlocklyProp TutorialsFLiP Try-It Kit + BlocklyProp
          • Badge WX Tutorial SeriesBadge WX
          • Propeller BlocklyProp Basics and ProjectsPropeller BlocklyProp Basics
          • View All Tutorial Series »
        • Browse Tutorials
        • Browse Tutorials

          Individual tutorials sorted by robot or kit, and language.
        • By Robot or Kit
          • ActivityBot
          • SumoBot WX
          • Boe-Bot
          • Shield-Bot
          • cyber:bot
          • Badge WX
          • ELEV-8
          • ARLO
        • By Language
        • By Language

          • Propeller C
          • Arduino
          • BlocklyProp
          • PBASIC
          • Python
          • MakeCode
          • View All Tutorials »
  • Educators
  • Reference
  • Downloads
  • Home
  • All Courses
  • Servo Spirit Project

Servo Spirit Project

Wiring it Up

There is no need to build circuits on the breadboard for this project. Instead, it takes advantage of the Activity Board WX’s 3-pin headers for the servos, and its D/A socket to drive the magnetic speaker.

Propeller I/O pin connections

  • Neopixel ring Data out – P0
  • Neopixel ring Data input – P1
  • Speaker – D/A 0 (P26)
  • PIR Rev B – P3
  • Hip servo – P15
  • Shoulder servo – P17

  • With power to the board turned OFF, make sure your servo port power jumpers are set to 5 V.
  • Plug the hip servo cable into the P15 servo header, and the shoulder servo cable into the P17 servo header.
  • Connect one speaker lead to the D/A 0 socket, the other to GND – there’s no + or – pins, either will do.
  • Connect the PIR sensor to to P3, 5V, and GND.
  • Connect the Neopixel ring Data out to P0, Data input to P1, 5 VDC to 5V, and GND to GND.

Which wire is which? Before you wrap your jumper wires together with electrical tape, get your code built and tested, and then label each wire. This is especially handy if you plugged two wires together of different colors to make a longer lead.


Printer-friendly version
Servo Spirit Body
Prev
Program with Spooky Sounds
Next

DISCUSSION FORUMS | PARALLAX INC. STORE

About | Terms of Use | Feedback: learn@parallax.com | Copyright©Parallax Inc. 2024

© 2025 Parallax Learn • Built with GeneratePress