Ready for a bigger ActivityBot? Try mounting your Propeller Activity Board (WX, or original) on the Arlo! After a couple connections, a few simple tests, and a change to one line of code, any ActivityBot example will run. The number of encoder ticks it takes for the Arlo to go distances and execute turns is different from your ActivityBot, so you will probably also want to adjust a few numbers in your programs. After that the Arlo will run ActivityBot code like a champ.
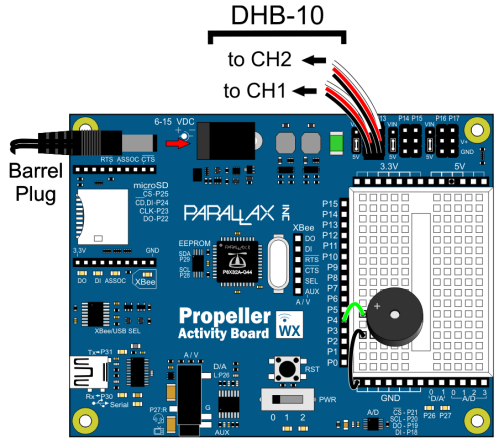
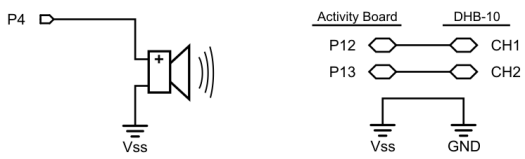
The ActivityBot connections to the Arlo’s DHB-10 motor control board use the same servo ports as the ones you used for your ActivityBot’s servos. The encoders are connected to the DHB-10 board, so you won’t need to connect encoders to the P14 and P15 ports, so they’ll be available for connecting to other devices.
NOTE: The 20k resistors are not needed when connecting your Activity Board to the Arlo. You should not have resistors in P14/P15; if they are in your breadboard, remove them and continue with this tutorial.
Let’s make sure to clear the program in the Activity Board before turning Motors power on. That way, some ActivityBot program that used to be in there won’t send your Arlo into unexpected maneuvers.
/*
  Arlo - No Surprise Maneuvers.c

  Run this before ever turning on power to the Arlo's motors to prevent any
  unexpected motions.
*/

#include "simpletools.h"                      // Include simple tools
#include "arlodrive.h"                        // Include arlo drive

int main()                                    // Main function
{
  freqout(4, 2000, 3000);                     // Beep -> program starting
  print("Your Arlo will stay still\n");       // Success message
}
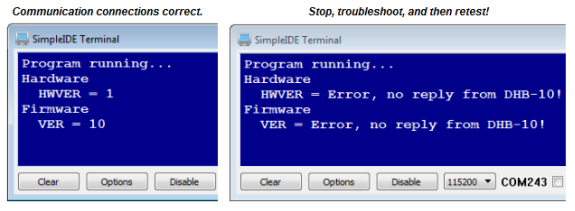
This next program asks the DHB-10 for its hardware and firmware versions, and displays the results in the SimpleIDE Terminal. Here is what you’ll see if your Activity Board’s Propeller microcontroller communicates successfully with the DHB-10 (left) alongside one of the messages you might see if communication fails (right).
/*
  Arlo - Test Activity Board and DHB-10 Communication.c

  Run this program to verify that your Activity Board and DHB-10 are communicating.

  Should display:
       Hardware
         HWVER = 1
       Firmware
         VER = 10

  If it instead displays:
      "ERROR, no reply from DHB..."
  It means there is a wiring problem.
*/

#include "simpletools.h"                      // Include simple tools
#include "arlodrive.h"                        // Include arlo drive

char *s;

int main()                                    // Main function
{
  freqout(4, 2000, 3000);                     // Beep -> program starting
  print("Program running...\n");              // Program running msg
  s = dhb10_com("HWVER\r");                   // Request hardware version
  print("Hardware\n  HWVER = %s", s);         // Display reply
  s = dhb10_com("VER\r");                     // Request firmware version
  print("Firmware\n  VER = %s", s);           // Display reply
}
This next program sets the Arlo’s motors to 20/127 of full power in the forward direction. If your Arlo goes forward while running this program, it indicates that your motors are connected correctly.
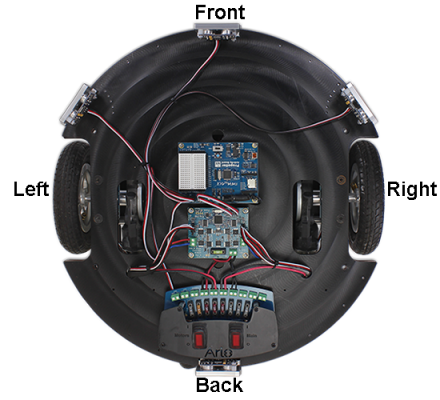
Check the picture at the start of this document and make sure you know the Arlo’s forward, backward, left and right.
IMPORTANT: Your Arlo will not be ready for the next step until it goes forward for this test.
/*
  Arlo - Test Motor Connections.c

  Run this program to verify that your Arlo goes forward.
*/

#include "simpletools.h"                      // Include simple tools
#include "arlodrive.h"                        // Include arlo drive

int main()                                    // Main function
{
  freqout(4, 1000, 3000);                     // Beep -> program starting
  print("Program running...\n");              // Program running message
  drive_feedback(0);                          // Disable encoders
  drive_speed(20, 20);                        // 20/127 of full power to motors
  pause(3000);                                // Go for 3 seconds
  drive_speed(0, 0);                          // Stop
  print("Program done!\n");                   // Program done message
}
The Arlo has encoders that track distance in 144th increments of a full wheel rotation. These increments are commonly called “counts”, and the Arlo’s encoders send 144 counts per revolution. The Arlo’s encoders are quadrature, meaning that the two encoder sensors are offset by ¼ of a count. By monitoring the pattern of low-high-low transitions for both sensors, the DHB-10 can also determine which direction the wheel is turning. For a given wheel, 144 counts would mean a full forward rotation, and -144 counts would mean a full backward rotation.
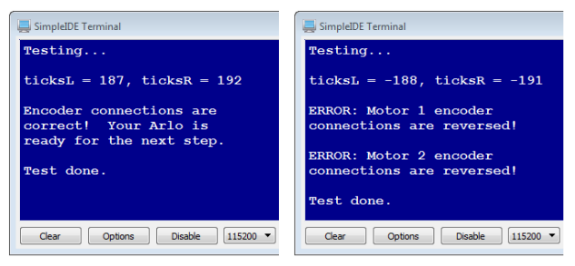
The next program will display the status of your encoder connections in the SimpleIDE Terminal. If there is a problem, it may indicate that the encoder cables have been swapped or that there is some other wiring problem. Here are examples of what you might see:
/*
  Arlo - Test Encoder Connections.c

  This program tests to make sure the Arlo's wheel encoder connections
  are correct.  The Arlo will not be ready for the next step until you
  have verified that the number of encoder transitions (ticks) for both
  wheels are positive when the wheels roll forward.

  If you have not already completed Test Arlo Motor Connections.c,
  complete it first, then continue from here.

  Use SimpleIDE's Run with Terminal button to run this program.  If the
  SimpleIDE Terminal displays the "Encoder connections are correct!..."
  message, your Arlo is ready for the next step, which is running
  navigation programs.

  If the SimpleIDE Terminal instead displays one or more "ERROR..."
  messages, those encoder encoder connections will need to be
  corrected.  For example, if the messages says, "ERROR: Motor 1
  encoder connections are reversed!", you will need to unplug and
  swap the two 3-wire encoder cables next to the Motor 1 terminal
  on the DHB-10, swap them, and plug them back in.

  Make sure to test between each adjustment.  Your arlo will not be
  ready for the next step until you get the success message from
  this test.
*/

#include "simpletools.h"                      // Include simpletools library
#include "arlodrive.h"                        // Include arlodrive library

int ticksL, ticksR;                           // Encoder tick counts

int main()                                    // Main function
{
  print("Testing...\n\n");                    // Display status

  drive_feedback(0);                          // Disable encoder feedback
  drive_clearTicks();                         // Clear encoder values

  drive_speed(32, 32);                        // Drive motors at 1/4 power
  pause(4000);                                // ...for 4 seconds
  drive_speed(0, 0);                          // Cut power to motors

  drive_getTicks(&ticksL, &ticksR);           // Get encoder measurements

  print("ticksL = %d, ticksR = %d\n\n",       // Display encoder measurements
         ticksL,      ticksR);

  if((ticksL > 175) && (ticksL < 325) &&      // Both distances positive?
     (ticksR > 175) && (ticksR < 325))
  {
    print("Encoder connections are \n");      // Success message
    print("correct!  Your Arlo is \n");
    print("ready for the next step.\n\n");
  }
  else
  {
    if(ticksL > 175 && ticksL < 325)          // Left encoders cables correct?
    {
      print("Motor 1 encoder cables \n");     // Correct encoder message
      print("are connected correctly.\n\n");
    }
    else if(ticksL > -325 && ticksL < -125)   // Left encoders cables swapped?
    {
      print("ERROR: Motor 1 encoder \n");     // Swapped encoder message
      print("connections are reversed!\n\n");
    }
    else                                      // Other problem
    {
      print("ERROR: Motor 1 encoder \n");     // Other encoder error message
      print("values out of range. \n");
      print("Recheck encoder connections\n");
      print(" and assemblies.\n\n");
    }
    if(ticksR > 175 && ticksR < 325)          // Right encoders cables correct?
    {
      print("Motor 2 encoder cables\n");      // Correct encoder message
      print("are connected correctly.\n\n");
    }
    else if(ticksR > -325 && ticksR < -125)   // Right encoders cables swapped?
    {
      print("ERROR: Motor 2 encoder\n");      // Swapped encoder message
      print("connections are reversed!\n\n");
    }
    else                                      // Other problem
    {
      print("ERROR: Motor 2 encoder\n");      // Other encoder error message
      print("values out of range.\n");
      print("Recheck encoder connections\n");
      print("and assemblies.\n\n");
    }
  }

  print("Test done.\n\n");                    // Display status
}
Let’s try the Forward Stop Face Right program from the learn.parallax.com site’s Go Certain Distances ActivityBot page.
The program would make an ActivityBot turn about 90° to the right, but not so with the Arlo. With its different wheel radius, turning radius, and counts per revolution, the number of encoder counts for ¼ turn is no longer a total of 51 counts. It is now 186, or +93 for the left wheel and -93 for the right wheel.
In the More Precise Maneuvers with Encoders section, we’ll get those 90° turns on the first try!
/*
  Forward Stop Face Right.c

  https://learn.parallax.com/activitybot/go-certain-distances
*/

#include "simpletools.h"
//#include "abdrive.h"                        // <- Comment out this line
#include "arlodrive.h"                        // <- Replace it with this line

int main()
{
  drive_goto(256, 256);
  pause(200);
  drive_goto(26, -25);
}
Another approach introduced in the ActivityBot pages is Navigation by Speed. As with the previous program, the parameter’s your programs will pass to the drive_speed calls will have to be adjusted to get the desired outcome. Another thing to keep in mind is that the speeds are not instantaneous. It takes some time for the Arlo to accelerate into and back out of any given maneuver.
/*

  Arlo - Speeds for Navigation.c

  Navigate by making your ActivityBot go certain speeds for certain amounts
  of time.

  https://learn.parallax.com/activitybot/set-certain-speeds
*/

#include "simpletools.h"                      // simpletools library

#include "arlodrive.h"                        // <- CHANGE abdrive to arlodrive

int main()
{
  drive_speed(64, 64);                       // Forward 64 tps for 2 s
  pause(2000);
  drive_speed(0, 0);

  drive_speed(26, 0);                        // Turn 26 tps for 1 s
  pause(1000);
  drive_speed(0, 0);

  drive_speed(128, 128);                     // Forward 128 tps for 1 s
  pause(1000);
  drive_speed(0, 0);
}
You can also communicate with the Arlo through the SimpleIDE Terminal, and perform the same serial communication tasks the Propeller has been programmed to do. For example, here is the sequence of commands and replies from Test Encoder Connections example.
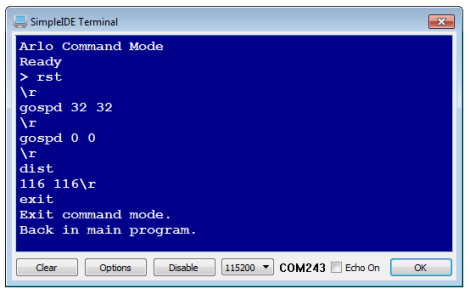
In this example, the rst command clears the encoder counts stored by the DHB-10. Next, gospd 32 32 makes the Arlo move forward at 32 counts per second with each wheel. Of course, gospd 0 0 stops the wheels, and dist asks how many encoder counts have passed since the last rst command. Last, but not least, exit takes the program out of command mode and allows the program to continue.
NOTE: For a full list of serial commands you can use, check the DHB-10 Motor Controller Firmware Guide.
/*
  Arlo - SimpleIDE Terminal Command Mode.c
  Communicate with Arlo through the SimpleIDE Terminal.
*/

#include "simpletools.h"
#include "arlodrive.h"

int main()
{
  dhb10_terminal(SIDE_TERM);
  print("Back in main program.");
}
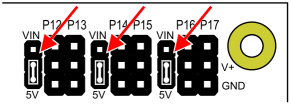
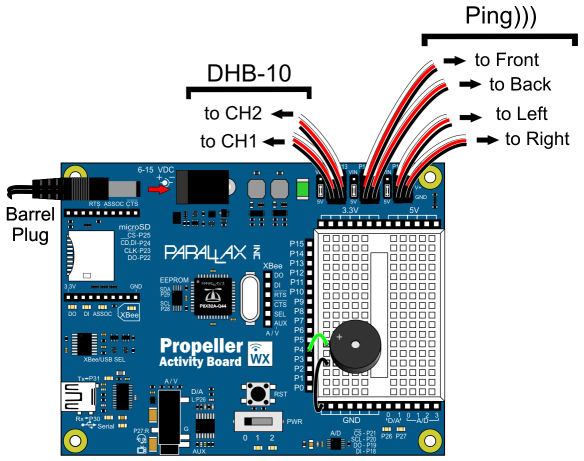
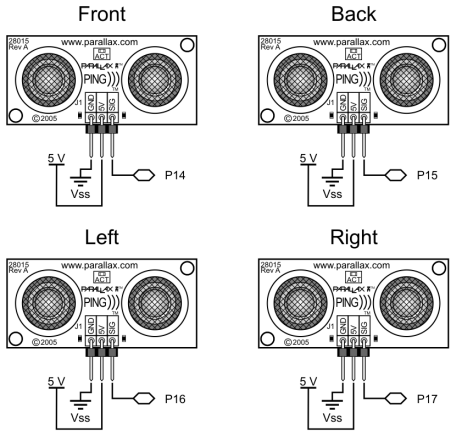
This connection diagram (below) shows where to connect each 3-wire Ping))) sensor cable. If you’re looking at the color version, note that each black wire is connected to either GND on the breadboard, or the GND terminal in the servo header. Each of those black wires should also be connected to a Ping))) sensor’s GND pin. The power selection jumper between the P13 and P14 servo ports should also be set to 5V, likewise for the one between P15 and P16.
WARNING: Wiring errors can damage the Ping))) sensors and/or your Propeller. Do not turn power back on until you have double-checked all the connections in this section’s checklist below.
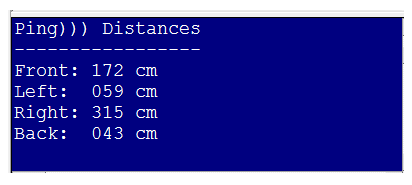
The SimpleIDE Terminal display after connecting the Ping))) sensors and running the example program will resemble this. If all the Ping))) sensors are connected correctly, the display should show the centimeter distances of obstacles placed in front of each one (within its 3 cm to 3 m range, and typically +/- 1 cm). Note that right now, the right Ping))) sensor does not see an obstacle, either because it’s beyond the 3 m limit, or the obstacle might be at an angle that’s reflecting the ultrasonic energy away from (instead of back to) the sensor. If you put your hand about 10 cm in front of the right sensor, that value should change to about 10. Make sure that each sensor correctly reports distances when you do that.
/*
  Arlo - Test Ping Array.c
*/

#include "simpletools.h"
#include "ping.h"

int n = 0, pingPin, cmDist;
int pins[4] = {14, 16, 17, 15};

int main()
{
  while(1)
  {
    if(n == 0)
    {
      print("%c", HOME);
      print("Ping))) Distances\n");
      print("-----------------\n");
    }

    pingPin = pins[n];
    cmDist = ping_cm(pingPin);

    switch(pingPin)
    {
      case 14: print("Front: "); break;
      case 16: print("Left:  "); break;
      case 17: print("Right: "); break;
      case 15: print("Back:  "); break;
    }

    print("%03d cm\n", cmDist);
    n++;
    if(n >= 4) n =0;
    pause(200);
  }
}
This example uses serial messages to demonstrate how your program can issue the same commands from Control Arlo with the SimpleIDE Terminal with the help of the arlodrive library’s dhb10_com function, this call allows your program to pass a text string to the Arlo’s DHB-10 motor controller, and returns the address of a string that contains the DHB-10’s reply. Remember, for a full list of serial commands you can use, check the DHB-10 Motor Controller Firmware Guide.
/*
  Arlo - Serial through arlodrive.c
*/

#include "simpletools.h"                      // Include simple tools
#include "arlodrive.h"

char *reply;

int main()                                    // Main function
{
  print("SPEED & DISTANCE\n\n");
  print("To DHB-10         From DHB-10\n");
  print("-------------     ----------------\n");

  print("RST\\r             ");
  reply = dhb10_com("RST\r");
  if(*reply == '\r') print("\\r\n");
  else print("%s", reply);

  print("gospd 32 32\\r     ");
  reply = dhb10_com("gospd 32 32\r");
  if(*reply == '\r') print("\\r\n");
  else print("%s", reply);

  pause(2000);

  print("gospd 0 0\\r       ");
  reply = dhb10_com("gospd 0 0\r");
  if(*reply == '\r') print("\\r\n");
  else print("%s", reply);

  // Display distance reply as text
  print("dist\\r            ");
  reply = dhb10_com("dist\r");
  if(*reply == '\r') print("\\r\n");
  else print("%s", reply);

  print("-------------     ----------------\n");

  // Convert distance reply text to numeric values to use in
  // calculations, and display the results stored by int variables.
  int countLeft, countRight;
  print("\nVARIABLE VALUES\n", reply);
  sscan(reply, "%d%d", &countLeft, &countRight);
  print("countLeft = %d, countright = %d\n", countLeft, countRight);
}
Integration KI and deadzone DZ are part of a group of values called control system constants that may need to be tuned to accommodate certain payload weights, and gearbox play. This example program is actually setting the default values, but you can change them, and then test the responses under the conditions you need the Arlo to perform.
If your battery is charged, and the payload is small, the default settings should be fine. If payloads increase and decrease during runtime, you may wish to programmatically adjust those constants, either to give it some extra push to get to each final goal, or to apply less push toward the final goal to prevent oscillations (repeated over corrections). For more information, see the DHB-10 command set for information on KI, KIT, KIP, and DZ.
Code for making the changes semi-permanent by writing them to the DHB-10’s EEPROM have been commented out. As long as you keep the lines with STORE commented, the changes only affect performance until the DHB-10 is restarted. You can restart the DHB-10 by pressing and releasing its Reset button or turning the Motors power off, and then back on.
NOTE: No need to run this program unless you want to observe different possible Arlo behaviours as it approaches its final distance destination.
/*
  Arlo - Control System Adjustments.c
*/

#include "simpletools.h"
#include "arlodrive.h"

char *reply;

int main()
{
  print("CHECK CONSTANTS\n\n");
  print("To DHB-10      From DHB-10\n");
  print("-----------    ----------------\n");

  print("KI\\r           ");
  reply = dhb10_com("KI\r");
  if(*reply == '\r') print("\\r\n");
  else print("%s", reply);

  print("DZ\\r           ");
  reply = dhb10_com("DZ\r");
  if(*reply == '\r') print("\\r\n");
  else print("%s", reply);

  print("\n\nSET CONSTANTS\n\n");
  print("To DHB-10      From DHB-10\n");
  print("-----------    ----------------\n");

  print("KI 65\\r        ");
  reply = dhb10_com("KI 65\r");
  if(*reply == '\r') print("\\r\n");
  else print("%s\n", reply);

  print("DZ 1\\r         ");
  reply = dhb10_com("DZ 1\r");
  if(*reply == '\r') print("\\r\n");
  else print("%s\n", reply);


  print("\n\nSTORE CONSTANTS\n\n");
  print("To DHB-10      From DHB-10\n");
  print("-----------    ----------------\n");

  print("STORE KI\\r     ");
  reply = dhb10_com("STORE KI\r");
  if(*reply == '\r') print("\\r\n");
  else print("%s\n", reply);

  print("STORE DZ\\r     ");
  reply = dhb10_com("STORE DZ\r");
  if(*reply == '\r') print("\\r\n");
  else print("%s\n", reply);

  print("\nAll done!\n");
}
Important: Keep Your DHB-10 Firmware Up-to-Date!
The DHB-10 firmware is expected to undergo occasional revision as continual improvements are made by Parallax and by the community. It is important to make sure your firmware is up to date.
To make sure you always have the latest firmware version, bookmark the following pages and check back regularly for updates: Updating Your Firmware, DHB-10 Firmware Download Page
