This is a C-language tutorial for the 8-core Propeller microcontroller. It features the Propeller Activity Board (original or WX) but other Propeller boards, such as the Propeller FLiP, will work.
This tutorial will show you how to write simple programs in Propeller C, using the SimpleIDE software. You will compile your code and load it into the Propeller microcontroller, then see the results.
Along the way, you will write programs that use variables, do math, count loops, make decisions, and store information. You will also learn how to add Simple Libraries — useful pre-written code — to your project.
The lessons don’t require any circuit-building, and they are meant to be done in order. We hope you try them all!
If you haven’t already done the following two steps, do so now. You’ll need your Propeller Board connected and SimpleIDE installed and updated to continue.
When you are done, you will be able write simple C programs that do all of the things mentioned above. And, you will be able to add Simple Libraries to your projects.
Next, you can dive into any of these three tutorials:
Just follow the links at the bottom of the page to get started.
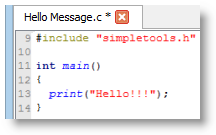
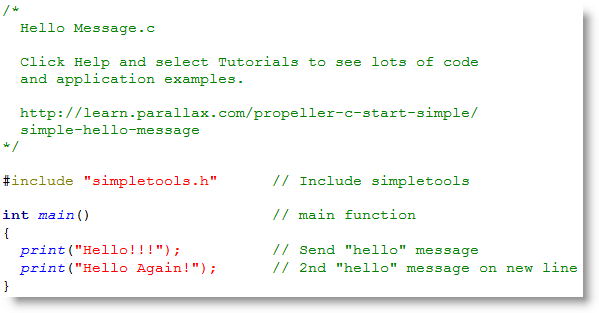
This C program will make the Propeller microcontroller send a “Hello!!!” message to the SimpleIDE Terminal on your computer.
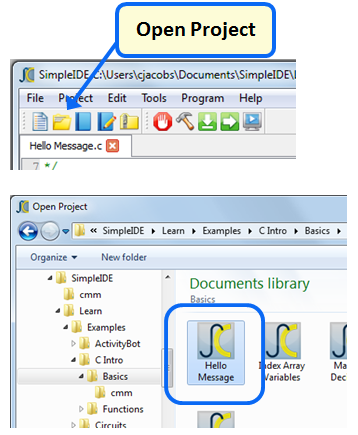
When SimpleIDE opens the project, it will open Hello Message.c into its text editor pane.
A single “Hello!!!” message should appear in the Simple IDE Terminal.
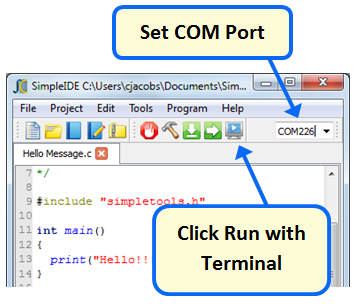
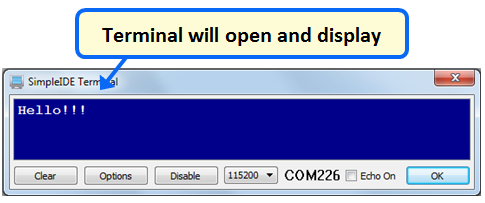
The print(“Hello!!!”) makes the Propeller chip send its message to your computer through its programming port. The SimpleIDE terminal displays the message on your computer screen.
The print(“Hello!!!”) is followed by a semicolon ;. The semicolon is what tells the PropGCC compiler that it has reached the end of an instruction statement.
The print statement is inside curly braces {} below main(), and so we call it part of the main function’s code block. A C program always starts with the first statement in the main function.
Print is also a function, but it is stored in other files called library files. Later on, you’ll get to search for libraries that contain useful functions to add to your own projects. For now, just keep in mind that your program needs #include “simpletools.h” because it has information about print, and many other useful functions.
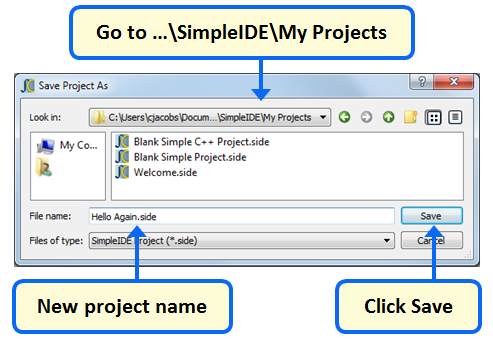
The program has one statement: print(“Hello!!!”);. Let’s save this project under a new name, and add a second print statement.
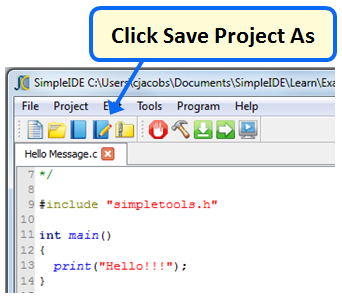

Saving Programs
SimpleIDE saves your program each time it compiles. As you progress through these tutorials you will notice that we ask you to save a new copy of any program you’ll be modifying to prevent you from overwriting the original project with one you have changed.
C is case-sensitive — You have to use the correct capitalization when programming in C. If you make an error, such as typing Print for example, SimpleIDE will let you know:

newline — \n is called the newline character, and it is an example of a control character used for positioning a cursor in a serial terminal.
int (main) — the int in int main() is part of the C compiler’s programming convention. It is used no matter what you include inside the main function’s code block. You will learn more about how int is used in other ways as you go through the tutorials.
Comments are notes about your code that help explain it to other people that have to work with it. Also, it is good to leave comments as notes to yourself about what you were doing in case you need a reminder days (or months or years) later.
If you want to comment all or part of a single line, use two forward slashes //. Everything to the right of // will be ignored by the C compiler. Block comments can span multiple lines. They start with /* and end with */, and everything in between will be ignored by the C compiler.
Variables are named sections of memory that make it possible for your program to “remember” values. Your program can also use them in math expressions to perform calculations.
This example program, Variables and Calculations.c, declares variables named a, b, and c. It stores 25 in a, 17 in b, and the result of a + b in the variable named c.
/*
  Variables and Calculations.c

  Add two integer values together and display the result.
*/

#include "simpletools.h"                      // Include simpletools

int main()                                    // main function
{
  int a = 25;                                 // Initialize a variable to 25
  int b = 17;                                 // Initialize b variable to 17
  int c = a + b;                              // Initialize c variable to a + b
  print("c = %d ", c);                        // Display decimal value of c
}
Variables and Calculations.c declares an integer variable named a and assigns it the value 25 with int a = 25. Then, it declares a second variable named b and initializes it to 17 with int b = 17. The last integer variable it declares is named c, and stores the result of a + b in it.
Finally, it displays the value of c with print(“c = %d”, c). This variation on print displays a sequence of characters called a string, followed by a variable. The %d is called a format placeholder, and it tells print how to display the value stored in that variable as a decimal number, 42 in this case.
The term + is a binary operator, meaning that it performs an operation on two inputs. Examples of binary operators include:
+ Add
– Subtract
* Multiply
/ Divide
% Modulus (remainder of a division calculation)
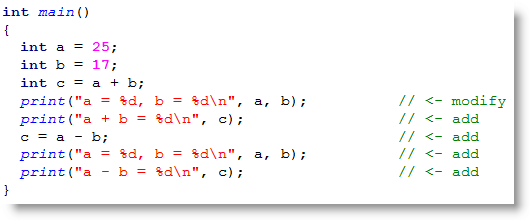
Here is a modified version of the main routine that displays “a = , b = “with their values, and then “a + b = ” and the value of c on a new line. Then, it repeats for a – b.
Notice that the second time it calculates the value of c, we don’t need to declare it with int. It’s just c = a – b. Notice also that print allows you to display more than one numeric value within your string. All it takes is two format placeholders in the string and two values, separated by commas, after the string.
PRO TIP: Displaying % with print
To display the output of the Modulus operator, use (“a mod b = …”) or (“a %% b = …) in the print function. Since % has another purpose in print strings, just saying (“a % b = …) will give unexpected results.
So far, these lessons have processed integers values, which encompass negative and positive counting values. C language also handles floating point values, which allow you to process numbers with a decimal point and one or more digits to the right, much as a calculator does. Since the number of digits to the left or right of the decimal point is flexible, the decimal point’s position can “float” from one position to another as needed.
/*
  Floating Point Calculations.c

  Calculate and display circumference of a circle of radius = 1.0.
*/

#include "simpletools.h"                      // Include simpletools

int main()                                    // main function
{
  float r = 1.0;                              // Set radius to 1.0
  float c = 2.0 * PI * r;                     // Calculate circumference
  print("circumference = %f \n", c);          // Display circumference
}
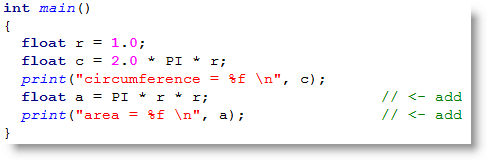
This program knows that PI ≈ 3.1415926… because it is defined in the simpletools library. Inside the main function, a floating point variable named r is initialized to 1.0 with float r = 1.0.
After that, the circumference is calculated with c = 2.0 * PI * r.
Then, print(“circumference = %f \n”, c) displays the floating point value stored in c. Notice the new format placeholder: %f for a floating point value.
You can declare different variable types that can store different sizes and types of numbers.
| signed char | -127 to 127 |
| char | 0 to 255 |
| int | -2,147,483,647 to 2,147,483,647 |
| unsigned int | 0 to 4,294,967,295 |
| long | same as int |
| unsigned long | same as unsigned int |
| float | approx: 3.4X10-38 to 3.4X1038 with 6 digits of precision |
Let’s try calculating the area of a circle with a = π×r2, which is PI * r * r.
Keep in mind that you have to use 4.0/3.0 to get the floating point version of 4/3. You can also use pow(r, 3.0) to raise r to the third power.
A variable array is a group of variables stored under the same name but with different index values. In the array declaration and initialization example below, you can think of the index value as the position of a specific variable in the list.
int p[] = {1, 2, 3, 5, 7, 11};
Each array element has a name (which is p in this example, the same as the array name) and an index (between brackets) that makes it possible to select an element.
This declaration sets aside six variables, each storing a prime number. This array has been initialized so that the p[0] array element stores 1. Likewise, the p[1] element stores 2. It continues for the rest of the array elements: p[2] stores 3, p[3] stores 5, p[4] stores 7, and p[5] stores 11.
/*
  Array Variables.c

  Declare and initialize an array and display a couple of its elements.
*/

#include "simpletools.h"                      // Include simpletools

int main()                                    // main function
{
  int p[] = {1, 2, 3, 5, 7, 11};              // Initialize the array
  print("p[0] = %d\n", p[0]);                 // Display what p[0] stores
  print("p[3] = %d\n", p[3]);                 // Display what p[3] stores
}
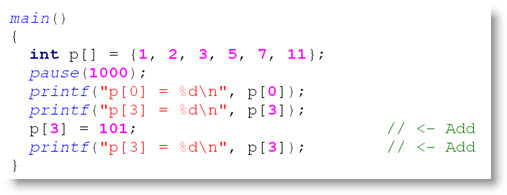
int p[] = {1, 2, 3, 5, 7, 11} initializes an array named p with a list of numbers between braces { }. Keep in mind that p[0] stores 1, p[1] stores 2, p[2] stores 3, p[3] stores 5, and so on. So, print(“p[0] = %d\n”, p[0]) displays the contents of p[0], which is 1. Likewise, print(“p[3] = %d\n”, p[3]) displays the contents of p[3], which is 5.
Here is an example that shows how the value of an array element can be reassigned. Take a look at the second to last statement in the main function. It’s p[3] = 101. After that, print(“p[3] = %d\n”, p[3]) will allow you to verify that the new value p[3] stores is 101.
A common program decision is what to do with an output, such as a light, speaker or motor, based on one or more inputs, such as measurements from sensors.
Next, we will look at some example programs that make decisions based on the values stored by certain variables. After you are through with this primer and into programs for simple circuits, you will see many examples of decisions based on sensor inputs.
This example program initializes and then displays the values of variables named a and b. After that, it checks if a is larger than b, and if so, it prints a message saying so.
/*
  Make a Decision.c

  If a condition is true, display a second message.
*/

#include "simpletools.h"                      // Include simpletools

int main()                                    // main function
{
  int a = 25;                                 // Initialize a variable to 25
  int b = 17;                                 // Initialize b variable to 17
  print("a = %d, b = %dn", a, b);            // Print all
  if(a > b)                                   // If a > b condition is true
  {
    print("a is larger n");                  // ...then print this message
  }
}
The program initializes a to 25 and b to 17 and displays both those values in the SimpleIDE Terminal. Then, it uses if(a > b) to decide whether to execute the contents of a code block, which contains the print(“a is larger n”) statement. If a is greater than b, it will print the second message. If it’s equal to or less than b, it will not print the message.
The > symbol is called a relational operator. Here is a list of relational operators and their meanings:
==       Equal to
!=       Not equal to
>        Greater than
>=       Greater than or equal to
<        Less than
<=       Less than or equal to
In C language, the expression a > b returns 0 if its false (a is not really greater than b) or 1 if it’s true (a is greater than b). So, in if(a > b){…}, the block of code inside the braces gets executed when a > b evaluates to 1, as in if(1) {…}. The code block does not get executed if a > b returns 0, as in if(0){…}.
Comparisons with negative numbers can be interesting.
Make a Decision introduced the if statement, where a code block gets executed if its if statement is true. If a program has multiple if statements that are true, more than one code block might get executed. But sometimes, you might only want one code block to execute based on a list of conditions.
For example, let’s say we want one message when a is greater than b, a different message when a is less than b, and a third message if a is equal to b.
Another example you might see later is a robot with two contact sensors. It needs to back up and turn in different directions depending on whether both sensors are pressed, or just the left, or just the right.
/*
  Decision Chain.c

  Check a series of conditions, but only act on the first one that's true.
*/

#include "simpletools.h"                      // Include simpletools

int main()                                    // main function
{
  pause(1000);                                // Wait 1 s for computer connection
  int a = 25;                                 // Initialize a variable to 25
  int b = 17;                                 // Initialize b variable to 17
  print("a = %d, b = %dn", a, b);            // Print all
  if(a > b)                                   // If a > b condition is true
  {
    print("a is larger n");                  // Then print this message
  }
  else if (a < b)                             // a > b not true? check a < b
  {
    print("b is larger n");                  // If true, print this instead
  }
  else                                        // Nothing else true?
  {
    print("a equals b");                      // Print this
  }
}
The if…else if…else statement first checks if a is greater than b with if(a > b). If it is, then the print(“a is larger n”) gets executed. An important point here is that it skips checking any of the other conditions in the statement and moves on to whatever code might be below the else{…} block. Now, if a is not greater than b, it does not execute print(“a is larger n”) and instead moves on to check the next condition: if a is less than b with if(a < b){…}. If that’s true, it’ll print that message instead. If that’s not true either, the code will move on to the else condition, which is an optional catch-all if nothing else is true.
There are two else if conditions in the if…else if…else block below . The first one checks for a special condition, which is when b has reached or exceeded 1000. In this case, the program just displays a warning message. However in other applications such as a robot or factory equipment, if might have lots more code for remedying that special condition. Now, if b is greater than a, but it’s not equal to 1000, the code just displays the standard message.
Make a Decision introduced the if statement, where a code block gets executed if its if statement is true. If a program has multiple if statements that are true, more than one code block might get executed. But sometimes, you might only want one code block to execute based on a list of conditions.
For example, let’s say we want one message when a is greater than b, a different message when a is less than b, and a third message if a is equal to b.
Another example you might see later is a robot with two contact sensors. It needs to back up and turn in different directions depending on whether both sensors are pressed, or just the left, or just the right.
/*
  Decision Chain.c

  Check a series of conditions, but only act on the first one that's true.
*/

#include "simpletools.h"                      // Include simpletools

int main()                                    // main function
{
  pause(1000);                                // Wait 1 s for computer connection
  int a = 25;                                 // Initialize a variable to 25
  int b = 17;                                 // Initialize b variable to 17
  print("a = %d, b = %d\n", a, b);            // Print all
  if(a > b)                                   // If a > b condition is true
  {
    print("a is larger \n");                  // Then print this message
  }
  else if (a < b)                             // a > b not true? check a < b
  {
    print("b is larger \n");                  // If true, print this instead
  }
  else                                        // Nothing else true?
  {
    print("a equals b");                      // Print this
  }
}
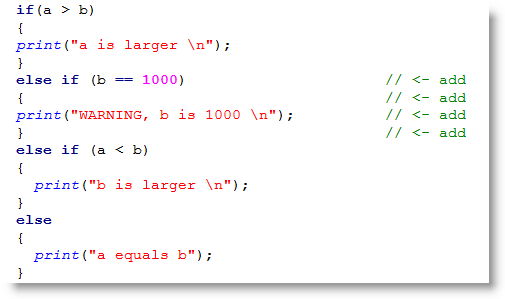
The if…else if…else statement first checks if a is greater than b with if(a > b). If it is, then the print(“a is larger \n”) gets executed. An important point here is that it skips checking any of the other conditions in the statement and moves on to whatever code might be below the else{…} block. Now, if a is not greater than b, it does not execute print(“a is larger \n”) and instead moves on to check the next condition: if a is less than b with if(a < b){…}. If that’s true, it’ll print that message instead. If that’s not true either, the code will move on to the else condition, which is an optional catch-all if nothing else is true.
There are two else if conditions in the if…else if…else block below . The first one checks for a special condition, which is when b has reached or exceeded 1000. In this case, the program just displays a warning message. However in other applications such as a robot or factory equipment, if might have lots more code for remedying that special condition. Now, if b is greater than a, but it’s not equal to 1000, the code just displays the standard message.
Your programs will often need to decide what to do based on if one condition AND another condition are true. Another thing your code might need to check for is if one condition OR another condition is true. Decide on Multiple Conditions.c decides if one condition AND another condition are true using the && operator.
/*
  Decide on Multiple Conditions.c

  Make a decision based on two conditions.
*/

#include "simpletools.h"                      // Include simpletools

int main()                                    // main function
{
  int a = 100;                                // Initialize a variable to 25
  int b = 17;                                 // Initialize b variable to 17
  print("a = %d, b = %d\n", a, b);            // Print all
  if((a > b) && (a == 100))                   // If a > b AND A == 100
  {
    print("a is larger than b,\n");           // Then print this message
    print("AND a is 100!\n");                 // Then print this message
  }
}
The statement if((a > b) && (a == 100){…} translates to “if a is greater than b AND a is equal to 100 then, do what’s in the braces.”
The && operator is called a logical operator. Your logical operator options are:
&&     Checks for if one condition AND another condition
||     Checks if one condition OR another condition is true
!      Inverts the result from true to false (1 to 0) or vice-versa
By now, you can probably tell that both conditions have to be true for the AND logical operator to evaluate to true (so that it will execute its code block). For one condition OR another to evaluate to true, either one or both conditions can be true.

Sometimes we need to be able to program our Propeller to repeat certain operations. This is useful for simple things, such as blinking a light, and more complex tasks, such as robotic sensor navigation.
Blocks of repeating code are called loops. The C while loop can be set up to repeat a code block while some condition is true. A while loop can also be set up to repeat endlessly, but there is a trick for escaping endless loops as well. Let’s try all of these.
/*
  Repeat While.c

  Keep displaying n = n + 5 every fifth of a second while n < 100.
*/

#include "simpletools.h"                      // Include simpletools

int main()                                    // main function
{
  int n = 0;                                  // Declare n, initialize to zero
  while(n < 100)                              // Repeat while n less than 100
  {
    print("n = %d\n", n);                     // Display name & value of n
    n = n + 5;                                // Add 5 to n each time through
    pause(200);                               // 0.2 s between repetitions
  }
  print("All done!");                         // Display all done
}
Inside main, a variable n is declared and initialized to zero. Then, while (n < 100) starts a loop that will keep repeating the code block below it as long as (n < 100) is true.
Each time through the loop, n = n +5 increases the value of n and then a print displays the new value in the SimpleIDE terminal.
Eventually, n = 100 so (n < 100) is no longer true. At that point, the code execution skips to the first instruction below the while loop’s code block. In this case, it’s print(“All done!”);.
Keep in mind that conditions like a < b and n < 100 evaluate to 1 if they are true or 0 if they are false. Like if statements, while statements execute their code block when the condition is 1, or really any value other than zero.
Think about the Did You Know section for a minute. Can you guess how to make a while loop repeat forever? If you change while(n < 100) to while(1), you’ll have an endless loop.
Even an endless loop doesn’t have to be endless thanks to the C language’s break keyword.
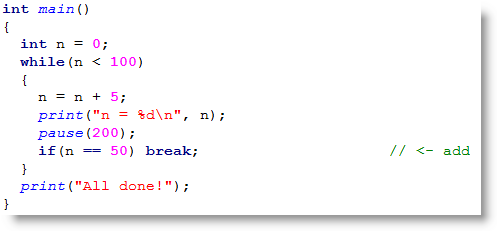
What do you think would happen if you move the break statement to just underneath n = n + 5 inside the while loop’s code block? Try it!
A for loop repeats a block of code, but it’s more configurable than a while loop. A for loop is also the preferred tool for counting tasks. while loops are better for repeating something “while” a condition is true. In contrast, for loops are better for repeating a block a certain number of times. This next program counts to ten with a for loop.
/*
  Count to Ten.c

  Count to ten in SimpleIDE Terminal.
*/

#include "simpletools.h"                      // Include simpletools

int main()                                    // main function
{
  for(int n = 1; n <= 10; n++)                // Count to ten
  {
    print("n = %d\n", n);                     // Display name & value of n
    pause(500);                               // 0.5 s between reps
  }
  print("All done!");                         // Display all done
}
The for statement has three parameters: for(start index; condition; increment).
In the Count to Ten program, the start index is int n = 1, a variable declaration that initializes the variable n to the value 1. The condition is n <= 10, which means that the loop will keep repeating while n is less than or equal to ten. The increment is n++, which is a shorthand form of n = n + 1. So with each repetition of the for loop’s code block, the value of n increases by 1.
Increment operators — The ++ operator is called an increment operator. Although increment and decrement operators are especially useful in for loops, they can be used as shortcuts in many parts of your programs.
++    add 1 to a variable
––    subtract 1 from a variable
Assignment operators — There are also some useful shortcuts for assigning values to variables. For example, instead of n = n + 5, you can use n += 5. As you might expect there are, shortcuts for subtraction –=, multiplication *=, division /=, and modulus (remainder) %=. These are called the assignment forms of the operators.
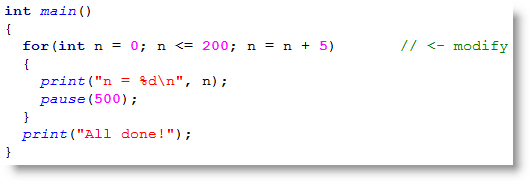
Here is a for loop that will count to 200 in steps of 5, just like the while loop you experimented with earlier.
A great use of for loops is performing operations on elements in an array variable. The for loop can increment through the array’s index values to access each element of the array in succesion. (See the Array Variables lesson for a refresher.)
/*
  Index Array Variables.c

  Use a for loop to display all the elements in an array.
*/

#include "simpletools.h"                      // Include simpletools

int main()                                    // main function
{
  int p[] = {1, 2, 3, 5, 7, 11};              // Initialize the array
  for(int i = 0; i < 6; i++)                  // Count i from 0 to 5
  {
    print("p[%d] = %d\n", i, p[i]);           // Display array element & value
    pause(500);                               // 1/2 second pause
  }
}
First, the main routine sets up an integer array named p with six elements, 1 followed by the first five prime numbers.
Next comes a for loop with a start index of int i = 0, a condition of i < 6, and an increment of i++.
Now, take a close look at the print statement in the for loop’s code block. It prints two items each time through the loop: the value of the i variable displayed as a p index, and the value the element in the p array that has an index equal to i.
So, the first time through the for loop, print(“p[%d] = %d\n”, i, p[i]) becomes print(“p[%d] = %d\n”, 0, p[0]). That prints “p[0] = 1” in the SimpleIDE Terminal.
The second time through the loop, i++ increments the value of i, so the print statement becomes print(“p[%d] = %d\n”, 1, p[1]).
The for loop continues to count up through 5, displaying all the array’s elements, ending with “p[5] = 11”.
sizeof — C has a unary operator called sizeof that returns the number of bytes consumed by an object in memory, such as an array.
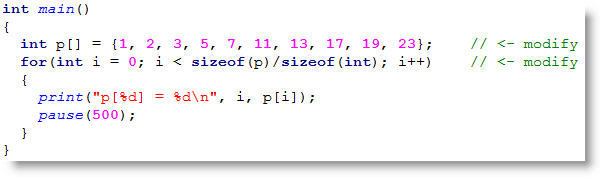
In the example program above, we knew our array had 5 elements, so we used i < 6 as the for loop’s condition to access all of the elements in the p array. But what if we didn’t know how many elements were in the p array? Here’s a for loop that would work:
for(int i = 0; i < sizeof(p)/sizeof(int); i++)
Here, sizeof(p) gets the total number of bytes in the array. sizeof(int) gets the number of bytes used by one int element in the array. So, sizeof(p)/sizeof(int) equals the number of elements in the array.
Up to now, we’ve been dealing with what values variables store, but there are some useful functions that need to know where the values are stored instead. So, to get ready for activities that use those kind of functions, let’s look at a simple way to get the variable’s address in RAM – by preceding it with the & operator.
In this activity, you will also experiment with how addressing of array elements work in the Try This and Your Turn sections.
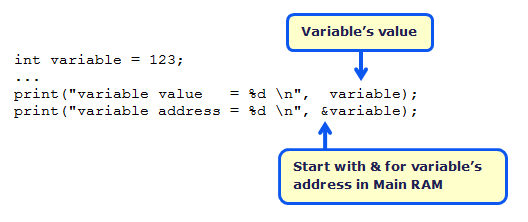
Here is an example where a print statement displays the value an int variable (that’s named variable), and another print statement displays the address where that value is stored, with &variable. After changing variable’s value, a third print displays the variable’s new value, but the fourth print (again with &variable) shows that the address has not changed.
If you haven’t already installed the latest USB driver, SimpleIDE, or Learn folder, go to Propeller C – Set up SimpleIDE and Propeller C – Start Simple.
This test code is not yet in the SimpleIDE/Learn/Examples folder, so follow these instructions for creating a new project with new code:
/*

 Variable Value and Address.c

 Display a variable's value and its address.

*/

#include "simpletools.h"                         // Include simpletools library

int variable = 123;                              // Declare/initialize variable

int main()                                       // Main function

{

 print("variable value   = %d \n",  variable);  // Display variable value

 print("variable address = %d \n", &variable);  // Display variable address

 variable = 4321;

 print("variable value   = %d \n",  variable);  // Display variable value

 print("variable address = %d \n", &variable);  // Display variable address

}
The program starts by declaring an int variable (named variable) and initializing it to the value 123 with:
int variable = 123;
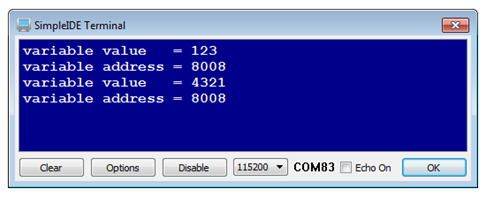
In the main function, the first print call displays variable’s value with the expected result of 123.
print("variable value = %d \n", variable)
So, at this point we expected the value to be 123, but what is variable’s address? A simple “address of” & operator to the left of variable returns its address instead of its value. The address is the number of bytes from the start of Main RAM.
print("variable address = %d \n", &variable);
After setting the variable’s value to something different, print(“variable value = %d \n”, variable) displays the new value, but print(“variable address = %d \n”, &variable) shows that the variable’s address is unchanged.
The addresses in Propeller Main RAM are expressed as byte addresses. It’s the number of bytes from the start of Main RAM.
This approach works for most variable types, including int, short, byte, and float.
The & operator can also be used to get addresses of array elements. For example, with the array:
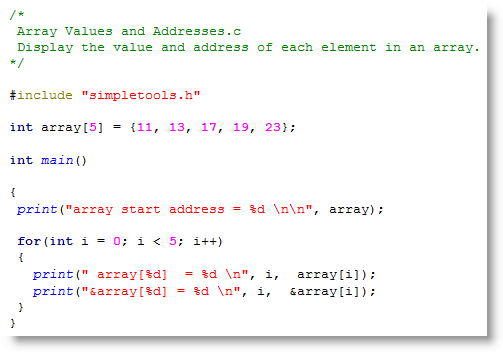
int array[5] = {11, 13, 17, 19, 23};
…your code could get the address of the third element (containing 19) with &array[3]. Here is an example of a print statement that displays it:
print("array[3] address = %d \n", &array[3]);
There is more than one way to get the zeroth element’s address (containing 11). Although code can use &array[0], it’s more common to just use array. So, these two print statements do exactly the same thing:
 print("array[0] address = %d \n", &array[0]);  // Display address of array[0]

 print("array[0] address = %d \n",  array);     // Display it again
Each element in an int array has 4 bytes, so the address of the second element will be 4 higher than the address of the first element, and so on. A char array would be different since each element only has one byte. So, each element’s address only increases by one over the previous element.
Let’s prove that each array element takes four bytes, and also that array can be used interchangeably with &array[0] to get the starting address of an array.
Your modified program’s SimpleIDE Terminal output should resemble this.
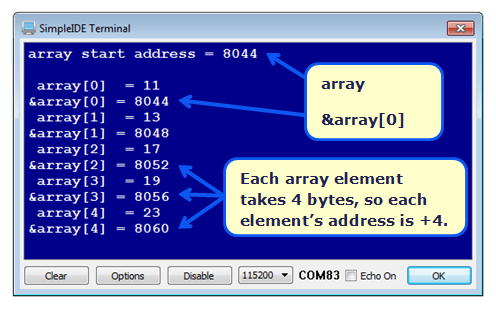
IMPORTANT: Passing the address of the first element in an array by using the array’s name is a very common practice; it is a good idea to get comfortable with it. Most code examples will use array instead of &array[0] for the starting address of an array.
The Did You Know section mentioned that a char array has one byte per element.
Modify the Try This code to use a char array instead of an int array to test and verify this.
Now that we know how to get variable addresses, let’s try passing them a function that is designed use those addresses for useful jobs. In this activity, you’ll get to experiment with the scan function to receive a value you type into SimpleIDE Terminal.
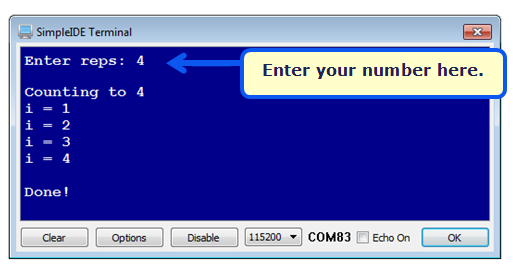
The scan function allows you to type values into the SimpleIDE Terminal. It can then convert the characters you type into the value those numbers represent. For example, after displaying “Enter reps: “ using a print function call, your code can then make a scan function call to load the number you typed into a variable.
If you haven’t already installed the latest USB driver, SimpleIDE, or Learn folder, go to Propeller C – Set up SimpleIDE and Propeller C – Start Simple.
/*
Scan to Int.c
*/

#include "simpletools.h"                         // Include simpletools library

int reps;                                        // Declare variable named reps

int main()                                       // Main function
{
  print("Enter reps: ");                         // User prompt to enter reps
  scan("%d\n", &reps);                           // Scan reps user types
  print("\nCounting to %d\n", reps);             // Display value scanned

  for(int n = 1; n <= reps; n++)                 // Count to value scanned
  {
    print("i = %d\n", n);                        // Display each step
  }

  print("\nDone!");                              // Display when done
}
After including the simpletools library, the program declares an int variable named reps that will be used to limit how high the Propeller counts.
#include "simpletools.h"                         // Include simpletools library

int reps;                                        // Declare variable named reps
The main function starts by printing the “enter reps” message.
int main()                                       // Main function
{
  print("Enter reps: ");                         // User prompt to enter reps
The scan function takes keyboard input from the SimpleIDE Terminal and uses it to set one or more values in one or more variables. This scan function has a formatting string with %d, which tells it to store the decimal integer conversion of the characters you type. The second argument in the function call is &reps, which tells the scan function the address of the variable where you want the result. That’s the way the scan function is designed – instead of a variable value, it needs a variable address to do its job.
scan("%d\n", &reps); // Scan reps user types
This print call helps verify that the scan function did its job by displaying the value reps stores.
print("\nCounting to %d\n", reps); // Display value scanned
The rest of the program counts from 1 to reps, in a manner similar to the Counting Loops activity.
  for(int n = 1; n <= reps; n++)                 // Count to value scanned
  {
    print("i = %d\n", n);                        // Display each step
  }

  print("\nDone!");                              // Display when done
}
After scan has stored the value at a variable’s address, like &reps, the reps variable stores the value. So, your code can do things like print(“reps = %d\n”, reps) to display the value of reps, and for(int n = 1; n <= reps; n++), which uses the value of reps to limit how high the for… loop counts.
The scan function is part of the simpletext library, which the simpletools library includes automatically. It is similar to the C language stdio library’s scanf. We use simpletext with the propeller because it takes less memory with code that uses floating point variables. The print function is also part of simpletext, and similar to printf from the stdio library.
Forgetting to use & in the scan function is a very common programming error.
scan is kind of like the inverse of print. For example, in print(“%d\n”, reps), the %d would make it display the decimal character representation of the value reps stores, and \n would make it display a newline. In scan(“%d\n”, &reps), the %d that tells the Propeller to receive a decimal character representation of a value from SimpleIDE terminal, convert it to an int value, and store it in the &reps memory location. The one important difference is that print would need the value of reps, but scan uses &reps – the address of the reps variable.
The scan function’s formatting flags have the same meanings as their print equivalents:
You will see more on %c and %s as you progress through Propeller C activities.
There are important differences between scan and print:
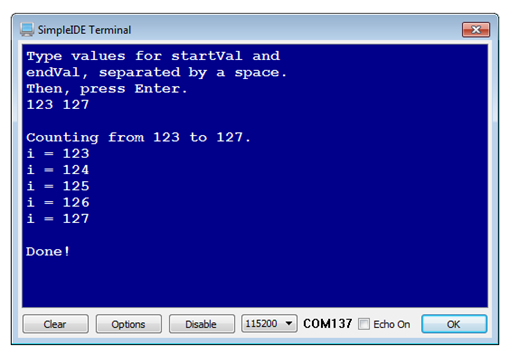
For example, scan(“%d%d”, &startVal, &endVal) will take two values that have to be separated by at least one non-numeric character, and the scan call itself gets completed by \n. You could input 123, followed by a space, then 127, then press the Enter key. But, you could also type abcdef123ghijklm127opq followed by the Enter key, and the results would be the same: startVal would store 123 and endVal would store 127.
Here, a single scan function call scan(“%d %d\n”, &startVal, &endVal) captures two values. Then, a single print call print(“\nCounting from %d to %d.\n”, startVal, endVal) displays those two values, and then the for… loop counts from the start value to the end value.

Since scan can be kind of tricky with the scan function’s rule set, let’s try functions from the simpletext library with a simpler set of rules for getting values from the SimpleIDE Terminal. The getDec function does not require pointers, and terminates with a press of the Enter key (meaning that instead of adding a space between each number as you have been doing, you would press enter instead). So, you could replace the scan code block from the Try This section with code that uses getDec, and end up with the same output in your Terminal Window.
  print("Type values for startVal and \n");
  print("endVal, separated by a space. \n");
  print("Then, press Enter.\n");

  scan("%d%d", &startVal, &endVal);
… with this:
  print("Type values for startVal and \n");
  print("endVal.  Press Enter after each one. \n");

  startVal = getDec();
  endVal = getDec();
Like print and scan, the getDec function is part of the simpletext library, which the simpletools library includes. You can view a full list of the simpletext library’s functions in SimpleIDE’s Help -> Simple Library Reference. For displaying data in the SimpleIDE Terminal, look for functions that start with put, and for acquiring data from the terminal, look for functions that begin with get.
Try replacing:
print("\nCounting from %d to %d.\n", startVal, endVal)
…with these calls to simpletext functions:
putStr("\nCounting from ");
putDec(startVal);
putStr(" to ");
putDec(endVal);
putStr(".\n");
Although print and scan provide some convenience with fewer lines of code, there is also a penalty in terms of program size. Replacing all print and scan calls with equivalent sets of get and put calls, can often significantly reduce the program size.
In Get Values from Terminal, numbers were entered into the SimpleIDE Terminal and stored in variables. In case you were wondering if something similar can be done with text, the answer is yes.
A sequence of characters is commonly referred to as a character string, and it is often shortened to just string or strings when referring to more than one. Strings are typically stored in character arrays, and the addresses of the first elements of arrays that contain strings are used for both getting text from the SimpleIDE Terminal and also displaying it.
In addition to entering and displaying strings this activity will introduce one of the many C standard library string handling features, for making comparisons with a password checker.
If you haven’t already installed the latest USB driver, SimpleIDE, or Learn folder, go to Propeller C – Set up SimpleIDE and Propeller C – Start Simple.
/*
Get Text.c
*/
#include "simpletools.h" // Include simpletools library
char text[16]; // Declare character array
int main() // Main function
{
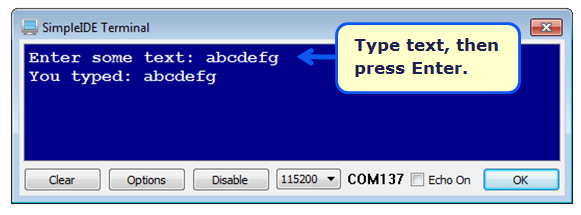
print("Enter some text: "); // User prompt
getStr(text, 15); // Tet string, max 15 characters
print("You typed: %s \n", text); // Display the characters
}
This code declares a char (short for character) array with 16 elements. That’s 16 byte elements, each of which can contain a value in the 0 to 255 range. The values that correspond with printed characters will all be in the 32 to 126 range. For more info, see ASCII Table 0-127.
char text[16];
After a user prompt to type some characters and press Enter, the getStr(text, 15) function passes the text array’s starting address, and limits the total characters entered to 15. If you want to enter fewer than 15 characters, make sure to press Enter to terminate the getStr function. The getStr function will also self-terminate when you type the 15th character.
  print("Enter some text: ");

  getStr(text, 15);
Why does getStr stop at 15 characters and not 16? Given the size of the text array, you might be wondering why getStr limits the characters entered to 15 and not 16. It’s because C language strings are zero-terminated, meaning there has to be a zero after the last character. The getStr function automatically appends the text you’ve typed with a zero. So, if there’s a char array with 16 elements, there’s enough room for 15 characters and one zero-terminator.
After typing the text, this print function then displays it.. The formatting string has %s indicating that it has to print a zero-terminated string. Since %s is the first formatting flag, the first argument has to have the starting address of an array that contains the characters. Remember from Variable Values and Addresses that the array’s variable name is used for passing the address of an array’s zeroth element to functions. So, text is the first argument after the format string.
print("You typed: %s \n", text);
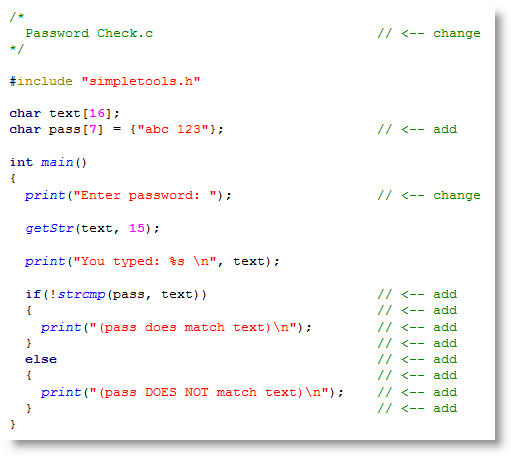
The three lines of code below all declare the same char array with 8 elements that stores the characters abc123, followed by a zero. A sequence of characters followed by a zero is commonly called a zero-terminated string. Even the first declaration, which uses quotes to define the array elements, automatically appends a zero to array[7]. So, there are seven characters, plus a zero terminator that’s built-in.
char pass[8] = {"abc 123"};

char pass[8] = {'a', 'b', 'c', ' ', '1', '2', '3', '\0'};

char pass[8] = {97, 98, 99, 32, 49, 50, 51, 0};
The simpletools library also includes the string standard C library. One of the functions in the string library is strcmp. The strcmp function takes the starting addresses of two zero-terminated strings stored in two character arrays, and returns a zero if they match, or nonzero if they do not match. Here is an example that prints “Same!” because the two strings match.
if(strcmp(pass, text) == 0) print("Same!"); else print("Different!");
The strcmp(pass, text) == 0 comparison returns 1 if it’s true, or 0 if it’s false. An if statement executes its code block if the comparison returns nonzero. The logical not ! operator changes zero to 1, and any nonzero value to 0. So, here is an equivalent statement in a style you are likely to see in published C language examples:
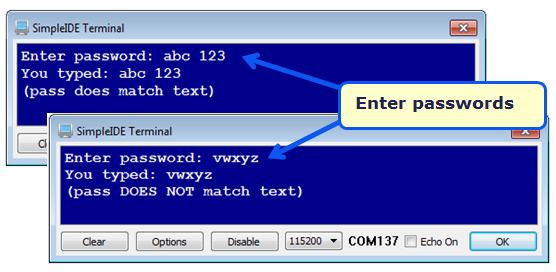
if(!strcmp(pass, text)) print("Same!"); else print("Different!");
If they match, strcmp returns 0, and the ! operator changes it to 1, so the if…else… statement will still print “Same!”. If they do not match, strcmp returns nonzero, which the ! operator changes to 0 and cause the if…else… statement to print “Different!”
Here is an example that uses zero-terminated strings, scan, and strcmp to make a simple password checker.
Many computer operating systems, automated teller machines, and other secure devices replace the password characters you type with asterisk * so that people nearby cannot see your password displayed on the screen. Although neither getStr nor scan have provisions for this, it’s not too difficult to write your own.
getStr(text, 15);

print("You typed: %s \n", text);
with this:
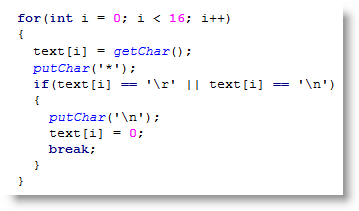
This custom version of getStr behaves almost identically to what getStr actually does. To make it match the getStr function, simply replace putChar(‘*’) with putChar(text[i]).
