LEARN.PARALLAX.COM
Published on LEARN.PARALLAX.COM (https://learn.parallax.com)
Home > IR Remote Control ActivityBot with Blockly

IR Remote Control ActivityBot with Blockly

This tutorial shows you how an IR remote can drive your ActivityBot, using BlocklyProp graphical programming.  The only sensor needed is a single IR Receiver included with the ActivityBot Robot Kit.  But, if your ActivityBot already has the PING))) sensor or Whisker switch circuits in place, leave them on and they can play too!

Before you Start

  • Complete the tutorial BlocklyProp Robotics with the ActivityBot 360°.
  • Watch the video below to see what’s in store.

]

What’s Needed

  • (1) Sony-programmable Universal Remote (#020-00001) with batteries
  • (1) ActivityBot robot* (Original #32500 or ActivityBot 360° #32600), fully built, calibrated and test-driven for basic navigation
  • (1) Infrared receiver* (#350-00014)
  • (1) 220 ohm resistor* (red-red-brown) (#150-02210)
  • Jumper wires*

*These items are included with the ActivityBot Robot Kits (assembly required!)

  • Have everything you need? Then follow the links below to get started.

Test the IR Receiver and Remote

IR Receiver Circuit

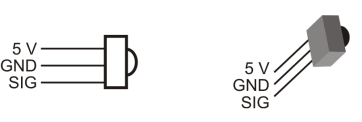
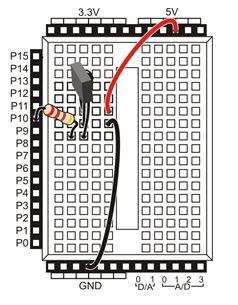
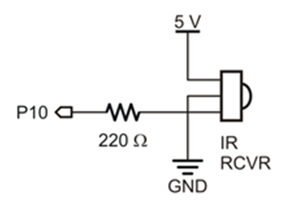
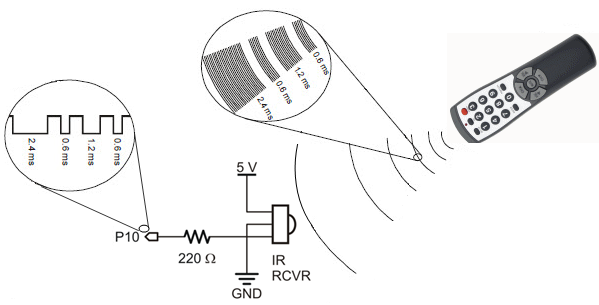
If you have not used the IR Receivers with your ActivityBot before, take a look at the pictures below. The infrared receiver needs three connections: 5 V, GND, and an I/O pin to read the signal it sends. The circuitry inside the infrared receiver makes it safe to connect its signal pin to the Propeller I/O pin with a small resistor, even though the sensor is powered by 5 V.

  • If you already have ActivityBot whisker circuits, or a PING))) Distance Sensor, or a piezospeaker on your ActivityBot, leave them there! You can add code for those to your project.
  • Build the IR receiver circuit on the Activity Board (original or WX version) breadboard.

Prepare your Remote

  • Configure your remote for Sony protocol, following its manufacturer instructions.  If you have the Brightstar brand remote from Parallax, hold the Setup button until the light near it comes on, and then Enter 6-0-5 and the light should go off. Done!

IR Receiver Test Code

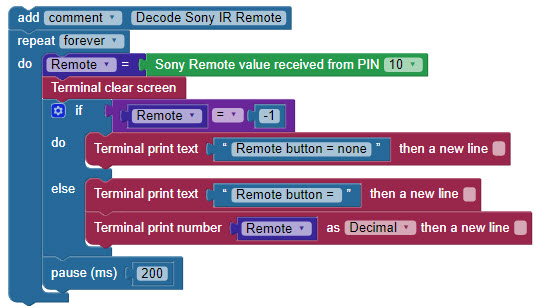
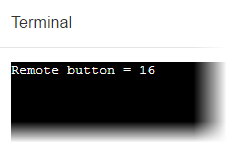
The test program decodes signals received the SONY remote and displays them in the BlocklyProp Terminal.

  • Log into your BlocklyProp account, and make a new Propeller C project.
  • Build and save the project shown below.

  • Connect your ActivityBot to the computer and put its power switch in Position 1.
  • Run the program, and the Terminal should open.
  • Point the remote at the IR receiver, and push some buttons.

You should see the remote button number displayed in the Terminal. Note that the Channel up/down, Volume up/down, and Mute buttons also return numbers. When no button is pressed you should see Remote button = none.” You may also see this message if the IR signal of the button that is pressed is not one that is recognized by this block’s library. Some remotes have a LOT of buttons!!!

  • Write down the numbers that you see when you push the Channel Up, Channel Down, Volume Up, and Volume down buttons on your remote.


How it Works

The IR receiver is looking for infrared light (in the 980 nanometer range) that is pulsing at around 38 kHz.  The IR remote sends short bursts of this pulsing 38 kHz infrared light, in a different on-off pattern for each button on the remote.  While the IR receiver detects these bursts it sends a 0 the Propeller I/O pin, and a 1 when it does not.  The C code underneath the BlocklyProp Sony Remote value block does the work of decoding the on-off pattern conveyed by the Propeller I/O pin.

The projects’s blocks are all inside a repeat forever loop (except for the comment at the top!)

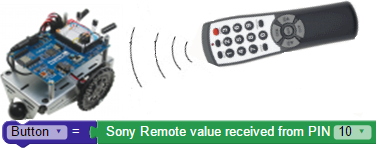
The first action is for the Sony remote value block to check PIN 10, and then store the number it receives into the Remote Button variable.  Next, a Terminal clear screen block is there to wipe away the old message each time through the repeat loop to make way for a new one.

Next, an if…do…else loop checks to see if Remote Button equals -1.  If this is true, it means no recognized button on the remote is pressed, and the if…do block is executed. That is just a Terminal print text block with the message “Remote button = none.  “

If Remote Button does NOT equal -1, the if…condition is NOT true, so a recognizable button must be pressed!  In that case code execution drops to the else blocks. Here, a Terminal print text block and prints “Remote button = ” which is immediately followed by the decimal value stored in Remote Button.

After the if…do…else block, pause (ms) 200 gives the Terminal time to display the message before code execution returns to the top of the repeat forever loop.

  • Ready to make the ActivityBot roll with the remote? Follow the link to the next page.


Remote Driving Code

Simple IR Remote Control Code

The BlocklyProp project below is a stratightforward way to achieve basic remote control driving.  In this example, the IR remote number values used correspond to the Channel Up (16) , Channel Down (17), Volume Up (18), and Volume Down ( 19) arrows on the Brightstar remote sold by Parallax. If you are using a different Sony remote, use the program on the previous page to identify the numbers that correspond to the buttons you’d like to use to drive your ActivityBot.

  • Log into your BlocklyProp account and make a new project named IR Remote Drive.
  • Build and save the project shown below.
  • Be sure to set the Robot initialize block to the right setting for your robot: ActivityBot or ActivityBot 360°.

  • Load the program to your ActivityBot’s EEPROM, then put it on the floor in an open place.
  • Press and hold the arrow keys to make the ActivityBot move.

How it Works

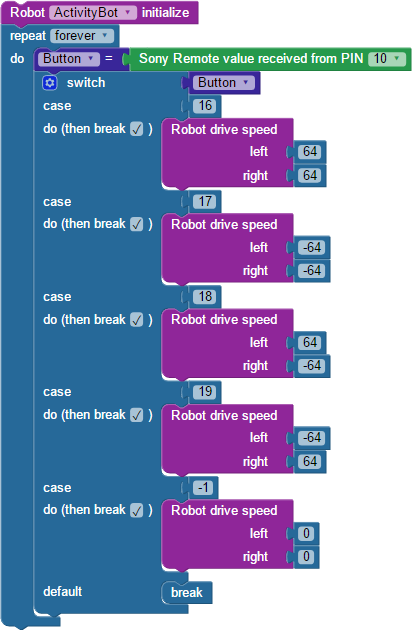
The code is very straightforward. After the required Robot initialize block, the rest of the code is in a repeat forever loop.

First, the Sony Remote value block checks the IR receiver on PIN 10, and then stores the number received in the Button variable.  Then, a switch…case block does the rest.  At switch, the Button variable’s number is read, and then the program jumps to the case with the matching number. Four of the case numbers correspond to the four arrow buttons on the Brightstar remote: 16, 17, 18, and 19.  The fifth case is -1, which is the value the Sony remote block provides when the IR receiver is not detetcting anything.

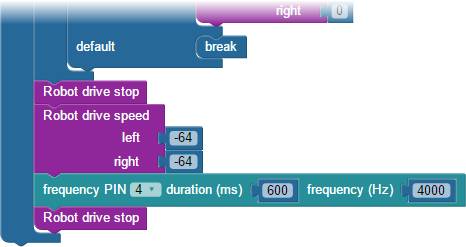
When the program jumps to a specific case number, the blocks in its do section gets executed. Here, that’s always a Robot drive speeds block. Each one has left and right values to perform the maneuver that goes with the button pressed. The case -1 makes the ActivityBot wheels stop turning, so that the robot will only move while you hold down one of the other buttons. 

If a button other than 16, 17, 18, 19, is pressed, the program jumps to case default at the bottom. It just holds a break block, which makes the program break out of the switch…case block. Also notice that every other case has the (then break _) checkmarked checked. So, only one case is executed at a time, then the program returns to the top of the repeat forever loop, to check if you are now pressing a different button!


Did you Know?

If you are just one of several people doing this activity in a small space, you have likely run into a problem!  You may find that you are unexpectedly controlling robots in addition to your own.  Or, you may find your robot responding to another person’s remote.  The communication between the remote and the ActivityBot is not at all private. 

  • If the ActivityBot robots were instead heavy equipment operating in the real world, what dangers could this pose?
  • If you just had a remote and no robot, could you still interfere with another person’s robot? How could this cause problems in a real-world situation?
  • If you just had an IR receiver and no remote or robot, could you still “spy” on the moves another person’s robot was making? How could this cause problems in a real-world situation?
  • Recall Your Turn – Test for IR Interference  from the ActivityBot tutorial. In a real-world situation, what dangers could this vulnerability pose?
  • Can you think of a way to make your ActivityBot respond only to your remote?

Try This – Add Speed Control

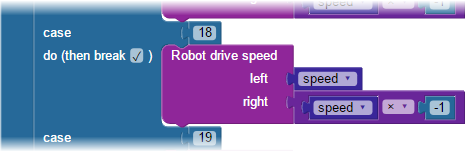
Right now, you have control over the direction your ActivityBot drives and turns, but not over its speed.  Let’s use some of the number buttons as different speed settings that you can change during run time. It will take several steps:

  • Save a copy of your project as IR Remote Drive Speeds.
  • Make a new variable named speed.
  • In the first four Robot drive speed blocks, replace every instance of 64 with the variable speed.
  • In the first four Robot drive speed blocks, replace every instance of the  -64 with the math operation block speed x -1. Here’s an example for case 18.

  • Add three more cases to your switch…case block, and attach number values 1, 2, and 3. Keep the (then break_) box checked.
  • For each new case’s do section, insert a Robot set acceleration for speed block.
  • Then add a set variable speed block for each new case.  For case 1 use speed = 32, for case 2 use speed = 64, and for case 3 use speed = 128.
  • Adjust each acceleration block so  speed = 32 uses 1200 ticks/s2, speed = 64 uses 600 ticks/s2, and speed = 128 uses 400 ticks/s2. Here’s an example for case 1:

  • Save the project and load it to your ActivityBot’s EEPROM.
  • On the IR remote, first press 1, 2 or 3, then press the arrow keys to drive.


Your Turn – Default Options

Here are two suggestions for optional improvements that you may want to make to your project. 

Default Speed

With the current IR Remote Drive Speeds code, when you first power up your ActivityBot, none of the drive buttons will make the robot move until you first press 1, 2 or 3 to select a speed value to use.  That is because the variable speed defaults to zero until it is changed by executing one of those three cases.

  • Above the repeat forever loop, add blocks to initialize the variable speed to 32, 64, or whatever you like. This will be the default speed upon start-up until you press button 1, 2, or 3.
  • If you choose a default speed that’s either very fast or very slow, you may also want to add a default Robot set acceleration for speed block that’s well matched to your chosen speed.
  • Save, load, and test-drive your modified code.

Press & Hold vs Set & Forget

Right now, the ActivityBot only moves while you are pressing and holding a button on the remote. This is a wise strategy while you are developing code or working in a crowded place. But, with a simple change, you can make the motion buttons set-and-forget style.

  • Change case -1 to case 20. 
  • Save, load, and test-drive the modified code.

The ActivityBot should now keep going after you briefly press an arrow button, and stop when you press the mute button. Keep in mind that if you change the speed with the 1, 2, or 3 button, the new setting will not be evident until you press an arrow button again.

  • Do you have a piezospeaker and either whisker switches or a PING))) sensor on your ActivityBot already? Follow the link below to add them into the project.


Add Obstacle Detection

Your Turn: Add Obstacle Detection Override

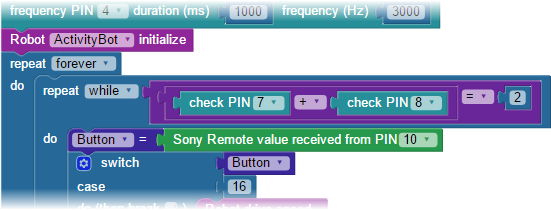
Right now, you can drive your ActivityBot right into an obstacle. But, if you already have the Ping))) Ultrasonic Distance Sensor or the whisker switches on board, you can program your ActivityBot for a little self-preservation!

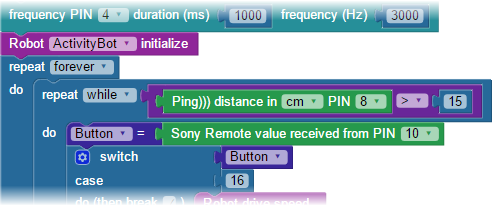
The key is making the existing remote control loop conditional.  That will let the remote control code run as long as no obstacle is detected. Placing this conditional loop inside of a repeat forever loop, and adding code for what to do If an obstacle is detected, is all it takes for the ActivityBot to defend itself!

Adding Code for Whisker Switches & Piezospeaker

  • If your ActivityBot does not have a built and tested piezospeaker circuit, add it now.
  • If your ActivityBot does not have built and tested whisker switches, add them now.
  • Start with your original IR Remote Drive code, and save a copy as IR Remote Drive with Whiskers.
  • Change the repeat forever loop into a repeat while loop with the block’s dropdown menu.
  • As shown below, attach the following condition to repeat while: ((check PIN 7 + check PIN 8) = 2). Remember, the whisker switches are active-low. So, as long as their states add up to 2, neither one is being pressed and so the ActivityBot has not hit an obstacle.

  • Place the repeat while loop into a repeat forever loop, as shown above.
  • At the bottom of the repeat forever loop, just after the repeat while loop, add the code shown below. It will make the ActivityBot stop, drive backward, play a beep for 600 ms, then stop again. This code will only be used if the repeat while condition does not equal 2 meaning one or both whiskers are pressed.

  • Save the project and load it into your ActivityBot’s EEPROM.
  • Take it for a test drive, and try to make the ActivityBot drive into a wall. It should automatically beep and back up, even if you hold the button down to make it drive forward.


Adding Code for PING))) Sensor & Piezospeaker

  • If your ActivityBot does not have a built and tested piezospeaker circuit, add it now.
  • If your ActivityBot does not have a built and tested PING))) Ultrasonic Distance Sensor circuit, add it now.
  • Start with your original IR Remote Drive code, and save a copy as IR Remote Drive with Ping.
  • Change the repeat forever loop into a repeat while loop with the block’s dropdown menu.
  • As shown below, attach the following condition to repeat while: (Ping))) distance in cm > 15). So, this loop will only execute if the ActivityBot is more than 15 cm away from a detectable object.

  • Place this repeat while loop into a repeat forever loop, as shown above.
  • At the bottom of the repeat forever loop, just after the repeat while loop, add the code shonw below. At will make the ActivityBot stop, drive backward, play a beep for 600 ms, then stop again. This code will only be used if the condition (Ping))) distance in cm > 15) is no longer true, meaning the ActivityBot has come within 15 cm of an object. (Yes, these are the same blocks that the Whisker Switches used above.)

  • Save the project and load it into your ActivityBot’s EEPROM.
  • Take it for a test drive, and try to make the ActivityBot drive into a wall. It should automatically beep and back up, even if you hold the button down to make it drive forward.


DISCUSSION FORUMS | PARALLAX INC. STORE

About | Terms of Use | Feedback: learn@parallax.com | Copyright©Parallax Inc. 2024


Source URL:https://learn.parallax.com/courses/ir-remote-control-activitybot-with-blockly/
Links