This activity features a program that displays what the ActivityBot detects in the BlocklyProp Terminal as it sweeps the Ping))) sensor back and forth. The image below shows an example with a water bottle in the ActivityBot’s 180° field of detection along with its signatures displayed in the Terminal:
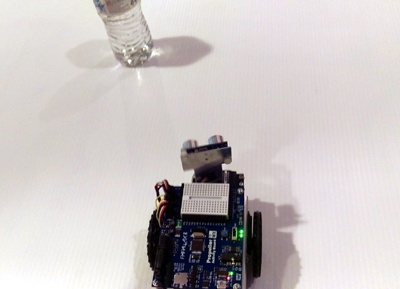
Experimenting with this program will help you better understand what the ActivityBot can and cannot detect with the Ping))) Ultrasonic Distance Sensor and mounting bracket. This will help you to write better programs that navigate with this object detection system.
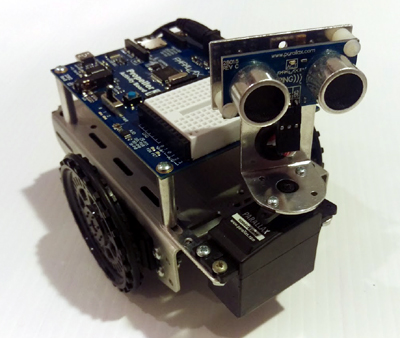
The next image shows an ActivityBot assembled with the Ping))) Ultrasonic Distance Sensor and Mounting Bracket Kits. The Mounting Bracket Kit makes it possible for the ActivityBot to swivel the Ping))) sensor and measure object distances across a 180° field in front of it.
This project contains advanced topics. Before continuing, we highly recommend that you complete the following tasks to gain a better understanding of how this program operates:
Follow the instructions in the Ping))) Mounting Bracket Kit documentation for making the mechanical and electrical connections to the servo and Ping))) sensor. When you finish, the servo will connect to P16 on the Activity Board, and the Ping))) sensor will connect to P17.
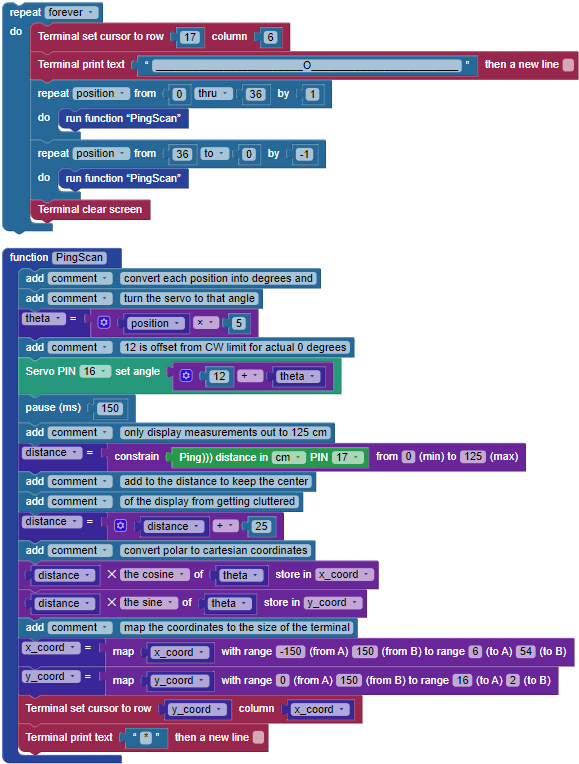
The Ping)))Dar BlocklyProp program will scan a 180° field in front of the ActivityBot by incrementally rotating the Ping))) mounting bracket and then taking a distance measurement. It will do this rapidly enough that the mounting bracket servo will appear just to be rotating from right to left and back again as it updates the Terminal display.
For each measurement in a given sweep, the information that the program will have to work with is a distance measurement (d) and an angle measurement (θ) as shown in the image below. Given distance and angle coordinates are called polar coordinates. We express coordinates in parentheses like this: (d θ). When telling those coordinates to someone, you would typically say, “d at an angle of theta.” The BlocklyProp code will have to convert these polar coordinates to Cartesian (x, y) coordinates to display these measurements graphically in the Terminal. That way, the Terminal set cursor block can be used to graphically display the measurement by positioning the cursor before the Terminal print text block sends an asterisk (“*”).
Calculating the x- and y-axis components given polar coordinates is not difficult with BlocklyProp! The equations for x and y are below. The x-axis component involves multiplying the distance by the cosine of the angle, and the y-axis component is the distance multiplied by the sine of the angle.

Since the object’s position is dependent on good distance and angle measurements, it is important to adjust and calibrate your Ping))) mounting bracket system mechanically, so that the program’s servo set angle block can sweep it from 0° (to the right) to 180° (to the left). The first adjustment step toward good Ping))) mounting bracket servo angular control is making sure that the Ping))) sensor is mounted so that the servo points it straight ahead when the servo set angle sends 90°. Note: We add 12° to the angle to point the servo at 90° with respect to the center of its range of motion. Otherwise, it’s with respect to the clockwise limit of its range of motion.

Now that your servo is in the correct position, you will use the concepts from the beginning of this tutorial to create a display in the Terminal window that reflects what the Ping))) sensor “sees” as the servo sweeps it back and forth over a 180° field of detection.
To understand what your ActivityBot does and does not “see” with the Ping))) sensor, a few experiments are in order. Here are some questions that can be answered with the program, as well as various objects placed in the ActivityBot’s field of detection.
Start with one or two cylindrical objects about 3 ft (91 cm) apart and 2 ft (61 cm) from the front of the ActivityBot. For best results, use tall cylindrical objects, such as soda cans, water bottles, etc. Sheets of paper can also be conveniently rolled into 8.5 inches (21.5 cm) tall by 2 to 3 inches (5 to 7.5 cm) diameter cylinders with a couple of pieces of tape.
No lessons available for this course, displaying course content instead:
This activity features a program that displays what the ActivityBot detects in the BlocklyProp Terminal as it sweeps the Ping))) sensor back and forth. The image below shows an example with a water bottle in the ActivityBot’s 180° field of detection along with its signatures displayed in the Terminal:
Experimenting with this program will help you better understand what the ActivityBot can and cannot detect with the Ping))) Ultrasonic Distance Sensor and mounting bracket. This will help you to write better programs that navigate with this object detection system.
The next image shows an ActivityBot assembled with the Ping))) Ultrasonic Distance Sensor and Mounting Bracket Kits. The Mounting Bracket Kit makes it possible for the ActivityBot to swivel the Ping))) sensor and measure object distances across a 180° field in front of it.
This project contains advanced topics. Before continuing, we highly recommend that you complete the following tasks to gain a better understanding of how this program operates:
Follow the instructions in the Ping))) Mounting Bracket Kit documentation for making the mechanical and electrical connections to the servo and Ping))) sensor. When you finish, the servo will connect to P16 on the Activity Board, and the Ping))) sensor will connect to P17.
The Ping)))Dar BlocklyProp program will scan a 180° field in front of the ActivityBot by incrementally rotating the Ping))) mounting bracket and then taking a distance measurement. It will do this rapidly enough that the mounting bracket servo will appear just to be rotating from right to left and back again as it updates the Terminal display.
For each measurement in a given sweep, the information that the program will have to work with is a distance measurement (d) and an angle measurement (θ) as shown in the image below. Given distance and angle coordinates are called polar coordinates. We express coordinates in parentheses like this: (d θ). When telling those coordinates to someone, you would typically say, “d at an angle of theta.” The BlocklyProp code will have to convert these polar coordinates to Cartesian (x, y) coordinates to display these measurements graphically in the Terminal. That way, the Terminal set cursor block can be used to graphically display the measurement by positioning the cursor before the Terminal print text block sends an asterisk (“*”).
Calculating the x- and y-axis components given polar coordinates is not difficult with BlocklyProp! The equations for x and y are below. The x-axis component involves multiplying the distance by the cosine of the angle, and the y-axis component is the distance multiplied by the sine of the angle.
Since the object’s position is dependent on good distance and angle measurements, it is important to adjust and calibrate your Ping))) mounting bracket system mechanically, so that the program’s servo set angle block can sweep it from 0° (to the right) to 180° (to the left). The first adjustment step toward good Ping))) mounting bracket servo angular control is making sure that the Ping))) sensor is mounted so that the servo points it straight ahead when the servo set angle sends 90°. Note: We add 12° to the angle to point the servo at 90° with respect to the center of its range of motion. Otherwise, it’s with respect to the clockwise limit of its range of motion.
Now that your servo is in the correct position, you will use the concepts from the beginning of this tutorial to create a display in the Terminal window that reflects what the Ping))) sensor “sees” as the servo sweeps it back and forth over a 180° field of detection.
To understand what your ActivityBot does and does not “see” with the Ping))) sensor, a few experiments are in order. Here are some questions that can be answered with the program, as well as various objects placed in the ActivityBot’s field of detection.
Start with one or two cylindrical objects about 3 ft (91 cm) apart and 2 ft (61 cm) from the front of the ActivityBot. For best results, use tall cylindrical objects, such as soda cans, water bottles, etc. Sheets of paper can also be conveniently rolled into 8.5 inches (21.5 cm) tall by 2 to 3 inches (5 to 7.5 cm) diameter cylinders with a couple of pieces of tape.
