The activities in this project will help you test and tune your Gripper. Then your cyber:bot will expand upon basic maneuvers by picking up and setting down objects along the way. If you have an extra micro:bit GO Bundle (or a second cyber:bot Robot with micro:bit), try the third activity too. It extends the Cybersecurity:Radio Tilt Control project by adding remote button control to pick up and set down objects.
You will need:
Complete these tutorials first:
You will be able to:
Gripper control with the cyber:bot robot can be a great first step toward robotics contests that involve fetching and sorting objects. Gripper control with the cyber:bot robot also introduces the basics of robotic arm control. From newer vending machines to manufacturing, medical research, underwater remotely operated vehicle “hands and arms,” these devices and machines have engineer designers and technical staff to make sure they run properly. So, this could even be the first step toward a variety of job opportunities.
The three main goals of this activity are to:
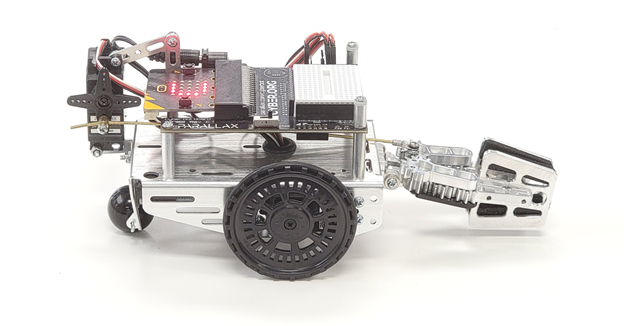
(1) cyber:bot robot with Gripper installed following the instructions in these chapters:
Note: The script was created by entering the python script below and adding the cyberbot.py module to the Project Files as shown in Add modules to your micro:bit. The project name was set to test_gripper_angles_buttons before saving it as a .hex file as shown in Save & Edit Scripts.
The script will turn the Gripper’s standard servo to its 30° position. This will make the Gripper close and lift its paddles. Then it will turn the standard servo to its 150° position to make the Gripper paddles lower and open. If your Gripper does not properly complete both motions, the troubleshooting section on the next page has a script you can run while making mechanical adjustments.
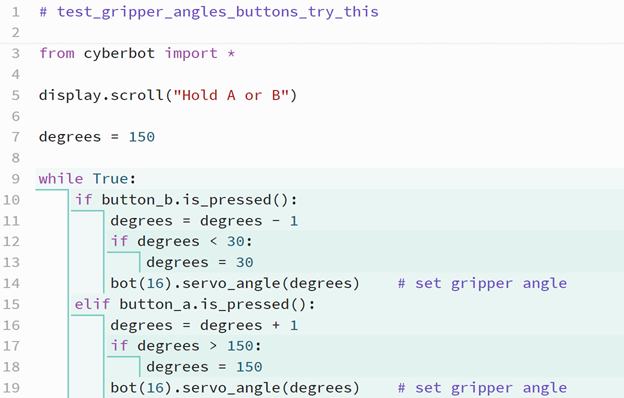
# test_gripper_angles_buttons
from cyberbot import *
display.show(Image.ARROW_E)
while True:
if button_b.was_pressed():
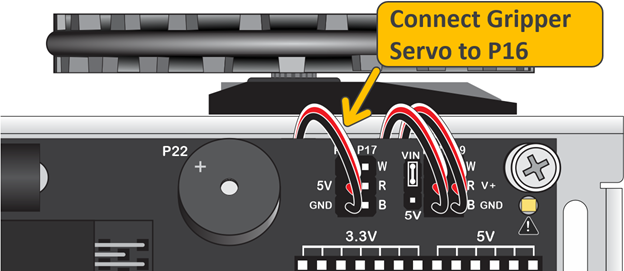
bot(16).servo_angle(30) # close gripper & lift
display.show(Image.ARROW_W)
elif button_a.was_pressed():
bot(16).servo_angle(150) # Lower gripper & open
display.show(Image.ARROW_E)
The main purpose of these tests is to verify that the script makes the Gripper complete both the close/lift and lower/open motions. If it doesn’t do both correctly, try the Troubleshooting section on the next page.
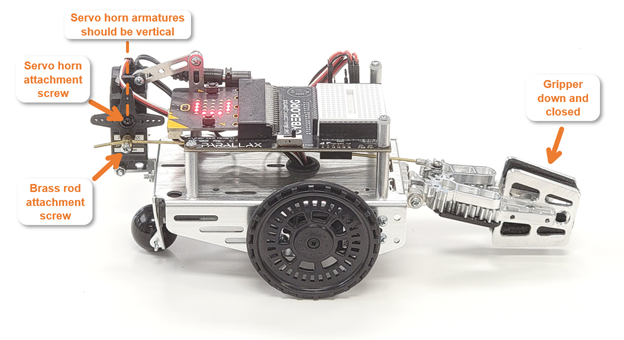
In the Gripper 3.0 Assembly Instructions, there’s a Tuning and Programming activity. The first section contains instructions to physically position the servo and Gripper, including “Move the servo through its range of motion and make sure it is centered when the Gripper is the closed, lowered position.” Here are some steps you can follow to make sure this was done correctly:
# center_gripper

from cyberbot import *

display.show('C')

bot(16).servo_angle(90)    # Lower only, leave closed
Now let’s make sure the mechanical connections are correct for the Gripper to work properly.
After importing the cyberbot module, the script uses display.show(Image.ARROW_E) to point at the micro:bit module’s B button.
# test_gripper_angles_buttons

from cyberbot import *

display.show(Image.ARROW_E)
The main loop repeatedly checks if either the A or B buttons have been pressed. If the B button was pressed since the last time it checked, the bot(16).servo_angle(30) call closes and lifts the Gripper paddles. If the A button was pressed since the last time it checked, the bot(16).servo_angle(150) call lowers and opens the Gripper paddles.
Both servo_angle calls can be considered “set it and forget it” so the servo will hold the position it was most recently set to. Whenever a particular button is pressed, the arrow is updated to point at the other button.
while True:
    if button_b.was_pressed():
        bot(16).servo_angle(30)     # close gripper & lift
        display.show(Image.ARROW_W)
    elif button_a.was_pressed():
        bot(16).servo_angle(150)    # Lower gripper & open
        display.show(Image.ARROW_E)
Some objects need to be lifted up and set down more carefully, like objects with narrower bases. Try modifying the test script to make the Gripper close-lift and lower-open more gradually.
Instead of having to hold down the A or B button, a script can make the Gripper complete a close-lift or lower-open maneuver open and close on its own after a button press-and-release. Simply put the statements updating the degrees variable and servo degree angle in a while loop that continues while the angle is greater than 30. A similar loop could also be written for button A that continues while degrees is less than 150.

In this activity, you will add cyber:bot navigation maneuvers to Gripper motion. This will make the cyber:bot robot roll to, pick up, move, and set down an object.
(1) cyber:bot with Gripper installed, tested and tuned by following the Parts, Circuit, Script and Tests sections in the previous Test and Tune the Gripper activity.
This script makes the Gripper-equipped cyber:bot:
Let’s give it a try.
cyber_bot_gripper_forward_object.hex
The script was created by entering the text below into the python.microbit.org editor. The cyberbot.py module was also added to the Project Files as shown in Add modules to your micro:bit. The Script Name was set to cyber_bot_gripper_forward_object before saving it as a .hex file as shown in Save & Edit Scripts.
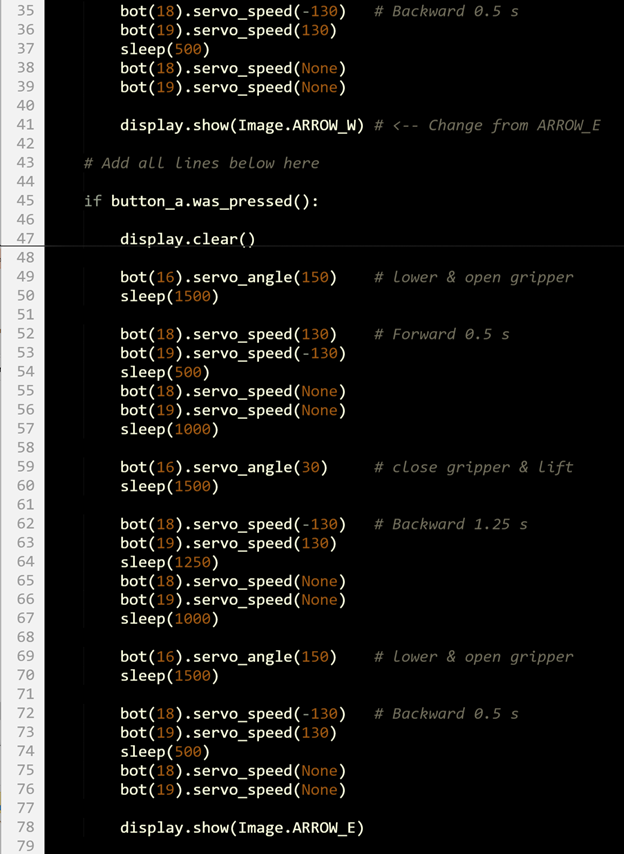
# cyber_bot_gripper_forward_object

from cyberbot import *

display.show(Image.ARROW_E)

while True:
    if button_b.was_pressed():

        display.clear()

        bot(16).servo_angle(150)    # lower & open gripper
        sleep(1500)

        bot(18).servo_speed(130)    # Forward 0.5 s
        bot(19).servo_speed(-130)
        sleep(500)
        bot(18).servo_speed(None)
        bot(19).servo_speed(None)
        sleep(1000)

        bot(16).servo_angle(30)     # close gripper & lift
        sleep(1500)

        bot(18).servo_speed(130)    # Forward 1.25 s
        bot(19).servo_speed(-130)
        sleep(1250)
        bot(18).servo_speed(None)
        bot(19).servo_speed(None)
        sleep(1000)

        bot(16).servo_angle(150)    # lower & open gripper
        sleep(1500)

        bot(18).servo_speed(-130)    # Backward 0.5 s
        bot(19).servo_speed(130)
        sleep(500)
        bot(18).servo_speed(None)
        bot(19).servo_speed(None)

        display.show(Image.ARROW_E)
Your cyber:bot robot might curve to the left or the right during these maneuvers. If it does, it can be straightened by slowing the servo that’s going faster and causing the curve. A remedy for this is included in the step-by-step instructions below.
After importing the cyberbot module, the script goes into an endless while True: loop that monitors the tilt micro:bit module’s B button.
# cyber_bot_gripper_forward_object

from cyberbot import *

display.show(Image.ARROW_E)

while True:
If the B button was pressed, the cyber:bot starts by rolling forward for ½ a second, then stops. The routine is appended with a sleep(1000) call to make sure the cyber:bot has completely come to rest. Once at full stop, the script uses bot(16).servo_angle(30) to close the Gripper. It is followed by sleep(1500) to give the Gripper paddles time to close and lift, and partially to make a slight pause between picking up the object and starting to move.
    if button_b.was_pressed():

        display.clear()

        bot(16).servo_angle(150)    # lower & open gripper
        sleep(1500)

        bot(18).servo_speed(130)    # Forward 0.5 s
        bot(19).servo_speed(-130)
        sleep(500)
        bot(18).servo_speed(None)
        bot(19).servo_speed(None)
        sleep(1000)

        bot(16).servo_angle(30)     # close gripper & lift
        sleep(1500)
After lifting the object, this part of the script makes the cyber:bot roll forward for 1.25 s. Then, it lowers and opens the Gripper paddles, setting down the object.
        bot(18).servo_speed(130)    # Forward 1.25 s
        bot(19).servo_speed(-130)
        sleep(1250)
        bot(18).servo_speed(None)
        bot(19).servo_speed(None)
        sleep(1000)

        bot(16).servo_angle(150)    # lower & open gripper
        sleep(1500)
Finally, it backs up for 0.5 s so that the object is no longer between the Gripper paddles.
        bot(18).servo_speed(-130)    # Backward 0.5 s
        bot(19).servo_speed(130)
        sleep(500)
        bot(18).servo_speed(None)
        bot(19).servo_speed(None)

        display.show(Image.ARROW_E)
It is often a good idea to put things back where you got them when you are done with them! Let’s add a Button A feature to make the cyber:bot take the object and place it back where it started before you pressed Button B.
Your Gripper-equipped cyber:bot is not limited to forward and backward motion! With some modifications to the script, you can add any of the turns introduced in the Navigation with the cyber:bot chapter’s Left and Right Turns activity.
]
This project allows you to use a second micro:bit to tilt control the cyber:bot robot and use its B and A buttons to remotely close-lift and lower-open the Gripper paddles.
For those who have a class set of cyber:bot robots, a second cyber:bot can be used as a tilt controller if an extra micro:bit GO kit is not available on its own.
This is the script to run on the cyber:bot robot. It receives values from the micro:bit tilt controller that are used for its drive servos and Gripper servo.
radio_tilt_grip_controlled_cyberbot.hex
The script was created by entering the text below into the python.microbit.org editor. The cyberbot.py module was also added to the Project Files as shown in Add modules to your micro:bit. The Script Name was set to cyber_bot_gripper_forward_object before saving it as a .hex file as shown in Save & Edit Scripts.
# radio_tilt_grip_controlled_cyberbot

from cyberbot import *
import radio

radio.on()
radio.config(channel=7, queue=1, length=64)

while True:

    packet = radio.receive()

    if packet:

        try:

            dictionary = eval(packet)

            x = dictionary.get('x')
            y = dictionary.get('y')
            needle = dictionary.get('needle')

            fb = y / 10
            lr = x / 10

            button = dictionary['button']   # added

        except Exception as e:

            display.show(Image.SAD)
            print("Exception e:", e)
            print("Type:", type(e))
            continue

        else:

            if abs(y) > 80:
                display.show(Image.ALL_CLOCKS[needle])
                vL = fb
                vR = -fb

                if(fb < 0): lr = -lr
                vL = vL - lr/2              # Reduced lr term by 2
                vR = vR - lr/2              # Reduced lr term by 2

            else:

                display.show(Image.DIAMOND_SMALL)
                vL = None
                vR = None

            if button == 'B':               # added
                bot(16).servo_angle(30)     # added Gripper close & lift
            elif button == 'A':             # added
                bot(16).servo_angle(150)    # added Gripper lower & open

        finally:

            bot(18).servo_speed(vL)
            bot(19).servo_speed(vR)
This is the script to run on the micro:bit module serving as the tilt controller for the Gripper-equipped cyber:bot robot. It takes measurements from its onboard tilt sensor and sends radio data values to the cyber:bot for its drive servos and Gripper servo.
The script was created by entering the text below into the python.microbit.org editor. The Script Name was set to cyber_bot_gripper_forward_object before saving it as a .hex file as shown in Save & Edit Scripts.
# radio_tilt_grip_controller

from microbit import *
import math
import radio

radio.on()
radio.config(channel=7, queue=1, length=64)

while True:
    x = accelerometer.get_x()
    y = accelerometer.get_y()

    angle = round( math.degrees( math.atan2(y, x) ) )
    needle = ( angle + 90 + 15 ) // 30

    if abs(y) > 80:
        display.show(Image.ALL_CLOCKS[needle])
    else:
        display.show(Image.DIAMOND_SMALL)

    dictionary = { }
    dictionary['x'] = x
    dictionary['y'] = y
    dictionary['needle'] = needle

    if button_b.was_pressed():          # add
        dictionary['button'] = 'B'      # add
    elif button_a.was_pressed():        # add
        dictionary['button'] = 'A'      # add
    else:
        dictionary['button'] = 'None'   # add

    packet = str(dictionary)
    radio.send(packet)

    sleep(50)
Follow these step-by-step instructions to test the tilt-drive and button Gripper control functions.
The scripts in this project are just slightly expanded versions of the ones from the Cybersecurity: Radio Tilt Control tutorial’s Radio Tilt Controlled cyber:bot activity.
To add button control to the Radio Tilt Controller Code, the routine below was added to the transmitter app. It expands the dictionary to contain data indicating which of the micro:bit module’s buttons were pressed. Before this, it just contained x, y, and needle key value pairs.
    if button_b.was_pressed():          # add
        dictionary['button'] = 'B'      # add
    elif button_a.was_pressed():        # add
        dictionary['button'] = 'A'      # add
    else:
        dictionary['button'] = 'None'   # add
This line was added to the Radio Controlled cyber:bot Code.
button = dictionary['button'] # added
These lines were added to respond to the button values by lowering/opening or closing/lifting the Gripper paddles.
            if button == 'B':               # added
                bot(16).servo_angle(30)     # added Gripper close & lift
            elif button == 'A':             # added
                bot(16).servo_angle(150)    # added Gripper lower & open
The tilt controller might be a little too responsive, but slowing it down isn’t hard. There are two facets to slowing it down.
First, the range where there’s no motion and the micro:bit displays a diamond can be extended from 80 to 200. This will help prevent accidentally moving the cyber:bot when you press a button.
Second, instead of dividing x and y tilts by 10 for a speed range of -100 to 100, you can divide them by 20 for half the speed range. This will also help, especially when you are getting used to controlling the cyber:bot with the Gripper.
In the radio_tilt_grip_controller script:
if abs(y) > 80: # Change from 80 to 200
In radio the _tilt_grip_controlled_cyberbot script:
            fb = y / 10                        # change divide by 20 instead of 10
            lr = x / 10                        # change divide by 20 instead of 10
…
            if abs(y) > 80:                    # change to if abs(y) > 200:
A dictionary with key-value pairs is a powerful way to organize data before exchanging it with another device. That’s the main reason why it took so few extra Python statements to add Gripper functionality to the existing Radio Tilt Controlled cyber:bot App.
Here are a few ideas for putting your Tilt Controlled Gripper cyber:bot to use and having some fun!
