Looking to create some audio that you can use in your Propeller Wavplayer projects? This helpful how-to will guide you through the steps to create WAV files that are compatible with your Propeller C or Spin applications. We will use the free Audacity software.
- Get the Audacity software (from SourceForge)
- Looking for pre-recorded files? See the Sound Library
- Need to reformat your audio files to WAV? See Formatting Audio Files for WAV Players
Record Your Own Audio
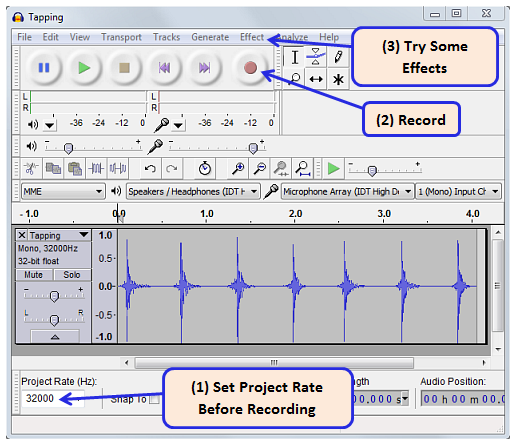
The above graphic shows the Audacity window.
- Set the Project Rate to 32000 before recording your audio.
- If you need to, select the speaker and microphone devices you want to use from the Device ToolBar.
- If you need to, adjust microphone volume settings on the Mixer ToolBar.
- Record your audio. Press the round button to start, square button to stop, and triangle button to play back.
- Play around with some effects to get the sound you want (see Tips for Better Audio, below).
- Make sure your file is set as Mono. If it isn't, change the track from stereo to mono by clicking the Tracks menu and selecting Stereo Track to Mono.
- Under File, click Select Export.
- Save as type to "WAV (Microsoft) signed 16 bit PCM".
- Name the file with 8 characters or fewer, no spaces or symbols allowed. This is important so the Propeller code can find the file on an SD card.
- When the Edit Metadata dialog box appears, make sure all fields are blank and click "Ok".
After following these steps you should have an audio file that is ready to be loaded onto your microSD card and used in your project! Here are some examples of how to do this:
- Propeller C: Play WAV Files tutorial
- Spin: Juke-Bots Propeller Robots project
Tips for Better Audio
- If you are recording in a noisy environment and don't want the excess background noise to be a part of your audio, try the Noise Removal... feature under the Effects window.
- Some sounds and effects can be quickly and easily added to your file by using the selections under the Generate menu at the top of the window. Add noise, chirps, etc!