Playing WAV files can enhance your project with music, a variety of tones, voice recordings, or even sound effects. The multicore Propeller chip is particularly well suited to playing WAV files because it can use a couple of its cores for reading the SD card and D/A conversion, while other cores can adjust the playback volume, change files, or even execute code for sensors or displays.
Circuit
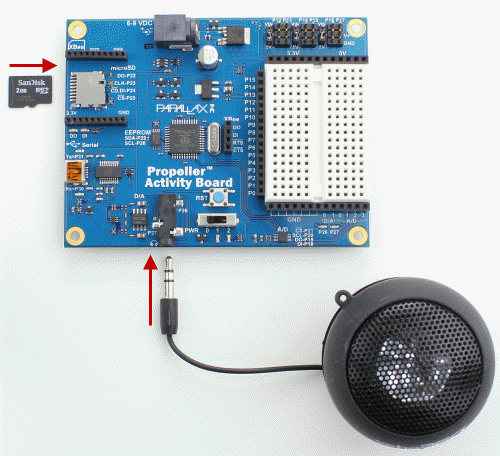
The Propeller Activity Board (original or WX version) has built-in audio D/A amplifiers and a microSD card holder. The Propeller microcontroller can fetch the audio data off the card, and use the D/A amplifiers to play back the sounds.
Parts
(1) FAT32 formatted microSD card (we used the preformatted microSD Parallax #32319; other SD cards might not provide the same sound quality)
(1) speaker or headphones with 3.5 mm plug (we used the Veho speaker, Parallax #900-00018)
- Insert a microSD card into the Propeller Activity Board’s microSD slot.
- Plug in a speaker or headphones into the headphone jack.
This lesson was written for the Propeller Activity Board (original or WX version). It will also work with the Propeller Board of Education. If using a different Propeller development board, connect the card reader to the Propeller I/O pins listed below in How it Works, or update the int variables at the beginning of Test WAV Volume.c to match your circuit.
Audio Test
The wavplayer library is designed for 16-bit PCM, 32 kHz, mono WAV files. A good source of free WAV files is www.freesound.org. Audacity is an excellent audio editor for converting other files to this format.
- Click SimpleIDE’s Open Project button.
- Open Test WAV Volume from ...Documents\SimpleIDE\Learn\Examples\Devices\Audio.
Before running this program, Let’s download a sample WAV file and load it into the SD card. (Hint: to keep from simply playing the WAV file with your browser, right-click the link and choose Save Link As... or Download Linked File.)
- Download techloop.wav
- Save it to … Documents\SimpleIDE\Learn\Examples\Devices\Audio
- In SimpleIDE, click Program and select File to SD Card. Click on techloop.wav, and then click Open. It will take about 1 ½ minutes for the file to load.
Now, let’s test the playback. The Test WAV volume application plays at a volume of 6 (out of 10) for 3.5 seconds, then a volume of 4 for 2 more seconds, then a volume of 8 for 3.5 seconds, before stopping the playback.
- Click the Load EEPROM & Run button.
- Use a speaker or headphones to verify playback.
Looking for pre-formatted, ready-to-use audio files? See our Sound Library
Want to create your own audio files? See Creating Audio Files for WAV Players
Need to reformat audio to WAV? See Formatting Audio Files for WAV Players
How it Works
This project includes simpletools.h and wavplayer.h.
First, four int variables are named and initialized for the microSD card's pads, and the Propeller I/O pins they connect to through the board's card socket: int DO = 22, CLK = 23, DI = 24, CS = 25;
Then, a call to sd_ mount accesses the SD card’s file system, using these variables by name: sd_mount(DO, CLK, DI, CS);. (We could have just called sd_mount(22, 23, 24, 25), but named variables makes the code easier to understand and adapt if you are not using a Propeller Activity Board.)
After that, const char techloop[] = {“techloop.wav”} creates a character array with 12 slots, and fills them with the characters t e c h l o o p . w a v. This array gets passed to the wav player with wav_play(techloop).
When the WAV player receives that string of characters, it searches for a file with that name in SD card’s root directory. It then opens the file, reads the header information about data rate, bits per sample, and other details. Then, it launches two more Propeller cores, or cogs.
One cog fetches the D/A values from the WAV file and store them in an array. The second cog grabs values from that array, and uses them to set the D/A converter output.
That second cog updates its D/A output by reading the values in the array at a rate of 32,000 times per second, and updating the D/A converter's output with each D/A value from the WAV file.
When the WAV file is playing, calls to wav_volume change the volume setting. This function's vol parameter accepts integers in the range of 0 to 10.
Finally, a call to pause sets the play time for that particular volume. Note that each call to wav_play also needs a call to wav_volume (either before or after). Each call to wav_play also needs to be followed by a pause. The call to pause dictates how long the wav file will play. To hear an entire wav file, the call to pause must be about 900 ms longer than the length of the file.
/*
  Test WAV Volume.c

  Play back a .wav file and try a few different volume settings.
*/

#include "simpletools.h"
#include "wavplayer.h"

int main()                                        // main function
{
  int DO = 22, CLK = 23, DI = 24, CS = 25;        // SD I/O pins
  sd_mount(DO, CLK, DI, CS);                      // Mount SD card

  const char techloop[] = {"techloop.wav"};       // Set up techloop string
  wav_play(techloop);                             // Pass to wav player

  wav_volume(6);                                  // Adjust volume
  pause(3500);                                    // Play for 3.5 s
  wav_volume(4);                                  // Repeat twice more
  pause(2000);
  wav_volume(8);
  pause(3500);

  wav_stop();                                      // Stop playing
}
Did You Know?
wavplayer library — This useful collection of functions also includes wav_playing to find out if the WAV file is still playing, and wav_stop to stop playback.
Switch tracks — You can call wav_play even if you are in the middle of playing back something else. The library will automatically stop what it’s playing and then start playing the next one.
More WAV files to play with — Our Sound Library is not a C library, but a small collection of ready-to-use WAV files, links to other sites with public domain sounds, and instructions for using Audacity to format audio files for use with Propeller projects.
Thank you, sonicspot.com — The WAV player was developed with information about WAV files from this very helpful page: http://www.sonicspot.com/guide/wavefiles.html
Try This - if you have a PING))) sensor
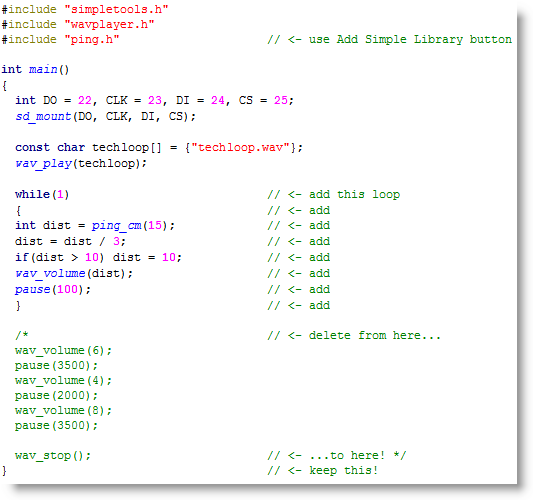
Since the WAV file is playing in other cogs, your code is free to work on other things, such as checking sensors. Here is an example where the volume is set by a measurement from a PING))) Ultrasonic Distance Sensor. We'll add the ping library to our project by adding the #include “ping.h” directive to our code.
(Note: you must be using SimpleIDE 0.9.4 or later to have #include automatically add a library to your project, for earlier versions use the Add Simple Library button)
- Use the circuit in Sense Distance with PING))) to add the sensor to your board.
- Use the Save Project As button to save a copy of your project in …Documents\SimpleIDE\My Projects.
- Type the #include "ping.h" library call in your code. (This requires SimpleIDE 0.9.40 or later, making it no longer necessary to use the Add Simple Library button for pre-existing libraries).
- Modify the main function as shown below.
- Run the program, and move your hand back and forth in front of the Ping))) sensor. When the cmDist value is small, the music is quiet, and when it’s large, the music is louder.
Your Turn
- Use Audacity to make a couple of 16-bit PCM, 32 kHz, mono WAV file recordings of yourself saying different things. Then, set up the pushbutton circuits from Check Pushbuttons to select which phrase to say.