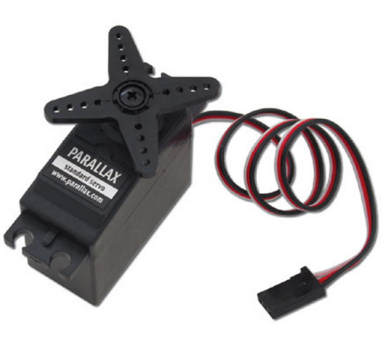
A hobby servo is a small device that controls the position of flaps, rudders, and steering in many radio-controlled toy planes, boats, and cars. The Parallax Standard Servo is a hobby servo, and it’s also useful in many robotics and animatronics projects. Since it can both move to and hold a position, it is ideal for tasks like rotating a distance sensor or controlling the fingers in a robotic hand.
This tutorial will show you how to make a servo hold three different positions, and then guides you through creating smooth, continuous motion through small, evenly-timed changes in position.
Circuit
Parts
(1) Parallax Standard Servo (#900-00005)
(1) 3” Jumper Wire (#800-00016)
(1) Power supply. Options include:
- 4-cell AA battery pack (#700-00038) with 1.5 V batteries
- 5-cell AA battery pack (#753-00007) with 1.2 or 1.5 V batteries
- 7.5 V 1 A Power Supply (#750-00009)
- Li-ion Boe-Bot Power Pack-Charger (#28988) with 7.5 V Li-Ion batteries
Supply Settings
A servo can draw more current than a USB port can supply, so you’ll need to plug an external power supply into the Activity Board’s 6 to 9 V power jack. Since the Parallax Standard Servo is rated for a 4 to 6 V supply, you may also need to move the Activity Board’s servo port power jumper settings to regulated 5V.
There are three pins to the immediate left of each pair of servo ports on the Propeller Activity Board (original or WX version). A small metal and plastic jumper can connect the middle pin to either the top or the bottom power pin. This is the power-select jumper for that pair of servo ports. When the jumper is over the bottom and middle pins, the pair ports' V+ pins receive 5 VDC through the board's voltage regulator. When the jumper is over the middle and top pins, the ports' V+ pins receive unregulated voltage directly from the power supply connected to the board.
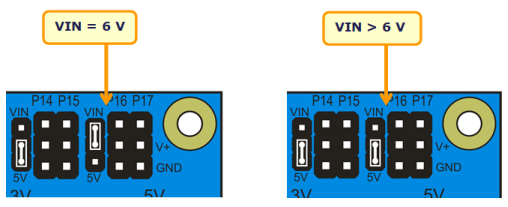
- If your power supply is 6 V or less, set the power-select jumper for the P16 servo port to 5V - this is safe for all power options listed above.
- If you are using a 4-cell battery pack (or are sure your power supply is 6 V or less) you may set the P16 servo port jumper to VIN - this is safe for the 4-cell battery pack.
Servo Angle Marker
It helps to make some sort of angle marker on the turning part of the servo (called its control horn) to know what position it is in. A jumper wire is handy for this.
- Find the middle of the servo’s range by gently twisting the horn right and left to find the mechanical stops, then positioning it in the middle of its range.
- Twist the wire through the top two holes at the center of its range to mark the "middle" position. When finished, it will most likely look something like the figure below.

Setup
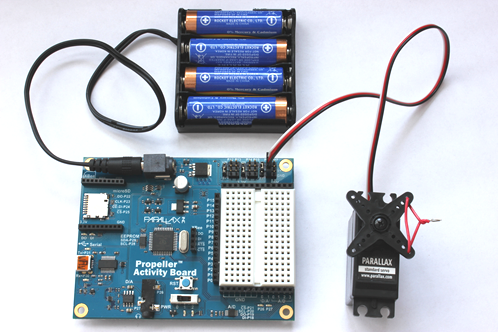
- Build the circuit as shown below.
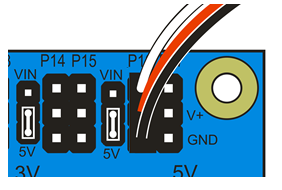
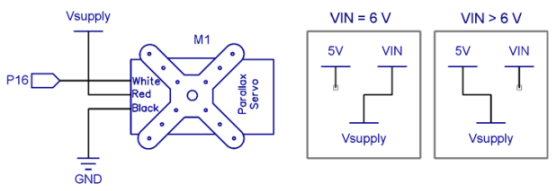
- Plug in your external supply.
- When you’re done, make sure your setup looks something like the one below.
If you haven't already installed the latest USB driver, SimpleIDE, or Learn folder, go to Propeller C - Set up SimpleIDE and Propeller C - Start Simple.
Test Code
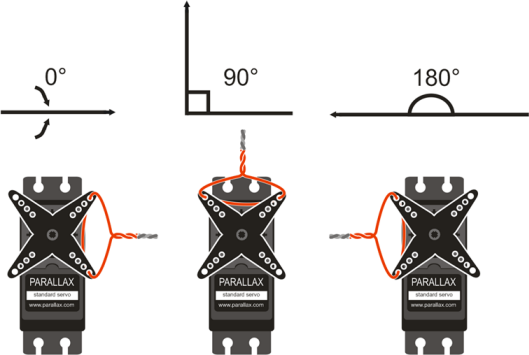
The servo test code will move the servo to the three positions shown below (0°, 90°, and 180° ) with three seconds to move between and hold each position. While the program is running, the servo will resist any attempt to move it out of position. When the program finishes, the servo will stop resisting.
- Click SimpleIDE’s Open Project button.
- Navigate to ...\Documents\SimpleIDE\Learn\Examples\Devices\Motor\Servo and open on Standard Servo Position.side
- Click the Load RAM & Run button.
- Verify the servo holds the 0° position, then 90° position, and then the 180° position, each for about 3 seconds.
- Try modifying the program to make the servo hold a 45° angle and a 135° angle. Verify it works as you would expect.
How it Works
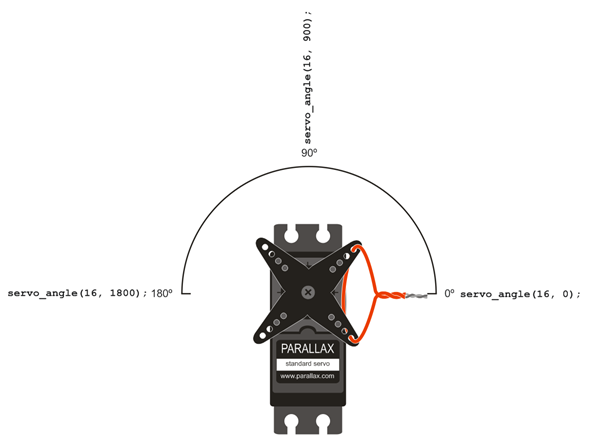
The servo_angle() function call takes two parameters: the pin the servo is connected to and the servo angle in tenths of a degree. For example, to make the servo connected to P16 turn to 90 degrees, the program uses servo_angle(16, 900). Keep in mind servo_angle() does not wait for the servo to get into position—it is necessary to include a pause for the servo to reach the desired position before setting a new angle.
/*
  Standard Servo Position.c

  Moves servo to 0, 90 and 180 degrees.  Holds each position for 3 s.
  Connect servo to P16 port on Propeller Activity Board.
*/

#include "simpletools.h"                      // Include simpletools header
#include "servo.h"                            // Include servo header

int main()                                    // main function
{
  servo_angle(16, 0);                         // P16 servo to 0 degrees
  pause(3000);                                // ...for 3 seconds
  servo_angle(16, 900);                       // P16 servo to 90 degrees
  pause(3000);                                // ...for 3 seconds
  servo_angle(16, 1800);                      // P16 servo to 180 degrees
  pause(3000);                                // ...for 3 seconds
  servo_stop();                               // Stop servo process
}
Did You Know?

Satellite dish image source: https://commons.wikimedia.org/wiki/File:Goldstone_DSN_antenna.jpg
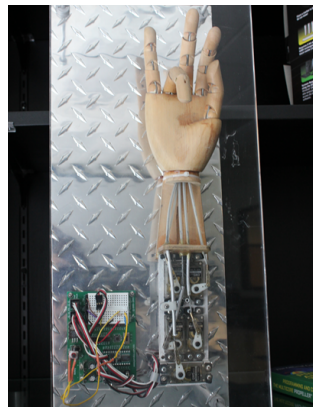
Servos aren’t just for hobbies. Much larger servos are used to precisely aim the position of huge satellite dishes towards extraterrestrial targets, like those in the Deep Space Network (above, left). Additionally, most robotic hands (like the one above that is preparing to make sign for number 7 in ASL, right, though it can't quite reach since the palm is not articulated.) are actuated by servos. Depending on how many independent degrees of freedom the hand has, it could use dozens of servos! The hand above is actuated using five standard servos.
Try This
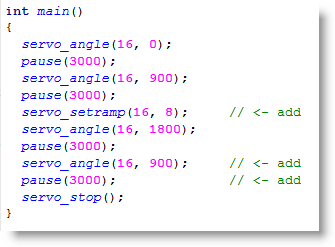
Let’s use a feature called ramping to make the servo move to new positions gradually. Ramping “cushions” or “smooths-out” the servo’s responses to large or sudden changes in sensor measurements by limiting how much it can change position over a given amount of time. This servo control library's servo_setramp() function takes two parameters: the servo’s pin, and the speed at which the servo will change in tenths of a degree per 50th of a second.
Once servo_setramp() is called, every servo_angle() call that follows it will move at the rate set by servo_setramp. Without this command, the servo will always move to new positions at its maximum speed. In this example, the servo will move to its first two positions at full speed just like it did in the program above. Then servo_setramp(16, 8) will slow it down to .8° per 50th of a second as it moves to the last two positions.
- Use the Save Project As button to save a copy of your project in …Documents\SimpleIDE\My Projects.
- Modify the main function as shown below.
- Run the program and watch the servo as it turns rapidly to the first two positions then gradually to the next two.
In this example, the servo moved from 180 degrees back to 90 degrees more gradually because of servo_setramp(), but it still made it there and paused. What do you think would happen if you changed the rate to .5 degrees per 50th of a second? Would the servo make it to 180 degrees before turning back? Try it!
Your Turn
Imagine you’re the engineer in charge of animatronic devices at an amusement park. Let’s say one exhibit contains two servos for its face, and needs to display five expressions, one each thirty seconds. One way to do this would be by storing these expressions in two arrays (one for each servo).
If you haven’t worked with array variables before, check out the Array Variables tutorial. Then, try the Index Array Variables tutorial and pay close attention to how the code loops through an array using a for loop and then uses print() to display the values. Instead of displaying the values in the arrays with print(), you can send them to a servo with servo_angle().
Here is some code where we give print() p[i] as an input. Think about how you would change print() to servo_angle() so that it uses the indexed array value p[1] as the angle, and keep in mind you’ll need to increase the pause.
 int p[] = {100, 200, 300, 500, 700, 1100};          // Initialize the array
 for(int i = 0; i < 6; i++)                          // Count i from 0 to 5
 {
   pause(500);                                       // 1/2 second pause
   print("p[%d] = %d\n", i, p[i]);                   // Display array element & value
 }
Add a P17 servo to your code. You can still test this code if you only have one servo. Run the code with the servo connected to P16 first, then turn off your board and switch the connection to P17. Run the test again to verify that if you had two servos, they would be working correctly and independently.