The first step in building running lights for the ELEV-8 v3 is to solder the surface-mount components to the printed circuit boards. If you don't know what to expect when reflow soldering, take time to watch some YouTube videos to understand how it works before proceeding.
Reflow Soldering Instructions
- First, put on your safety eyewear.
- Lay out your boards on a hard, flat surface. You will be using your syringe of ChipQuick to apply solder to the exposed pads on each PCB.
- Carefully squeeze a small amount of soldering paste onto each of the exposed pads as shown in the photograph below:

If you accidentally add too much soldering paste, wipe the excess away with a paper towel or cotton swab. Do not try to wash the soldering paste away with water or cleaning solution. It is okay if it is messy or smeared - simply leave the smudge for now, since it is much easier to remove after the PCBs have been reflowed later in this tutorial.
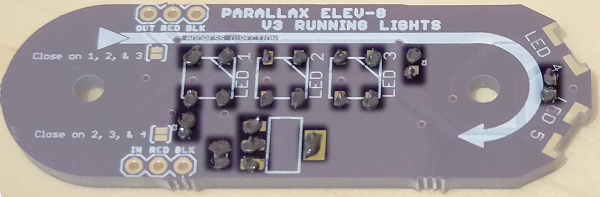
- Next, use the tweezer or needle-nosed pliers to place each surface mount (SMD) component on the PCBs as shown in the photo below:
- The capacitors can be installed in either direction.
- The LEDs have a small notch in one corner that must be matched up with the triangle in the corner of the white printing on the PCBs - if you install them backwards the LED (and every LED after in the chain) will fail.
- The voltage regulator can only be installed in one direction.


Once the SMD components have been placed on the PCBs, they are ready to be reflowed.
If you are using an electric skillet:
- Set the temperature to 350° F and let the skillet warm up.
- Using your tweezers or pliers, carefully set one of the PCBs on the skillet and wait for the solder to melt.
- Quickly check each component to make sure it is aligned properly before removing the board.
- If one of the components has slid away or moved, use your tweezers to nudge it back into place.
- Once the components are all in place, carefully remove the PCB and let it cool.
- Repeat this process for each PCB.
If you are using a heat gun:
- Place the PCB on a surface that can be safely heated to 400° F such as a baking sheet over oven mits, a baking stone, or a ceramic tile.
- Hold the heat gun approximately one inch above the PCB and wait for the soldering paste to melt.
- Once solder in the area you are heating has melted, slowly move the heat gun across the board until all of the components have been soldered to the PCB.
- If any of the components have shifted or are not properly aligned, re-heat the solder until it melts and use your tweezers to nudge the component back into place.
Reminder! Once an electric frying pan, baking pan, pizza stone, or other kitchen utensil has been used for soldering, do not ever use it for preparing food again! Solder and soldering paste can be hazardous to ingest.