Skip to content
Parallax Learn

Parallax Learn

  • Welcome
  • Tutorials
        • Tutorial Series head tag

          Tutorial Series
        • Tutorial Series

          The special, classroom-ready series pages are organized collections of tutorials for our most popular hardware and/or languages. The tutorials for each topic are conveniently accessible from a single page, shown in the order it is recommended that they be completed.
        • Robotics Series Head tag

          Robotics Series
        • Robotics Series

          • Artificial Intelligence
          • Cybersecurity: Radio Data tutorialCybersecurity
          • cyber:bot + Python
          • cyber:bot + MakeCode
          • Boe-Bot Tutorial SeriesBoe-Bot
          • Arduino Shield-Bot
          • ActivityBot with C TutorialsActivityBot + C
          • ActivityBot with BlocklyProp Tutorial SeriesActivityBot + BlocklyProp
          • Scribbler 3 Tutorial SeriesScribbler 3
        • Electronics & Programming Series Head tag

          Electronics & Programming Series
          • BS2 Board of Education Tutorial SeriesBS2 Board of Education
          • Propeller C-Language BasicsPropeller C Basics
          • FLiP Try-It Kit C Tutorial SeriesFLiP Try-It Kit + C
          • FLiP Try-It Kit BlocklyProp TutorialsFLiP Try-It Kit + BlocklyProp
          • Badge WX Tutorial SeriesBadge WX
          • Propeller BlocklyProp Basics and ProjectsPropeller BlocklyProp Basics
          • View All Tutorial Series »
        • Browse Tutorials
        • Browse Tutorials

          Individual tutorials sorted by robot or kit, and language.
        • By Robot or Kit
          • ActivityBot
          • SumoBot WX
          • Boe-Bot
          • Shield-Bot
          • cyber:bot
          • Badge WX
          • ELEV-8
          • ARLO
        • By Language
        • By Language

          • Propeller C
          • Arduino
          • BlocklyProp
          • PBASIC
          • Python
          • MakeCode
          • View All Tutorials »
  • Educators
  • Reference
  • Downloads
  • Home
  • All Courses

Propeller C Programming with the ActivityBot 360°

Curriculum

  • 1 Section
  • 42 Lessons
  • Lifetime
Expand all sectionsCollapse all sections
  • Propeller C Programming with the ActivityBot 360°
    42
    • 1.1
      Mechanical Assembly
    • 1.2
      Check your Hardware
    • 1.3
      Prepare the Tires
    • 1.4
      Prepare the Chassis
    • 1.5
      Prepare the Servos
    • 1.6
      Mount the Right Servo
    • 1.7
      Mount the Left Servo
    • 1.8
      Mount the Battery Pack
    • 1.9
      Mount the Tail Wheel
    • 1.10
      Mount the Drive Wheels
    • 1.11
      Mount the Activity Board WX
    • 1.12
      Electrical Connections
    • 1.13
      Software and Programming
    • 1.14
      Circuit Practice
    • 1.15
      Powering & Connecting Circuits
    • 1.16
      Blinks
    • 1.17
      Beeps
    • 1.18
      Navigation Basics
    • 1.19
      Test the Feedback 360° Servos
    • 1.20
      Calibrate the ActivityBot 360°
    • 1.21
      Go Certain Distances
    • 1.22
      Set Certain Speeds
    • 1.23
      Navigate by Touch
    • 1.24
      Build the Whiskers
    • 1.25
      Test the Whiskers
    • 1.26
      Inside the Whisker Circuit (Optional)
    • 1.27
      Add Whisker Indicator Lights
    • 1.28
      Whisker-Wheel Response
    • 1.29
      Roaming with Whiskers
    • 1.30
      Navigate by Ultrasound
    • 1.31
      Build and Test the Ping))) Sensor Circuit
    • 1.32
      Roaming with Ultrasound
    • 1.33
      Follow Objects with Ultrasound
    • 1.34
      Navigate by Visible Light
    • 1.35
      Meet the Photoransistor
    • 1.36
      Build the Light Sensor Circuits
    • 1.37
      Using the Measurements
    • 1.38
      Roaming with Light Sensors
    • 1.39
      Navigate by Infrared Flashlights
    • 1.40
      Build the IR Sensor Circuits
    • 1.41
      Test the IR Sensor Circuits
    • 1.42
      Roaming with Infrared Flashlights

Electrical Connections

Gather the Parts

For this construction step, you will need:
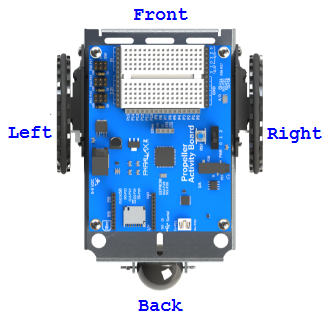
  • Assembled robot
  • (5) 1.5 V AA batteries – don’t put them in yet!
  • Needle-nose pliers – optional but helpful
  • Masking tape
  • Pen

Battery Type Matters!

The Feedback 360° servos do best 6 to 8 volts.  Five alkaline batteries provide 5 x 1.5 V = 7.5 V.  Five NiMH batteries provide 5 x 1.2 V = 6 V.  NiMH batteries perform well, but Ni-Cad rechargeable batteries do not perform well in this application and are not recommended.


Label the Cables

  • Put a masking tape label on the end of each encoder cable and servo cable, near the 3-pin socket.
  • Trace each cable back to its origin to see what it is connected to.
  • Label each cable Right or Left, Encoder or Servo. 


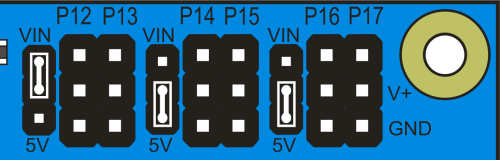
Prepare the Servo Ports

Each pair of 3-pin servo ports along the top of the Propeller Activity Board (original or WX version) has a jumper on power-select pins to its immediate left. 

Important! Make sure there are no cables plugged into the board.  Moving jumpers with power connected could damage your board.

  • Unplug the USB cable and battery pack if you have either of them plugged into the board.
  • Move the shunt jumpers into the configuration shown below. (If your jumpers don’t have a little tab on them, needle-nose pliers will help.)
  • P12 & P13: VIN
    P14 & P15: 5V
    P16 & P17, 5V

Missing a Voltage Selection Jumper? Replacements are available  – contact our sales department to order part #452-00043; there are three per board.


Plug In the Cables

The servos and the external encoders have 3-wire cables: white = signal, red = power, black = ground.  When plugging these cables into servo headers, be sure to align white wires with the I/O pin labels along the top of the board, and the black wires along the row labeled GND.

The Feedback 360° servo also has a single yellow encoder feedback signal wire, which plugs onto a separate servo header’s I/O pin – closest to the top edge of the board.

  • Plug the servo’s white-red-black cables into these servo ports
    P12: Left Servo
    P13: Right Servo
  • Plug the encoders into these servo ports, making sure the white or yellow signal line connects to the port’s I/O pin – closest to the top of the breadboard.
    P14: Left Encoder
    P15: Right Encoder

With external encoders (left/top);  with Feedback 360° servos (right/bottom)


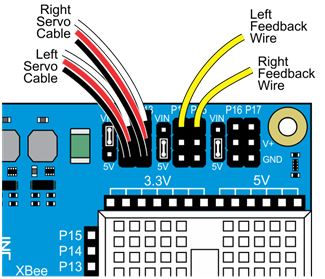
*P14/P15 resistors (shown on left) are only needed for ActivityBot kits using External Encoders (#32500).


Double-check your Connections

  • P12 & P13 servo port shunt jumper — Set to VIN
  • P14 & P15: servo port shunt jumper — Set to 5V
  • Left servo cable — P12 servo port
  • Right servo cable — P13 servo port
  • Left feedback wire — P14 servo port I/O pin, closest to the edge of the board
  • Right feedback wire — P15 servo port I/O pin, closest to the edge of the board


Insert the Batteries

  • Place five 1.5 V AA batteries into the battery pack. 
  • Plug the battery pack’s barrel plug into the Propeller Activity Board’s (original or WX version) barrel jack.

Printer-friendly version
Mount the Activity Board WX
Prev
Software and Programming
Next

DISCUSSION FORUMS | PARALLAX INC. STORE

About | Terms of Use | Feedback: learn@parallax.com | Copyright©Parallax Inc. 2024

© 2026 Parallax Learn • Built with GeneratePress