Skip to content
Parallax Learn

Parallax Learn

  • Welcome
  • Tutorials
        • Tutorial Series head tag

          Tutorial Series
        • Tutorial Series

          The special, classroom-ready series pages are organized collections of tutorials for our most popular hardware and/or languages. The tutorials for each topic are conveniently accessible from a single page, shown in the order it is recommended that they be completed.
        • Robotics Series Head tag

          Robotics Series
        • Robotics Series

          • Artificial Intelligence
          • Cybersecurity: Radio Data tutorialCybersecurity
          • cyber:bot + Python
          • cyber:bot + MakeCode
          • Boe-Bot Tutorial SeriesBoe-Bot
          • Arduino Shield-Bot
          • ActivityBot with C TutorialsActivityBot + C
          • ActivityBot with BlocklyProp Tutorial SeriesActivityBot + BlocklyProp
          • Scribbler 3 Tutorial SeriesScribbler 3
        • Electronics & Programming Series Head tag

          Electronics & Programming Series
          • BS2 Board of Education Tutorial SeriesBS2 Board of Education
          • Propeller C-Language BasicsPropeller C Basics
          • FLiP Try-It Kit C Tutorial SeriesFLiP Try-It Kit + C
          • FLiP Try-It Kit BlocklyProp TutorialsFLiP Try-It Kit + BlocklyProp
          • Badge WX Tutorial SeriesBadge WX
          • Propeller BlocklyProp Basics and ProjectsPropeller BlocklyProp Basics
          • View All Tutorial Series »
        • Browse Tutorials
        • Browse Tutorials

          Individual tutorials sorted by robot or kit, and language.
        • By Robot or Kit
          • ActivityBot
          • SumoBot WX
          • Boe-Bot
          • Shield-Bot
          • cyber:bot
          • Badge WX
          • ELEV-8
          • ARLO
        • By Language
        • By Language

          • Propeller C
          • Arduino
          • BlocklyProp
          • PBASIC
          • Python
          • MakeCode
          • View All Tutorials »
  • Educators
  • Reference
  • Downloads
  • Home
  • All Courses

Propeller C Programming with the ActivityBot 360°

Curriculum

  • 1 Section
  • 42 Lessons
  • Lifetime
Expand all sectionsCollapse all sections
  • Propeller C Programming with the ActivityBot 360°
    42
    • 1.1
      Mechanical Assembly
    • 1.2
      Check your Hardware
    • 1.3
      Prepare the Tires
    • 1.4
      Prepare the Chassis
    • 1.5
      Prepare the Servos
    • 1.6
      Mount the Right Servo
    • 1.7
      Mount the Left Servo
    • 1.8
      Mount the Battery Pack
    • 1.9
      Mount the Tail Wheel
    • 1.10
      Mount the Drive Wheels
    • 1.11
      Mount the Activity Board WX
    • 1.12
      Electrical Connections
    • 1.13
      Software and Programming
    • 1.14
      Circuit Practice
    • 1.15
      Powering & Connecting Circuits
    • 1.16
      Blinks
    • 1.17
      Beeps
    • 1.18
      Navigation Basics
    • 1.19
      Test the Feedback 360° Servos
    • 1.20
      Calibrate the ActivityBot 360°
    • 1.21
      Go Certain Distances
    • 1.22
      Set Certain Speeds
    • 1.23
      Navigate by Touch
    • 1.24
      Build the Whiskers
    • 1.25
      Test the Whiskers
    • 1.26
      Inside the Whisker Circuit (Optional)
    • 1.27
      Add Whisker Indicator Lights
    • 1.28
      Whisker-Wheel Response
    • 1.29
      Roaming with Whiskers
    • 1.30
      Navigate by Ultrasound
    • 1.31
      Build and Test the Ping))) Sensor Circuit
    • 1.32
      Roaming with Ultrasound
    • 1.33
      Follow Objects with Ultrasound
    • 1.34
      Navigate by Visible Light
    • 1.35
      Meet the Photoransistor
    • 1.36
      Build the Light Sensor Circuits
    • 1.37
      Using the Measurements
    • 1.38
      Roaming with Light Sensors
    • 1.39
      Navigate by Infrared Flashlights
    • 1.40
      Build the IR Sensor Circuits
    • 1.41
      Test the IR Sensor Circuits
    • 1.42
      Roaming with Infrared Flashlights

Mount the Battery Pack

Parts List

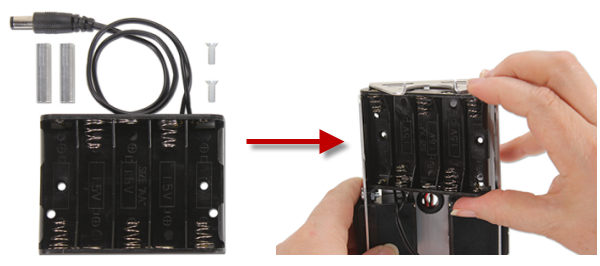
(2)  Nylon flat-head slotted screws, 3/8″ 4-40
(2)  1″ standoffs (removed from BOE Shield previously)
(1) 5-cell battery pack with 2.1 mm center-positive plug
Instructions

  • Place the empty battery pack inside the chassis positioned as shown. The easiest method is to insert one side, then press down on the other side until it is flush with the chassis. The fit may be snug, but it should snap into place using a small amount of force (below).
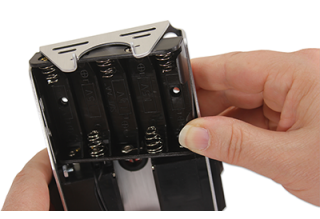
  • Insert the two Nylon flat-head screws through the inside of the battery pack. Use the smaller set of holes that line up with the chassis mounting holes for the front standoffs, shown by the arrows.
  • From the top of the chassis, thread a 1″ standoff on each screw and tighten.
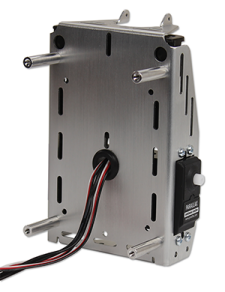
  • Pull the battery pack’s power cord and servo lines through the rubber grommet hole in the center of the chassis, as shown below.

Printer-friendly version

DISCUSSION FORUMS | PARALLAX INC. STORE

About | Terms of Use | Feedback: learn@parallax.com | Copyright©Parallax Inc. 2024

© 2026 Parallax Learn • Built with GeneratePress