Skip to content
Parallax Learn

Parallax Learn

  • Welcome
  • Tutorials
        • Tutorial Series head tag

          Tutorial Series
        • Tutorial Series

          The special, classroom-ready series pages are organized collections of tutorials for our most popular hardware and/or languages. The tutorials for each topic are conveniently accessible from a single page, shown in the order it is recommended that they be completed.
        • Robotics Series Head tag

          Robotics Series
        • Robotics Series

          • Artificial Intelligence
          • Cybersecurity: Radio Data tutorialCybersecurity
          • cyber:bot + Python
          • cyber:bot + MakeCode
          • Boe-Bot Tutorial SeriesBoe-Bot
          • Arduino Shield-Bot
          • ActivityBot with C TutorialsActivityBot + C
          • ActivityBot with BlocklyProp Tutorial SeriesActivityBot + BlocklyProp
          • Scribbler 3 Tutorial SeriesScribbler 3
        • Electronics & Programming Series Head tag

          Electronics & Programming Series
          • BS2 Board of Education Tutorial SeriesBS2 Board of Education
          • Propeller C-Language BasicsPropeller C Basics
          • FLiP Try-It Kit C Tutorial SeriesFLiP Try-It Kit + C
          • FLiP Try-It Kit BlocklyProp TutorialsFLiP Try-It Kit + BlocklyProp
          • Badge WX Tutorial SeriesBadge WX
          • Propeller BlocklyProp Basics and ProjectsPropeller BlocklyProp Basics
          • View All Tutorial Series »
        • Browse Tutorials
        • Browse Tutorials

          Individual tutorials sorted by robot or kit, and language.
        • By Robot or Kit
          • ActivityBot
          • SumoBot WX
          • Boe-Bot
          • Shield-Bot
          • cyber:bot
          • Badge WX
          • ELEV-8
          • ARLO
        • By Language
        • By Language

          • Propeller C
          • Arduino
          • BlocklyProp
          • PBASIC
          • Python
          • MakeCode
          • View All Tutorials »
  • Educators
  • Reference
  • Downloads
  • Home
  • All Courses

Tilt-Controlled Gripper with the cyber:bot Robot

Curriculum

  • 1 Section
  • 14 Lessons
  • Lifetime
Expand all sectionsCollapse all sections
  • Tilt-Controlled Gripper with the cyber:bot Robot
    14
    • 1.0
      Test and Tune the Gripper
    • 1.1
      Gripper Test Project
    • 1.2
      Troubleshooting your Gripper
    • 1.3
      How The Gripper Test Works
    • 1.4
      Automatic Open and Close
    • 1.5
      Go and Get an Object
    • 1.6
      Project and Tests
    • 1.7
      How The Test Project Works
    • 1.8
      Put the Object Back
    • 1.9
      Tilt Controlled cyber:bot with Gripper Control
    • 1.10
      Project for Tilt & Grip cyber:bot
    • 1.11
      Project for Tilt & Grip Controller
    • 1.12
      Test the Tilt-Controlled Gripper
    • 1.13
      Tune and Organize the Project Code

Project and Tests

Project: cyber_bot_gripper_forward_object

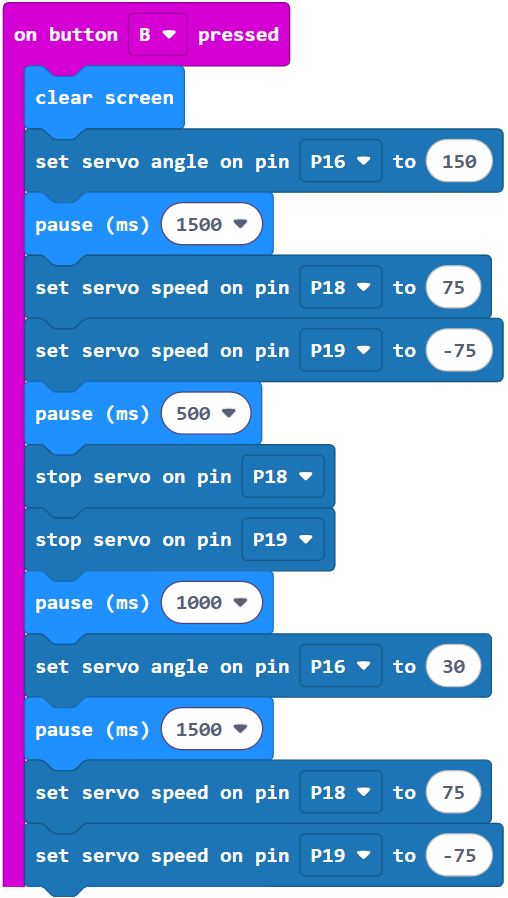
This project makes the Gripper-equipped cyber:bot:

  • roll forward for 0.5 seconds,
  • pick up an object,
  • roll forward for another 1.25 seconds,
  • set down the object,
  • and back up for 0.5 seconds.

Let’s give it a try.

  • Right-click the cyber_bot_gripper_forward_object.hex link below, choose Save As, and then save the file to your computer.

cyber_bot_gripper_forward_object.hex

  • Open the saved file with the micro:bit Makecode Editor.
  • Plug the battery pack’s barrel plug into the cyber:bot board’s barrel jack.
  • Set the cyber:bot board’s PWR switch to 0.
  • Click Download.

Tests

Your cyber:bot robot might curve to the left or the right during these maneuvers. If it does, it can be straightened by slowing the servo that’s going faster and causing the curve. A remedy for this is included in the step-by-step instructions below.

  • Disconnect the USB from the cyber:bot robot’s micro:bit module.
  • Set the PWR switch to 2.
  • Press/release the micro:bit module’s B button and verify that:
    • The cyber:bot rolls forward half a second and then stops.
    • The Gripper paddles close and lift an object.
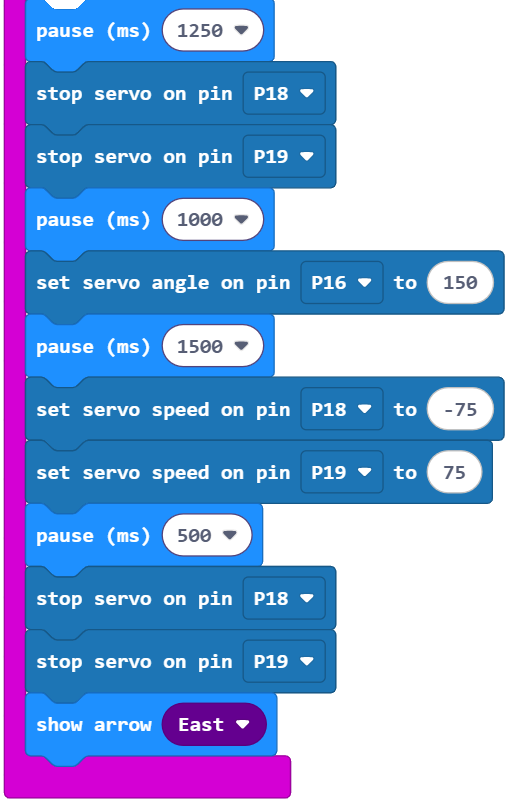
    • The cyber:bot rolls forward for another 1.25 seconds and then stops.
    • The Gripper paddles lower and open to set down and release the object.
    • The cyber:bot rolls backward for a half a second.
  • If the cyber:bot curved right, the 75 value in (Pin18) servo speed (75) can be reduced to straighten its travel. Try reducing the speed by increments of 5 until it travels straight ahead. If it starts curving the other direction, increase by smaller increments until you are satisfied with the cyber:bot robot’s trajectory.
  • If the cyber:bot curved to the left, the -75 value in(Pin19) servo speed (-75) will need to be reduced to straighten out its travel. Try -70, -65, etc. If one of the increments of 5 overcorrects, and it starts curving the other direction, back off by an increment of 2 and try again. Again, keep tuning until you are satisfied with the cyber:bot robot’s trajectory.
  • When you are done, set the cyber:bot board’s PWR switch to 0 to conserve battery power. 

Printer-friendly version
Go and Get an Object
Prev
How The Test Project Works
Next

DISCUSSION FORUMS | PARALLAX INC. STORE

About | Terms of Use | Feedback: learn@parallax.com | Copyright©Parallax Inc. 2024

© 2026 Parallax Learn • Built with GeneratePress