Skip to content
Parallax Learn

Parallax Learn

  • Welcome
  • Tutorials
        • Tutorial Series head tag

          Tutorial Series
        • Tutorial Series

          The special, classroom-ready series pages are organized collections of tutorials for our most popular hardware and/or languages. The tutorials for each topic are conveniently accessible from a single page, shown in the order it is recommended that they be completed.
        • Robotics Series Head tag

          Robotics Series
        • Robotics Series

          • Artificial Intelligence
          • Cybersecurity: Radio Data tutorialCybersecurity
          • cyber:bot + Python
          • cyber:bot + MakeCode
          • Boe-Bot Tutorial SeriesBoe-Bot
          • Arduino Shield-Bot
          • ActivityBot with C TutorialsActivityBot + C
          • ActivityBot with BlocklyProp Tutorial SeriesActivityBot + BlocklyProp
          • Scribbler 3 Tutorial SeriesScribbler 3
        • Electronics & Programming Series Head tag

          Electronics & Programming Series
          • BS2 Board of Education Tutorial SeriesBS2 Board of Education
          • Propeller C-Language BasicsPropeller C Basics
          • FLiP Try-It Kit C Tutorial SeriesFLiP Try-It Kit + C
          • FLiP Try-It Kit BlocklyProp TutorialsFLiP Try-It Kit + BlocklyProp
          • Badge WX Tutorial SeriesBadge WX
          • Propeller BlocklyProp Basics and ProjectsPropeller BlocklyProp Basics
          • View All Tutorial Series »
        • Browse Tutorials
        • Browse Tutorials

          Individual tutorials sorted by robot or kit, and language.
        • By Robot or Kit
          • ActivityBot
          • SumoBot WX
          • Boe-Bot
          • Shield-Bot
          • cyber:bot
          • Badge WX
          • ELEV-8
          • ARLO
        • By Language
        • By Language

          • Propeller C
          • Arduino
          • BlocklyProp
          • PBASIC
          • Python
          • MakeCode
          • View All Tutorials »
  • Educators
  • Reference
  • Downloads
  • Home
  • All Courses

Visual Metronome Project

Curriculum

  • 1 Section
  • 2 Lessons
  • Lifetime
Expand all sectionsCollapse all sections
  • Visual Metronome Project
    2
    • 1.0
      Metronome Assembly and Code Overview
    • 1.1
      Timing Specifics

Timing Specifics

System Counter and Wait Until Blocks

The Visual Metronome is all about timing. Most of the code is self-explanatory, but the use of these blocks in the metronomeTime processor should be understood since they manage the timing. Here’s how they work:

  1. Two variables are created. The QuarterMinute variable is equal to the system clock frequency multiplied by 15 – which works out to be 15 seconds. The tSync variable is the current value of the system counter – some value between 0 and 4,294,967,295 which rolls over (the actual number doesn’t matter since we’re only interested in elapsed time). These variables are only assigned once.

  2. The tempo is calculated in the repeat-forever loop. The HalfPeriod equal to QuarterMinute divided by (BPM beats per minute, dividied by two). Next, the tSync variable is calculated. It is set to tSync (the current value of the system counter, stored before the loop) plus the HalfPeriod. Knowing the half period is convenient for turning sound on and off, along with the lights.

  3. The code running in this loop is less than half of the period (a beat). When the loop is done, the wait until block is encountered and causes the program to stop until the next calculated period has elapsed (tSync).

Setting the Time Signature

The example code uses 4:4 (four beats per measure). To change this to 3:4 (triple time, as commonly used for the waltz and minuet) or 2:4 (duple, as used in polka or a march) you only need to change the loopCounter variable to the desired number of beats per measure.

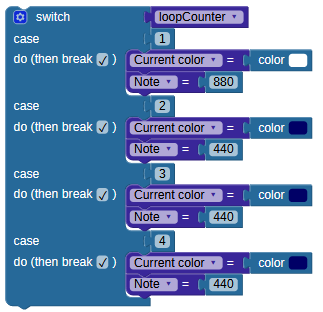
And, change the case statement to reflect the number of beats per measure and the colors set on the NeoPixels:

Effectiveness of the Visual Metronome

While I’m still struggling with keeping timing on the clarinet, it’s mostly a result of having stopped taking lessons though early tests show the Visual Metronome is a step in the right direction. I’m going to modify the beep to be a short “click” and use less intrusive colors as the next adjustment. Another change suggested by a Parallax engineer is to make the light tubes alternate between left and right, like a mechanical metronome swinging back and forth.

When I put it in front of my son he seemed to know what to do right away on the piano, as shown below.

Additional Learn Resources

  • Propeller BlocklyProp Reference for System Blocks
  • Precision Timing with the Propeller

Printer-friendly version
Metronome Assembly and Code Overview
Prev

DISCUSSION FORUMS | PARALLAX INC. STORE

About | Terms of Use | Feedback: learn@parallax.com | Copyright©Parallax Inc. 2024

© 2026 Parallax Learn • Built with GeneratePress