At this point, you might be wondering how to modify an existing script to make it work with Feedback 360° servos. For example, what if you wanted to update scripts from Touch Navigation for the cyber:bot [1] or maybe Cybersecurity: Radio Tilt Control [2]? In this activity, you will learn the simple steps for updating any cyber:bot application script to work with the Feedback 360° servos.
MEMORY WARNING! Your cyber:bot will need to use a micro:bit v2 or newer for most cyber:bot applications that use the F360° servos; the v1.5 micro:bit does not have enough memory.
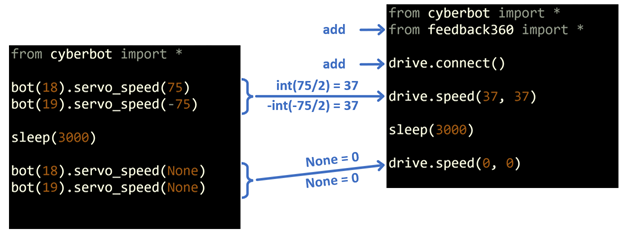
Here is a summary and diagram of how to adjust an existing cyber:bot script so that it runs with the Feedback 360° servos. Starting with the feedback_360_template.hex [3], add from feedback360 import * and drive.connect() just below from cyberbot import *. Then, any time you see bot(18).servo_speed(vL) and bot(19).servo_speed(vR), use the vL and vR values in drive.speed(int(vL/2), -int(vR/2)). The term int(vL/2) means divide the original vL by 2 and round down. The term int(-vR/2) means divide the original vR by 2 and round down, and take its negative value. Important: replace None with 0.
In this activity you will follow this procedure, broken into five steps. Examples with both constant values (like 75), and variables (like vL and vR) will be used. It should encompass just about any script you might want to adapt to your new Feedback 360° servos.
A cyber:bot robot [4] with two Feedback 360° High Speed Servos [5] installed following the instructions in the Swap and Test the Servos [6] section.
Here are the steps you can follow to adapt just about any existing cyber:bot application script to Feedback 360° servos.
Step 1: Download and start with the feedback_360_template.hex, and enter the original script. Note: the template already has the cyberbot and feedback360 modules added by the procedure in Add modules to your micro:bit. (Remember to always right-click and chose Save As to download hex files.)
Step 2: Add two lines just below from cyberbot import *:
from feedback360 import *
drive.connect()
Step 3: Take the vL and vR values from these two statements:
bot(18).servo_speed(vL)
bot(19).servo_speed(vR)
…and add this statement immediately below them:
drive.speed(int(vL/2), -int(vR/2))
IMPORTANT! If you see None as either the vL or vR value, replace it with 0.
NOTE: The term int(vL/2) means "divide by 2 and round down."
Step 4: Use the # symbol to comment the bot(18).servo_speed(vL) and bot(19).servo_speed(vR) statements.
Step 5 (optional): After you have verified that your adjustments work properly, optionally remove all the bot(18/19).servo_speed… calls.
Let’s start with a simple app, like forward_three_seconds from Forward and Backward in the Navigation with the cyber:bot chapter. After following the four steps, the updated script might look like forward_three_seconds_for_fb360 (below).
# forward_three_seconds_for_fb360

from cyberbot import *
from feedback360 import *           # <-- add

drive.connect()                     # <-- add

# bot(18).servo_speed(75)           # <-- comment Half speed forward
# bot(19).servo_speed(-75)          # <-- comment
drive.speed(37, 37)                 # <-- add

sleep(3000)                         # Wait three seconds

# bot(18).servo_speed(None)         # <-- comment Stop
# bot(19).servo_speed(None)         # <-- comment
drive.speed(0, 0)                   # <-- add
Again, here is a repeat of the summary and diagram of how to adjust an existing cyber:bot script so that it runs with the Feedback 360° servos.
Starting with the feedback_360_template.hex, add from feedback360 import * and drive.connect() just below from cyberbot import *. Then, any time you see bot(18).servo_speed(vL) and bot(19).servo_speed(vR), use the vL and vR values in drive.speed(int(vL/2), -int(vR/2)). The term int(vL/2) means "divide the original vL by 2 and round down." The term int(-vR/2) means "divide the original vR by 2 and round down, and take its negative value." Important: replace None with 0.
Next, let’s break it into steps, starting with an existing script to convert from Forward and Backward in the Navigation with the cyber:bot chapter.
# forward_three_seconds.py

from cyberbot import *

bot(18).servo_speed(75)             # Half speed forward
bot(19).servo_speed(-75)
sleep(3000)                         # Wait three seconds

bot(18).servo_speed(None)           # Stop
bot(19).servo_speed(None)
Now, let’s take a look at how the four steps were applied to this script. Read each of the step summaries and examine how they are incorporated into the script.
Step 1 is to start with the feedback_360_template.hex file and add the existing script, and Step 2 is to add from feedback360 import * and drive.connect() immediately below from cyberbot import *. This adds the necessary feedback360 module, and initializes the servos.
# forward_three_seconds_for_fb360

from cyberbot import *
from feedback360 import *           # <-- add

drive.connect()                     # <-- add
For Step 3, recall that the term int(vL/2) means "divide by 2 and round down." So, vL ÷ 2 = 37.5, and rounded down, the result is 37. Likewise, the result of -int(vR/2) is -(-75 ÷ 2) rounded down is 37 because the two negative signs cancel. These two results are used in adding drive.speed(37, 37). In Step 4, the bot(18).servo_speed(vL) and bot(19).servo_speed(vR) statements are commented with the # symbol.
# bot(18).servo_speed(75)           # <-- comment Half speed...
# bot(19).servo_speed(-75)          # <-- comment
drive.speed(37, 37)                 # <-- add
No changes here:
sleep(3000) # Wait three seconds
REMEMBER: To stop the cyber:bot, make sure to use 0 in place of None! So, in Step 3, add drive.speed(0, 0). Then, in Step 4, just use the # symbol to comment bot(18).servo_speed(None) and bot(19).servo_speed(None).
# bot(18).servo_speed(None)         # <-- comment Stop
# bot(19).servo_speed(None)         # <-- comment
drive.speed(0, 0)                   # <-- add
Here are some alternate versions of the script you can try. Following the optional Step 5, the final script would look more like this after the servo_speed calls are removed. Remember, comments do take up memory space on your micro:bit RAM, and if you run out you will see a MemmoryError.
# forward_three_seconds_for_fb360_final

from cyberbot import *
from feedback360 import *           # <-- add

drive.connect()                     # <-- add

drive.speed(37, 37)                 # Forward top speed 37 x 3.25mm/s

sleep(3000)                         # Wait three seconds

drive.speed(0, 0)                   # <-- add
Experiment with the speeds to find ones you like. The values of 37 were chosen by taking half of the speed from the original script because the Feedback 360° servos are twice as fast! Your speeds can range between -128 and 128. This example uses 64, which is considerably faster. In fact, that matches the previous servos’ top speeds!
# forward_three_seconds_for_fb360_speed_scaled

from cyberbot import *
from feedback360 import *           # <-- add

drive.connect()                     # <-- add

drive.speed(64, 64)                 # Forward top speed 48 x 3.25mm/s

sleep(3000)                         # Wait three seconds

drive.speed(0, 0)                   # Stop
Even before being updated, the cyber:bot scripts will actually run. Reason being, the Feedback 360° servos do respond to normal servo signals! Without changing anything, the Feedback 360 servos will also exhibit typical continuous rotation servo behaviors, like needing adjustments to speeds to straighten the cyber:bot robot’s path. In contrast, following the instructions below will incorporate the cyber:bot robot board’s feedback360 control system and automatically make the servos turn at the same speeds.
This example demonstrates how to update for servo_speed calls that use variables instead of constants. It will start with the script from the Tethered Terminal Control Script [8] page in Cybersecurity: Navigation Control from a Keyboard. The example with drive.speed(int( vL/2), -int(vR/2) ) will approximately match the wheel speeds to the previous servos. After verifying that it works, we will adjust it to rely on the full Feedback 360° speed range using drive.speed( vL, -vR ), and enter speeds in the -128 to 128 range into the terminal.
You will probably find that the USB cable doesn’t give the cyber:bot with Feedback 360° servos enough range at higher speeds. So, after learning the procedure here, you can also try your hand at updating the scripts from Terminal Control — Go Wireless! [9]
# terminal_controlled_bot_tethered_intro_for_fb360

from cyberbot import *
from feedback360 import *                         # <-- add

drive.connect()                                   # <-- add

sleep(1000)

print("\nSpeeds are -100 to 100\n")

while(True):
    text = input("Enter left speed: ")
    vL = int(text)

    text = input("Enter right speed: ")
    vR = int(text)

    text = input("Enter ms to run: ")
    ms = int(text)

    # bot(18).servo_speed(vL)                      # <-- comment
    # bot(19).servo_speed(-vR)                     # <-- comment
    drive.speed( int(vL/2), -int(-vR/2) )          # <-- add
    sleep(ms)
    # bot(18).servo_speed(None)                    # <-- comment
    # bot(19).servo_speed(None)                    # <-- comment
    drive.speed( 0, 0 )                            # <-- add

    print()
Next, let’s modify the script so that it makes use of the Feedback 360 servos' entire speed range.

Links
[1] https://learn.parallax.com/tutorials/robot/cyberbot/touch-navigation-cyberbot
[2] https://learn.parallax.com/tutorials/robot/cyberbot/cybersecurity-radio-tilt-control
[3] https://learn.parallax.com/sites/default/files/content/cyberbot/F360/feedback_360_template.hex
[4] https://www.parallax.com/product/cyberbot-robot-kit-with-microbit/
[5] https://www.parallax.com/product/parallax-feedback-360-high-speed-servo/
[6] https://learn.parallax.com/tutorials/robot/cyberbot/upgrade-your-cyberbot-feedback-360-servos/swap-and-test-servos
[7] https://python.microbit.org/v/2
[8] https://learn.parallax.com/tutorials/robot/cyberbot/cybersecurity-navigation-control-keyboard/terminal-control-%E2%80%94-start-0
[9] https://learn.parallax.com/tutorials/robot/cyberbot/cybersecurity-navigation-control-keyboard/terminal-control-%E2%80%94-go-wireless