Complex projects are always built in small steps. With microcontrollers, these challenges are best being divided into small pieces with consideration to the outcome. This means you’ll be programming and testing in small steps, saving your programs along the way in case you need to roll back to a prior version. Therefore, let’s start by simply pointing the ActivityBot 360° towards a single color signature which centers the colored object in the middle of the display using its X or Y position.
These are the steps:
- Connect the Pixy2 to the USB cable. Use power setup (A).
- Make sure the 5V wire is disconnected from the Pixy2.
- Run the PixyMon software and clear all signatures (Action / Clear Signatures).
- Choose the colored object you would like to track and set it as signature 1 (Action / Set signature 1). Take note of whether you have the LED lamp ON or OFF when setting the signature.
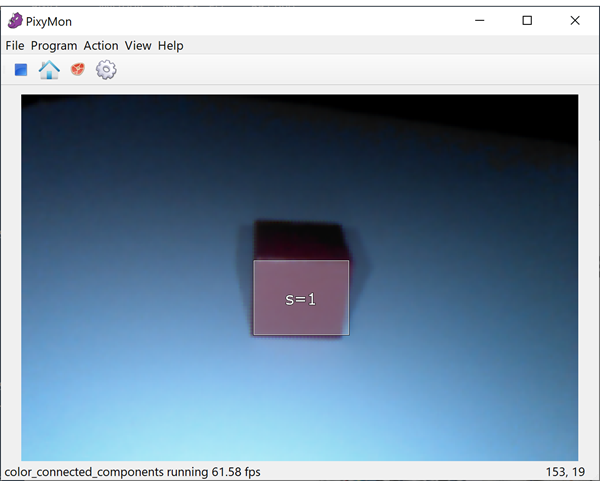
Here is an example with a single red block and LED lamp ON.
- Keeping the ActivityBot 360° in place with the colored object in front, disconnect the USB cable from the Pixy2, close the PixyMon software and change over to power setup (B).
- Make sure the USB cable is disconnected from the Pixy2.
- Connect the ActivityBot 360° to your computer with the USB cable.
- Turn the ActivityBot 360° power switch to position 1.
- Start your Launcher and BlocklyProp Solo.
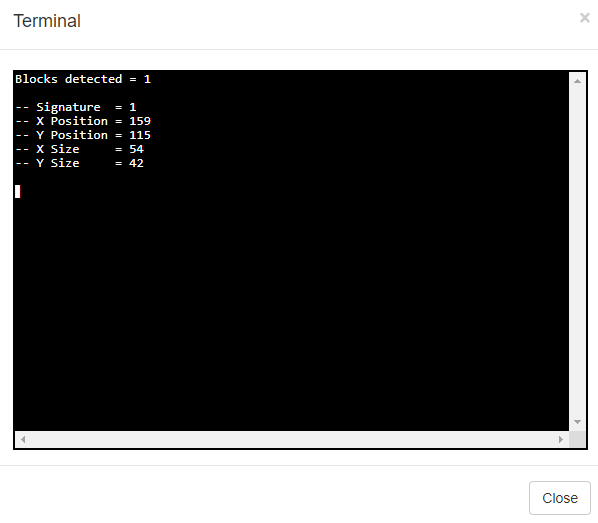
- Run the Pixy2TerminalDisplay.svg code in BlocklyProp Solo. You should now see the values for Signature = 1 in the Terminal window.
Programming the ActivityBot 360° To Track Color Signatures
With a single colored block which has an associated signature assigned in PixyMon, we can program the ActivityBot 360° to point towards the block. Suppose the red block is positioned either left, center or right in the Pixy2’s view. Three simple cases could mean three different programming actions!
The variable bXpos in the “show_signatures” function of Pixy2DisplayTerminal.svg shows where the detected color signature is from the Pixy2’s point of view. The values of bXpos will range from 1 (far left) to 316 (far right).
One easy coding approach would be an IF-ELSE block that evaluates bXpos and either turns left or right towards the block at full speed.
But this is a very clunky control method. A simple full-speed, on-or-off control loop that quickly “startles” the ActivityBot 360° towards the red block, possibly over-shooting the goal of centering the block.
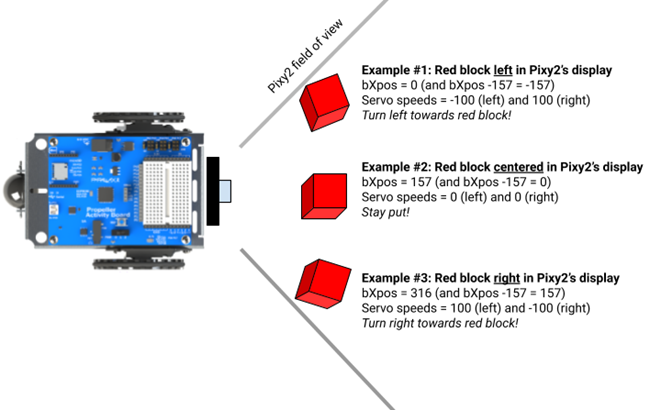
Proportional Control: Smoothly Turn Towards Color Signature
Proportional control is a much more suitable approach. With proportional control, the desired drive speed depends on the distance of the red block from the middle of the Pixy2’s view. If the red block is far left, the robot would set the servo speeds to fast, to move toward the red block aggressively. But if the block is only a few pixels left of center, the robot could respond with a slow-speed driving command to the left. Once the block is centered in the camera's view, the robot will calm down and remain still, making only small adjustments to the speed until it stays still.
We can use the bXpos value to determine how to affect the robot’s drive speed. If the red block is far left or right in the camera view, the ActivityBot 360° will rotate quickly to center the block. If the red block is just left or right of the center, the ActivityBot 360° could respond more slowly, avoiding an overshoot.
Let's review the numbers we’re working with before we look at the code modifications:
- ActivityBot 360° servo speed values range -100 to +100
- Left speed = 0 and right speed = 0 causes the robot to stay put.
- Left speed = -100 and right speed = 100 is a left turn at full speed.
- Left speed = 100 and right speed = -100 is a right turn at full speed.
- When the detected color signature is on the left, we want to turn left; if detected on the right side, let’s turn right.
- X Position of the color signature 1 will be between 0 (far left) and 316 (far right).
- Half of 316 is 158; this occurs when the block is centered in front of the ActivityBot 360.
- If we subtract 158 from any measured X position, then x position can be used in the following way:
- 0 means the detected color signature is directly in front of the ActivityBot 360.
- -158 means the object is far left of the robot, but still in the camera view.
- 158 means the object is far right, but still in the camera view .
- If there is no color signature detected, we should stop (speeds of 0,0).
We can use the value of bXpos to calculate our servo motor drive speeds. If the red block is on the far left (Example #1 above) and we subtract 158 from the bXpos variable, bXpos s now -157. This is a large number to use as a servo speed, so we’ll divide it by 3 and it’s now -52, a number we can use to drive a servo. This is very convenient, so we’ll use -52 on the left servo motor (to turn it backwards) and the positive value (multiply by -1) of 52 on the right servo motor. This will cause the robot to turn left, towards the object.
If the red block is on the far right (xPosition = 316) and we subtract 158 from this variable, it is now 158. Again, divide it by three and it’s 52. Drive the left motor with 52 and the right motor with -52 and turn right, towards the object.
Program the ActivityBot 360° To Point Towards Color Signature 1 on X-Axis
Download Pixy2_X-Axis_Following.svg
The example code Pixy2_X-Axis_Following.svg is a modified version of the Pixy2TerminalDisplay.svg code, both produced on BlocklyProp Solo. The following changes were made to Pixy2TerminalDisplay.svg:
- Added an IF-DO statement in the navigate_by_signatures function to do the following:
- Check for presence of color signature 1
- Calculate a left and right wheel speed based on the position of the detected signature
- Added an additional function call to display the servo speeds on the Terminal
- Disabled all terminal blocks in the main program loop in order to increase the sampling/motor drive frequency
Your Turn: Program the ActivityBot 360° To Point Towards Color Signature 1 on Y-Axis
Using the same approach, you can modify the BlocklyProp example code to drive near or away the colored object, centering it in the middle of the Y-axis display of the Pixy2.