Skip to content
Parallax Learn

Parallax Learn

  • Welcome
  • Tutorials
        • Tutorial Series head tag

          Tutorial Series
        • Tutorial Series

          The special, classroom-ready series pages are organized collections of tutorials for our most popular hardware and/or languages. The tutorials for each topic are conveniently accessible from a single page, shown in the order it is recommended that they be completed.
        • Robotics Series Head tag

          Robotics Series
        • Robotics Series

          • Artificial Intelligence
          • Cybersecurity: Radio Data tutorialCybersecurity
          • cyber:bot + Python
          • cyber:bot + MakeCode
          • Boe-Bot Tutorial SeriesBoe-Bot
          • Arduino Shield-Bot
          • ActivityBot with C TutorialsActivityBot + C
          • ActivityBot with BlocklyProp Tutorial SeriesActivityBot + BlocklyProp
          • Scribbler 3 Tutorial SeriesScribbler 3
        • Electronics & Programming Series Head tag

          Electronics & Programming Series
          • BS2 Board of Education Tutorial SeriesBS2 Board of Education
          • Propeller C-Language BasicsPropeller C Basics
          • FLiP Try-It Kit C Tutorial SeriesFLiP Try-It Kit + C
          • FLiP Try-It Kit BlocklyProp TutorialsFLiP Try-It Kit + BlocklyProp
          • Badge WX Tutorial SeriesBadge WX
          • Propeller BlocklyProp Basics and ProjectsPropeller BlocklyProp Basics
          • View All Tutorial Series »
        • Browse Tutorials
        • Browse Tutorials

          Individual tutorials sorted by robot or kit, and language.
        • By Robot or Kit
          • ActivityBot
          • SumoBot WX
          • Boe-Bot
          • Shield-Bot
          • cyber:bot
          • Badge WX
          • ELEV-8
          • ARLO
        • By Language
        • By Language

          • Propeller C
          • Arduino
          • BlocklyProp
          • PBASIC
          • Python
          • MakeCode
          • View All Tutorials »
  • Educators
  • Reference
  • Downloads
  • Home
  • All Courses

Arlo Robot Assembly Guide

Curriculum

  • 1 Section
  • 47 Lessons
  • Lifetime
Expand all sectionsCollapse all sections
  • Arlo Robot Assembly Guide
    47
    • 1.1
      Section 0 – Getting Ready to Build Arlo
    • 1.2
      Section 1 – Motor Mount and Wheel Kit Assembly
    • 1.3
      Step 1 – Axle Assemblies
    • 1.4
      Step 2 – Motor to Bearing Block Assembly
    • 1.5
      Step 3 – Drive Axle Pin
    • 1.6
      Step 4 – Bearing Block and Axle
    • 1.7
      Step 5 – Soldering the Encoder Connectors
    • 1.8
      Step 6 – Encoder Cables
    • 1.9
      Step 7 – Encoder Assemblies
    • 1.10
      Step 8 – Drive Wheels
    • 1.11
      Step 9 – Wheel Assemblies to Drive Shaft
    • 1.12
      Section 2 – Caster Wheel Kits
    • 1.13
      Step 10 – Swivel Rod and Mounting Plate
    • 1.14
      Step 11 – Swivel Block
    • 1.15
      Step 12 – Flange Bearings
    • 1.16
      Step 13 – Shaft Collar and Swivel Post
    • 1.17
      Section 3 – Mounting Wheel Assemblies
    • 1.18
      Step 14 – Lay Out the Parts
    • 1.19
      Step 15 – Motor Mounts to Arlo Base
    • 1.20
      Step 16 – Casters to Arlo Base
    • 1.21
      Step 17 – Screws and Standoffs
    • 1.22
      Section 4 – Arlo Power Distribution Board
    • 1.23
      Step 18 – Low-Profile Components
    • 1.24
      Step 19 – Diodes
    • 1.25
      Step 20 – Fuse Holders
    • 1.26
      Step 21 – Terminal Blocks
    • 1.27
      Step 22 – Switch Terminals
    • 1.28
      Step 23 – Charging Power Jack
    • 1.29
      Step 24 – Voltage Regulators and Heat Sinks
    • 1.30
      Step 25 – Polarized Capacitors
    • 1.31
      Step 26 – Switch Plate
    • 1.32
      Step 27 – Switch Plate Assembly to PDB
    • 1.33
      Section 5 – Batteries and Battery Tray
    • 1.34
      Step 28 – Prepare Battery and Tray
    • 1.35
      Step 29 – Batteries and Tray
    • 1.36
      Section 6 – Assembling and Mounting the Ping))) Sensors
    • 1.37
      Step 30 – Light Pipe and Protector Stands
    • 1.38
      Step 31 – Attach Ping)))s to Stands
    • 1.39
      Section 7 – Control Components and DHB-10 Connections
    • 1.40
      Step 32 – Arlo Power Distribution Board
    • 1.41
      Step 33 – DHB-10 and Control Board
    • 1.42
      Section 8 – Arlo Top Deck
    • 1.43
      Step 34 – Wiring the DHB-10 Power Connections
    • 1.44
      Step 35 – Wire PDB to Battery
    • 1.45
      Step 36 – Prep the Barrel Jack Connection
    • 1.46
      Step 37 – Connecting Power & Encoders
    • 1.47
      Step 38 – Mount Top Deck

Step 15 – Motor Mounts to Arlo Base

  • Attach the first motor assembly to the Arlo base using (2) ¼-20 flat head machine screws and the 5/32” allen wrench.

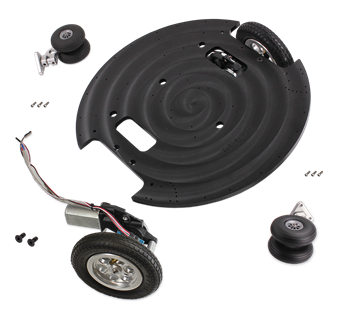
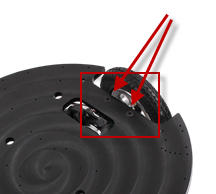
  • Now attach the second drive motor assembly in the same manner.

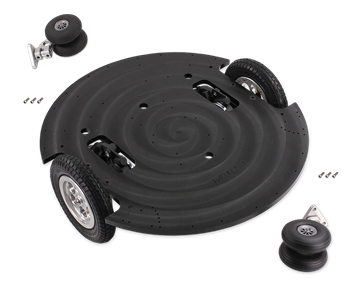
WARNING! Never, ever put your fingers through the holes in the rims. It may be tempting to carry an assembled Arlo by the wheel, but this poses a grave hazard to your fingers should the motors accidentally move the wheels. Carry the Arlo by the base plate, or by the carry-handles in the top plate once it is installed.


Printer-friendly version
Step 14 – Lay Out the Parts
Prev
Step 16 – Casters to Arlo Base
Next

DISCUSSION FORUMS | PARALLAX INC. STORE

About | Terms of Use | Feedback: learn@parallax.com | Copyright©Parallax Inc. 2024

© 2026 Parallax Learn • Built with GeneratePress