Test the IR Object Detectors
Detecting Objects with Infrared
Object detection with the IR LED and receiver circuits you built on your cyber:bot takes three steps:
- Flash the IR LED on/off at 37500 Hz.
- Delay for a millisecond or more. This gives the IR receiver time to send a low signal if it detects 37500 Hz, that is 37.5 kHz, IR light reflecting off an object.
- Check the state of the IR receiver for either a high signal (no IR detected), or a low signal (IR detected).
The block ir detect handles all of these steps for us. Here is an example from our next project:
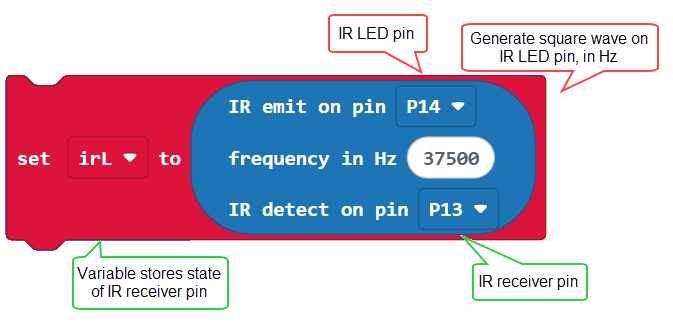
The ir detect block generates a square wave on the IR LED pin; here the arguments specify a 37500 Hz signal on P14. This square wave lasts about 2 milliseconds. Then, the block checks the state of the IR receiver pin; P13 in this example, and stores the result in the variable irL. The state of the IR receiver pin. If the IR receiver detects a reflection of the 37500 Hz infrared light signal, irL will store a zero, and if not, irL will store a 1— remember that this receiver is an “active low” sensor.
Hardware Setup
- Set the cyber:bot board’s power (PWR) switch to Position 0.
- Make sure the battery holder is loaded with 5 AA batteries.
- Make sure the battery holder’s barrel plug is firmly plugged into the cyber:bot board’s barrel jack.
- Connect your micro:bit module to your computer with a USB cable.
Software Setup
- In a browser, go to makecode.microbit.org to open the micro:bit Makcode Editor.
- Make sure the cyberbot.py module is added to the Project Files.
(See Add extensions to your micro:bit).
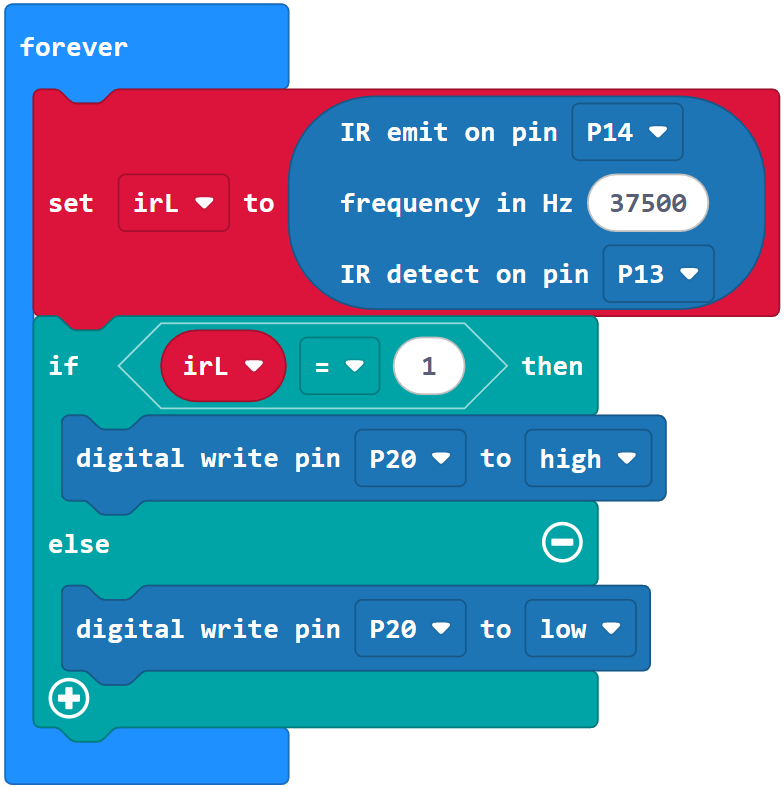
Example project: test_left_ir
This project only tests the cyber:bot’s left IR detector. Focusing on only one of the two object detector circuits at a time helps simplify troubleshooting. This is yet another example of subsystem testing. After the subsystems check out, we can move to system integration. But first, let’s make sure to test and correct any wiring or code entry errors that might have crept in.
- Set the name to test_left_IR and enter the project below.
(See Save & Edit Projects and Flash Projects with MakeCode Editor.) - Click Download.
(See Flash Projects with MakeCode Editor.)
Once the project is fully flashed and running, the cyber:bot board, the LED labeled P20 should come on.
- Place an object, such as your hand or a sheet of paper, a couple of inches (5 cm) from the left object detector. The P20 LED should turn off.
- Move the object away again. The P20 LED should turn on.
- Once the LED is working properly for object not detected and object detected, move on to the Try This and Your Turn sections.
Try This – Test the Right IR Detector
Now it is time to modify the project to test the right-side object detector.
- Rename the project test_left_IR to test_right_IR, or make a new one.
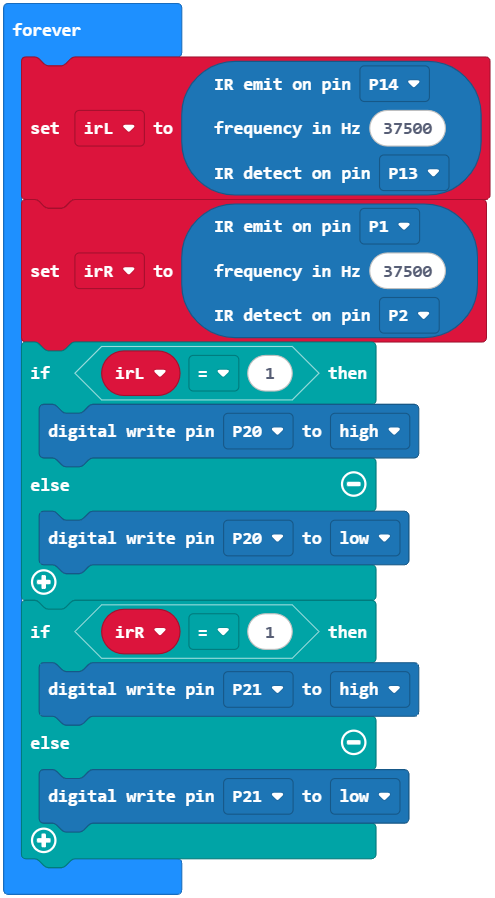
- Change in (Pin14) out (Pin13) to in (Pin1) out (Pin2).
- Change irL to irR.
- Change (Pin20) write digital (irL) to (Pin21) write digital (irR).
- Repeat the testing steps in this activity for the cyber:bot’s right IR object detector.
- If necessary, troubleshoot any mis-wired circuits or code entry errors.
Your Turn – Test Both Sides Together
- Combine the right and left IR detector tests into a single project that tests both object detectors.
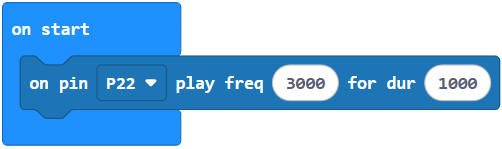
- In the on start loop, add a block that plays a 3000 Hz tone for one second, to signal that the project is running and ready for object detection.
- Put the cyber:bot board’s power switch in position 1, and flash the project.
- Verify that the speaker makes a clear, audible tone.
- Verify that when you place an object in front of the left IR detector, the left (pin 20) LED turns off.
- Repeat that test for the right IR detector and pin 21 LED.