Skip to content
Parallax Learn

Parallax Learn

  • Welcome
  • Tutorials
        • Tutorial Series head tag

          Tutorial Series
        • Tutorial Series

          The special, classroom-ready series pages are organized collections of tutorials for our most popular hardware and/or languages. The tutorials for each topic are conveniently accessible from a single page, shown in the order it is recommended that they be completed.
        • Robotics Series Head tag

          Robotics Series
        • Robotics Series

          • Artificial Intelligence
          • Cybersecurity: Radio Data tutorialCybersecurity
          • cyber:bot + Python
          • cyber:bot + MakeCode
          • Boe-Bot Tutorial SeriesBoe-Bot
          • Arduino Shield-Bot
          • ActivityBot with C TutorialsActivityBot + C
          • ActivityBot with BlocklyProp Tutorial SeriesActivityBot + BlocklyProp
          • Scribbler 3 Tutorial SeriesScribbler 3
        • Electronics & Programming Series Head tag

          Electronics & Programming Series
          • BS2 Board of Education Tutorial SeriesBS2 Board of Education
          • Propeller C-Language BasicsPropeller C Basics
          • FLiP Try-It Kit C Tutorial SeriesFLiP Try-It Kit + C
          • FLiP Try-It Kit BlocklyProp TutorialsFLiP Try-It Kit + BlocklyProp
          • Badge WX Tutorial SeriesBadge WX
          • Propeller BlocklyProp Basics and ProjectsPropeller BlocklyProp Basics
          • View All Tutorial Series »
        • Browse Tutorials
        • Browse Tutorials

          Individual tutorials sorted by robot or kit, and language.
        • By Robot or Kit
          • ActivityBot
          • SumoBot WX
          • Boe-Bot
          • Shield-Bot
          • cyber:bot
          • Badge WX
          • ELEV-8
          • ARLO
        • By Language
        • By Language

          • Propeller C
          • Arduino
          • BlocklyProp
          • PBASIC
          • Python
          • MakeCode
          • View All Tutorials »
  • Educators
  • Reference
  • Downloads
  • Home
  • All Courses

Sound for the cyber:bot

Curriculum

  • 1 Section
  • 5 Lessons
  • Lifetime
Expand all sectionsCollapse all sections
  • Sound for the cyber:bot
    5
    • 1.0
      Introducing the Piezospeaker
    • 1.1
      Place the Piezospeaker
    • 1.2
      The cyber:bot tone block
    • 1.3
      Notes from Frequencies
    • 1.4
      Songs with Lists

The cyber:bot tone block

Let’s test the piezospeaker using calls to the cyber:bot module’s tone block. True to its name, this block instructs an I/O pin to alternate high/low electrical signals at a specific frequency, allowing a piezospeaker to emit a tone.

The tone block allows you to specify the frequency with the freq parameter, and the duration of the tone in milliseconds with the dur parameter. 

This piezospeaker is designed to play 4.5 kHz tones for smoke alarms, but it can also play a variety of audible tones and usually sounds best in the 1 kHz to 3.5 kHz range. The start-alert tone we’ll use is:

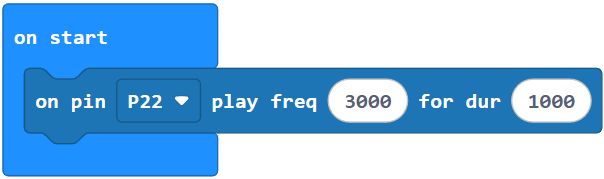
That will make P22 send a series of high/low signals repeating at 3 kHz (3000 times per second). The tone will last for 1000 ms, which is 1 second. The micro:bit will wait until the tone block is complete before moving on to the next command. 

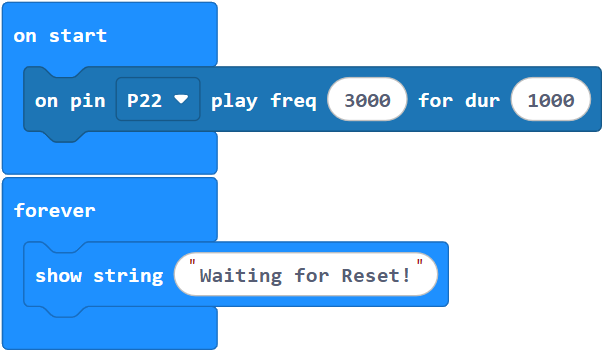
Example project: piezospeaker_test

This example project makes a beep when it starts running, then it sends the message “Waiting for Reset” scrolling across the micro:bit LED matrix. These messages will continue indefinitely because they are in the forever loop. If the reset button is pressed, the speaker will replay the sound.

  •  In a browser, go to makecode.microbit.org to open the micro:bit Makcode Editor.
  •  Make sure the cyberbot extension is added.
    (See Add extensions to your micro:bit).
  • Set the name to piezospeaker_test and enter the project below.
    (See Save & Edit Projects and Flash Projects with MakeCode Editor.)
  • Click Download.
    (See Flash Projects with MakeCode Editor.)

  • Set PWR to 1.
  • Verify that the piezospeaker makes a tone for one second.
  • Press and release the micro:bit module’s reset button to hear the tone again. The reset button is underneath the micro:bit, by the USB connector. 

Try this: for loops for sound effects

It is easy to make sound effects by using a for loop and a range block from the support subcategory.

  • Set the name to sound_effect and enter the project below.
  • Click Download. 

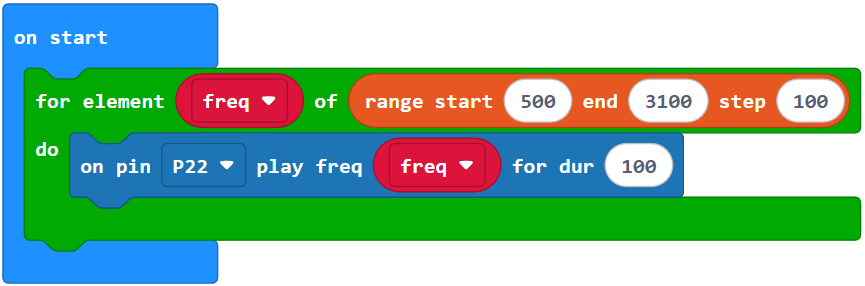
You should hear a series of tones that increase in pitch.

  • Set PWR to 0.

Your Turn

Just for fun, modify the sound_effect project by varying the values in the range block’s start, end, and step parameters.

  • Try making the tones cover a greater range of frequencies.
  • Try making the tones vary only a little from one to the next, for a smoother sound.
  • Try making the tones go from a higher pitch to a lower pitch, so it sounds like something is falling.
  • Try making a project that sounds like a cricket.

Printer-friendly version

Leave a Comment Cancel reply

Place the Piezospeaker
Prev
Notes from Frequencies
Next

DISCUSSION FORUMS | PARALLAX INC. STORE

About | Terms of Use | Feedback: learn@parallax.com | Copyright©Parallax Inc. 2024

© 2026 Parallax Learn • Built with GeneratePress