Suppose you want to use your S3 to scribble the word "Robot". If you wanted each letter to be separate, you would need to remove the pen tip from the drawing surface between each letter. In handwriting or drawing terms, this is called a pen lift. (Here is a video of a Parallax S2 doing just that.)
Hardware Hack Instructions
In a previous tutorial, you learned how to control a Standard Servo by connecting it to your S3’s Hacker Port. In the pen lift hack, you can use a servo to lift the pen between letters or for other special purposes when we are scribbling. Follow this tutorial to learn how.
The video below shows the mechanical assembly of the pen lift device.
Photos, instructions, and the pdf print-out you will need are listed below. It is a simple and creative way to add a pen lifter to your S3 using a Standard Servo and some simple tools.
Parts List
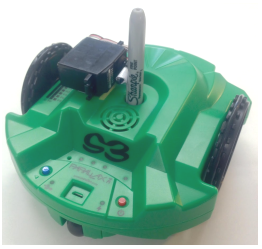
- S3 Robot
- Parallax Standard Servo (#900-00005)
- 1/2" by 1 1/2” piece of double-sided foam tape or similarly sized Command® Strips
- 3/4” wide clear tape (clear, double sided tape will not be strong enough)
- Pen that fits in the S3 - Sharpie® or whiteboard marker
- Scissors
- Phillips-head screwdriver
- Diagonal cutters or tin snips (or hand saw and clamps)
- Safety glasses (always a good idea, but use every time when cutting things!)
- Cable tie or twist tie
- S3 Pen Lifter Paper Template
Preparing the Pen and Attachment Loop
- Print out the Pen Lifter Template document, from the parts list.
- Use scissors or a paper cutter to cut out one of the templates.
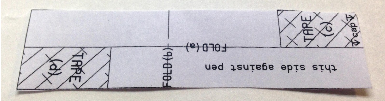
- Fold lengthwise, along line "a".
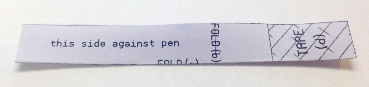
- Using a piece of tape the length of the paper strip, tape over/around the long seam, so that it can not be unfolded.
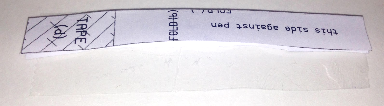
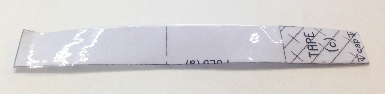
- Fold widthwise, along line "b".
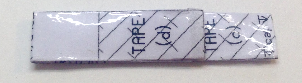
- Align the bottom of the paper template (indicated by the word “cap”) with the cap of your pen, making sure that the side labeled “this side against the pen” is exactly that.
- Place a piece of tape over the “c” tape area to secure it to the pen.
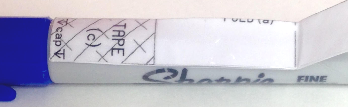
- Tape “d” to the pen in the same way, making sure the template lays flat against the pen. The two ends of the template will NOT be matched up.

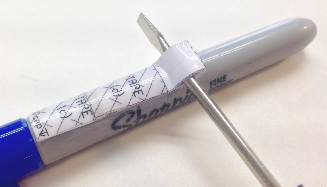
- Carefully push a pencil or similar instrument through the loop of paper just enough to open it up.
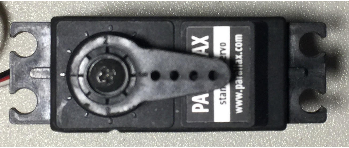
Modify the Servo Horn
- Use your hand to gently rotate the servo horn as far counterclockwise as you can. Be careful not to force it.
- Use a phillips-head screwdriver to remove the servo horn.
- Use diagonal cutters, tin snips, or a hand saw to cut off three of the points. Be sure to wear safety glasses and, if using a hand saw, hold servo horn with clamp - not your hands!
Test and Configure the Servo
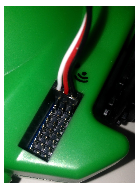
- Make sure the power is off on your S3. Connect the 3-wire cable to the pin row marked P5. Orient the connector so that the black wire is connected to the Ground column, the red wire is connected to the middle or 5V pin, and the white signal connector wire is on the pin column.
- Open BlocklyProp, login, make a new program called Pen Down Test, and construct the code below. Hint: You will need to use a set variable block and a get variable block to complete this code, renaming as below.
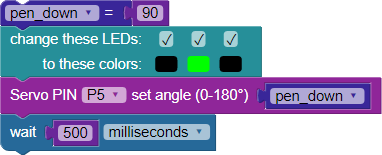
- Save it, compile, and load to EEPROM. This sets the servo to the center position and sets the center LED to green.
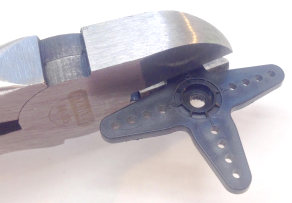
- Place the modified servo horn back over the servo output shaft in the orientation shown below, push down onto the output shaft, and replace the screw to secure.
- Now rerun the code by pressing the blue reset button. Find the exact angle setting so that the horn is centered as shown above. Insert that new angle as the pen_down variable value. Power down your S3 when done.
Putting it All Together
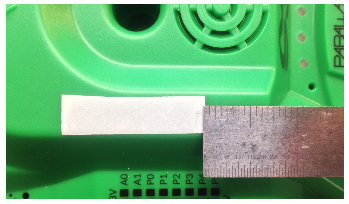
- Cut a ½" by 1 ½” strip of double-sided foam tape.
- Adhere the tape to your S3 on the surface adjacent to the pinout silkscreen, about 3/4” back from the face that has S3 written on it.
- Place the servo over the tape in the position shown and press/hold in place for 30 seconds to ensure a good, strong bond.
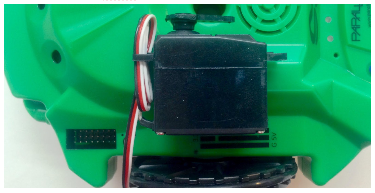
- Plug the servo into P5 of the Hacker Port, if not already connected, and use the cable tie to contain the extra cable.
- Place your S3 over a safe writing surface (remember Sharpie ink is permanent).
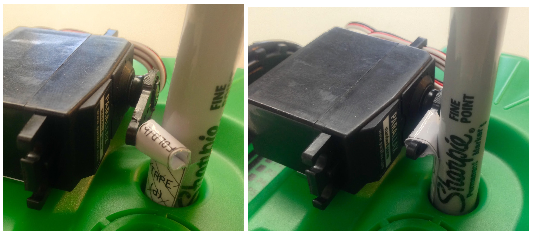
- Remove the cap from the pen and place ink down in the pen holder. Twist the paper loop over and onto the servo horn as shown in the next set of photos.
- Congratulations, you’ve completed the Pen Hack! Now, let’s write one more piece of BlocklyProp code to test and set the pen’s "up" position.
Try This
- Open BlocklyProp, login, and open your Pen Down Test. Save a copy as Pen Down and Up Test. Then modify the code as shown below.
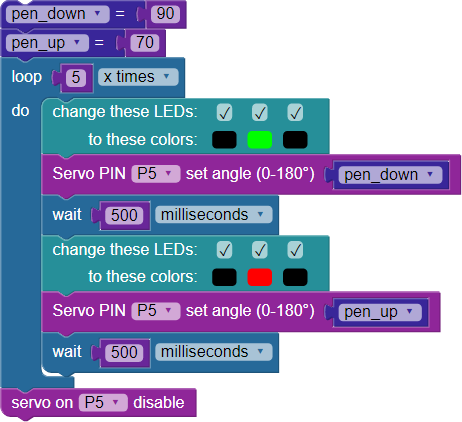
This code depicts the following: First, you add a pen_up set variable block. Your values may vary - see note below. Next, you loop the body of the code 5 times. A green LED indicates that the pen is down, where it stays for 500 ms. The red LED shows that the pen is up, again for 500 ms. As before, the servo is attached to P5. Finally, you disable the servo when finished.
Note: pen_down and pen_up values will vary based on your servo position, paper loop size and position, but the 20 degrees between values should be close to correct. Play with it to find out what works best for you.
- Save it, compile, and load to EEPROM. Make sure that the pen is in contact with the surface at pen down and raised above the surface at pen up. Adjust the variables for these settings in your code, if necessary, save it and test it again.
- Modify the program. Name it “Pen Down and Up Drive Test”- adding a speed variable block and drive speed block.
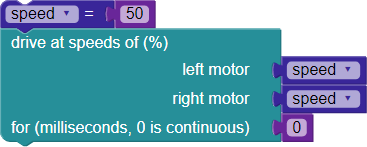
- Now add the stop driving block at the end. This code makes the S3 move forward as the pen moves from down to up - making a dotted line.

- Save, compile, load to EEPROM, and run the program. Adjust the settings so that your pen lifter works optimally. Change the drive speed variable and wait time to change the dotted line pattern.
Your Turn
- Modify the Pen Down and Up Drive Test - adding a variable for the wait block setting. That makes the previous “Try This” a snap!
- Modify some of the BlocklyProp programs you created in the Draw Simple Shapes or Turning Shapes into Art - adding pen lifts to make the shapes with dotted lines.
- Check out this BlocklyProp program (created by Parallax-friend Whit Stodghill) and see if you can figure out what it does.
- Save a copy of it as S3 Scribble, compile, and load to EEPROM. (Note: Use the best variable settings for your personal S3 robot that you discovered earlier.)
- Place your pen in the pen holder attach the paper loop to the servo horn. To run the program, press the reset button once.
Did your S3 do what you expected? If not, check out the Youtube Video of this program in action here.
Special thanks to Parallax friend Whit Stodghill for his assistance in writing, editing, and testing material for these S3 tutorials.