Let’s test our S3’s IR receiver and our SONY remote. To do this we will write a simple test program in BlocklyProp that decodes signals received by the SONY remote and displays them in the BlocklyProp Terminal.
- Your remote should already be configured. If it isn't, go back to the previous page and follow the instructions.
- Log into your BlocklyProp account, and make a new Scribbler Robot project.
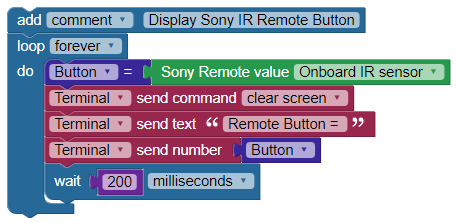
- Build and save the BlocklyProp code shown below.
- Once you have written the program, compile it and then load it to EEPROM on your S3 to test its functionality.
- Point the remote directly at the IR receiver, and push some buttons.
You may notice that pressing and holding a button for a half-second or more gives more consistently readable Terminal results than a rapid press-and-release. Why? Hint: it has to do with how quickly the program completes each cycle through the loop, and the clear command at the beginning of the loop.
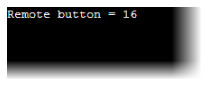
You should see the remote button number displayed in the Terminal. Note that the Channel up/down, Volume up/down, and Mute buttons also return numbers. When no button is pressed you should see Remote button = -1. You may also see this message if the IR signal of the button that is pressed is not one that is recognized by this block's library. Some universal remotes have a LOT of buttons, and if you use a non-Parallax remote for this activity, some of them may not display a number.
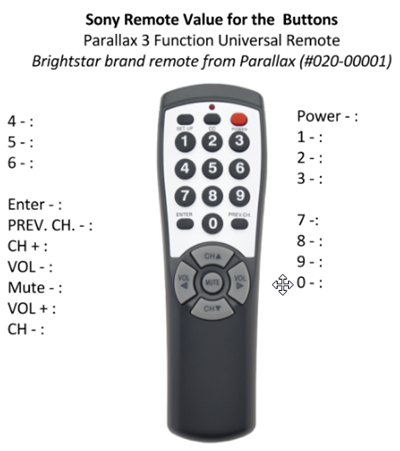
Write down the numbers that you see when you push the various buttons on your remote. Use the chart below or create your own for your Sony or Universal Remote (set for Sony use).
How it Works
The IR receiver looks for pulsing infrared light. The IR remote sends short bursts of this pulsing infrared light, in different on-off patterns for each button on the remote. When the IR receiver detects these bursts it sends a 0 to the Propeller I/O pin, and a 1 when it does not. The C code underneath the BlocklyProp Sony Remote value block does the work of decoding the on-off pattern conveyed by the Propeller controller I/O pin.
Interested in a more in-depth look at IR emitters and receivers? Check out our Propeller C Simple Device tutorial: IR Receiver and Remote. The C library it uses is the same library being used to generate our Sony remote blocks in BlocklyProp.
This project's blocks are all inside a repeat forever loop (except for the comment at the top).
The program begins by clearing the terminal and displaying “Remote Button = “. Then, it gets the value of whichever button is being pressed on the remote and stores it in the variable Button. If no button is being pressed, the value will be -1.
The send number block then prints this value to the Terminal so you are able to see which button is being pressed. Then, the program waits 200 milliseconds before repeating the whole process.
This brief pause of 200 ms gives the Terminal time to display the message before code execution returns to the top of the repeat forever loop (where it is cleared.).
Try This
In the tutorial called Using Reset as Part of a Program, you learned that the S3 can count the number of times the reset button is pressed. It displays that count using the S3’s indicator LEDs as shown below.
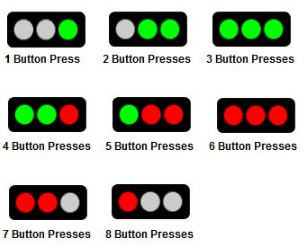
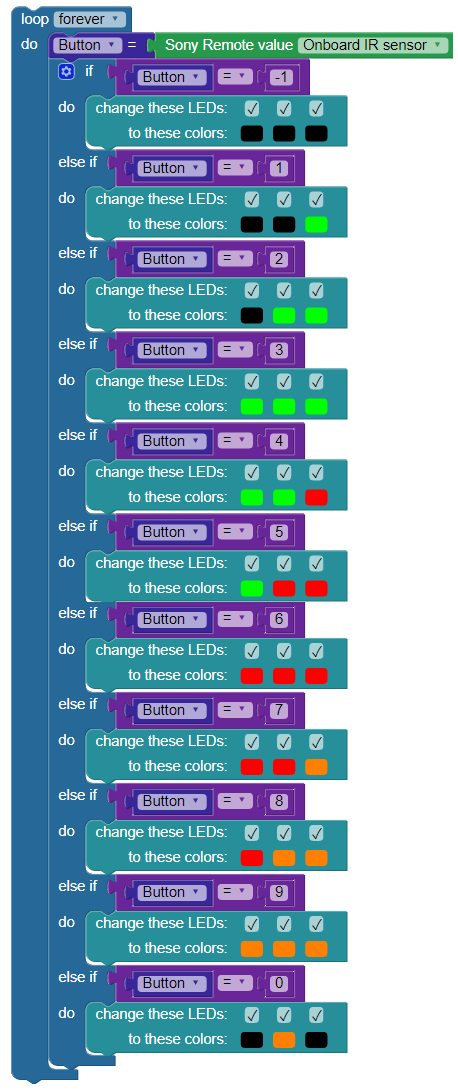
- Let’s use these light patterns with the remote instead, but we'll modify numbers 7 and 8 and add additional LED conditions for 9 and 0. Write a BlocklyProp program like the one below to use the LEDs to indicate which button you're pressing on your remote:
- Save, compile and load it to your S3.
Does pressing buttons 1-0 on your remote create these different LED patterns on your S3? If so, move on to the Your Turn section below. If not, find the coding error and retry.
Your Turn
- Modify the BlocklyProp program above so that the LEDs remain lit and set to the designation for the last button pressed (1 - 0, above) and that the LEDs are turned off only when the mute button is pressed.