Skip to content
Parallax Learn

Parallax Learn

  • Welcome
  • Tutorials
        • Tutorial Series head tag

          Tutorial Series
        • Tutorial Series

          The special, classroom-ready series pages are organized collections of tutorials for our most popular hardware and/or languages. The tutorials for each topic are conveniently accessible from a single page, shown in the order it is recommended that they be completed.
        • Robotics Series Head tag

          Robotics Series
        • Robotics Series

          • Artificial Intelligence
          • Cybersecurity: Radio Data tutorialCybersecurity
          • cyber:bot + Python
          • cyber:bot + MakeCode
          • Boe-Bot Tutorial SeriesBoe-Bot
          • Arduino Shield-Bot
          • ActivityBot with C TutorialsActivityBot + C
          • ActivityBot with BlocklyProp Tutorial SeriesActivityBot + BlocklyProp
          • Scribbler 3 Tutorial SeriesScribbler 3
        • Electronics & Programming Series Head tag

          Electronics & Programming Series
          • BS2 Board of Education Tutorial SeriesBS2 Board of Education
          • Propeller C-Language BasicsPropeller C Basics
          • FLiP Try-It Kit C Tutorial SeriesFLiP Try-It Kit + C
          • FLiP Try-It Kit BlocklyProp TutorialsFLiP Try-It Kit + BlocklyProp
          • Badge WX Tutorial SeriesBadge WX
          • Propeller BlocklyProp Basics and ProjectsPropeller BlocklyProp Basics
          • View All Tutorial Series »
        • Browse Tutorials
        • Browse Tutorials

          Individual tutorials sorted by robot or kit, and language.
        • By Robot or Kit
          • ActivityBot
          • SumoBot WX
          • Boe-Bot
          • Shield-Bot
          • cyber:bot
          • Badge WX
          • ELEV-8
          • ARLO
        • By Language
        • By Language

          • Propeller C
          • Arduino
          • BlocklyProp
          • PBASIC
          • Python
          • MakeCode
          • View All Tutorials »
  • Educators
  • Reference
  • Downloads
  • Home
  • All Courses

ELEV-8 v3 Quadcopter Assembly Guide

Curriculum

  • 1 Section
  • 40 Lessons
  • Lifetime
Expand all sectionsCollapse all sections
  • ELEV-8 v3 Quadcopter Assembly Guide
    40
    • 1.0
      Step 1: Do I Need to Loctite® the Set Screws?
    • 1.1
      Step 2: Attach Motors to Motor Mounts
    • 1.2
      Step 3: Feed Motor Wires Through Booms
    • 1.3
      Step 4: Bolt Motor Mount and Landing Gear to Booms
    • 1.4
      Step 5: Insert Tube Plugs
    • 1.5
      Step 6: Prepare the Top Chassis Plate
    • 1.6
      Step 7: Connect Booms to Top Chassis Plate
    • 1.7
      Step 8: Attach the Bottom Chassis Plate
    • 1.8
      Step 9: Attach Battery Straps and Foam Pads
    • 1.9
      Step 10: Connect the ESCs to the Motors
    • 1.10
      Step 11: Label ESC Signal Cables
    • 1.11
      Step 12: Route ESC Signal Cables through Chassis
    • 1.12
      Step 13: Bolt Standoffs to Isolation Plate
    • 1.13
      Step 14: Mount the Flight Controller and PDB
    • 1.14
      Step 15: Install the FC Power Cable
    • 1.15
      Step 16: Shield Sensors and Install FC Cover
    • 1.16
      Step 17: Attach the Isolation Assembly
    • 1.17
      Step 18: Connect the ESCs to the PDB and FC
    • 1.18
      Step 19: Connect and Mount Your Radio Receiver
    • 1.19
      Step 20: Connect PDB Power Cable and Secure Battery
    • 1.20
      Step 21: Configure the Transmitter and Bind to Receiver
    • 1.21
      Step 22: Install Software
    • 1.22
      Step 23: Install or Update Firmware
    • 1.23
      Step 24: Configure Flight Controller
    • 1.24
      Step 25: Calibrate the ESC Throttle Range
    • 1.25
      Step 26: Configure Motor Spin Direction
    • 1.26
      Step 27: Mount ESCs to Booms
    • 1.27
      Step 28: Full Systems Check
    • 1.28
      Step 29: Fasten Propeller Adapters
    • 1.29
      Step 30: Attach Propellers
    • 1.30
      Section 1: Assemble the Booms
    • 1.31
      Section 2: Assemble the Chassis
    • 1.32
      Section 3: Connect the ESCs
    • 1.33
      Section 4: Make the Isolation Assembly
    • 1.34
      Section 5: Install the Electronics
    • 1.35
      Section 6: Software and Firmware
    • 1.36
      Section 7: Configure the ESCs
    • 1.37
      Section 8: Final Testing
    • 1.38
      Step 19b: Spektrum AR610 and AR8000 Receivers
    • 1.39
      Step 19a: Spektrum SPMAR620 Receiver

Step 30: Attach Propellers

STOP!! Propeller blades can cut skin. Do not install propellers until you are ready to fly in a properly prepared indoor OR outdoor flying area. Never install propeller blades on a quadcopter in a classroom or a bench testing area.  Never connect the flight controller to a computer if the propeller blades are installed.

Attaching the Propellers in the wrong positions is the #1 most common mistake, so follow the directions below carefully!

Tools Needed:

  • 5/16″ Wrench, 5/16″ Socket, or Adjustable Wrench
  • Flat-nose Pliers

Parts Needed:

  • ELEV-8 v3 Assembly, prepared in Step 29
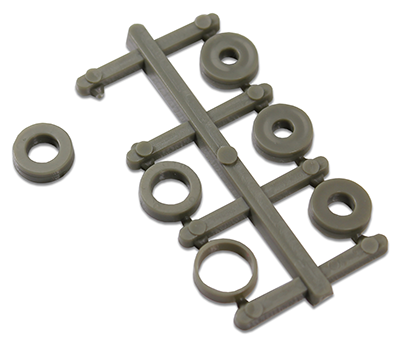
  • 4 – Propeller Adapter Nuts (one included with each motor)
  • 4 – Propeller Adapter Washers (one included with each motor)
  • 2 – 11×4.5 CCW (L) Propeller (#721-80040)
  • 2 – 11×4.5 CW (R) Propeller (#721-80041)
  • 4 – Propeller Spacer Ring (included with each propeller)

WARNING: Do not install the propellers until you have gone through every step of the Assembly Guide.

Instructions:

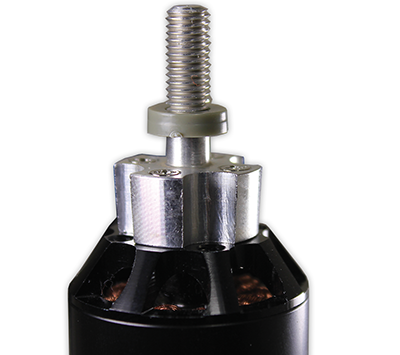
  1. Remove the spacer rings from the propeller bags and place the one indicated in the figure below over each propeller adapter shaft.

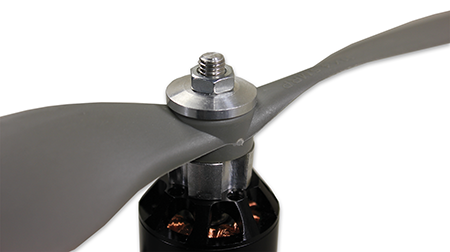
  1. Attach a CW (R) propeller to motor #1. Place the propeller over the adapter shaft so that the small writing near the center of the propeller is upright, as shown in the image below (the sharper edges of the propeller should be on the bottom).
  2. Place a washer over the propeller so that the flat side is down.
  3. Thread a nut onto the adapter and tighten until it makes contact with the washer and propeller, and the resistance increases; then tighten another 1/4 turn.

  1. Using the same procedure, attach a CW (R) propeller to motor #3. Attach a CCW (L) propeller to motors #2 and #4.


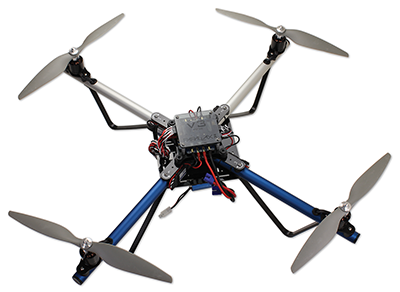
Now it’s time to learn to fly!

Congratulations on completing the assembly of your ELEV-8 v3 Quadcopter! We know you are probably anxious to fly it, so please head over to the How to Fly a Multirotor sUAV tutorial, where you will learn how to fly your ELEV-8 v3.  PLEASE DO NOT attempt to fly your ELEV-8 v3 until you have read through both the How to Fly a Multirotor sUAV and UAV Safety, Laws, and Good Citizenship tutorials, as you could put yourself and others needlessly at risk. (For example, the Flying Guide contains important information on how to identify and switch between flight modes).


Printer-friendly version
Step 29: Fasten Propeller Adapters
Prev
Section 1: Assemble the Booms
Next

DISCUSSION FORUMS | PARALLAX INC. STORE

About | Terms of Use | Feedback: learn@parallax.com | Copyright©Parallax Inc. 2024

© 2026 Parallax Learn • Built with GeneratePress