Skip to content
Parallax Learn

Parallax Learn

  • Welcome
  • Tutorials
        • Tutorial Series head tag

          Tutorial Series
        • Tutorial Series

          The special, classroom-ready series pages are organized collections of tutorials for our most popular hardware and/or languages. The tutorials for each topic are conveniently accessible from a single page, shown in the order it is recommended that they be completed.
        • Robotics Series Head tag

          Robotics Series
        • Robotics Series

          • Artificial Intelligence
          • Cybersecurity: Radio Data tutorialCybersecurity
          • cyber:bot + Python
          • cyber:bot + MakeCode
          • Boe-Bot Tutorial SeriesBoe-Bot
          • Arduino Shield-Bot
          • ActivityBot with C TutorialsActivityBot + C
          • ActivityBot with BlocklyProp Tutorial SeriesActivityBot + BlocklyProp
          • Scribbler 3 Tutorial SeriesScribbler 3
        • Electronics & Programming Series Head tag

          Electronics & Programming Series
          • BS2 Board of Education Tutorial SeriesBS2 Board of Education
          • Propeller C-Language BasicsPropeller C Basics
          • FLiP Try-It Kit C Tutorial SeriesFLiP Try-It Kit + C
          • FLiP Try-It Kit BlocklyProp TutorialsFLiP Try-It Kit + BlocklyProp
          • Badge WX Tutorial SeriesBadge WX
          • Propeller BlocklyProp Basics and ProjectsPropeller BlocklyProp Basics
          • View All Tutorial Series »
        • Browse Tutorials
        • Browse Tutorials

          Individual tutorials sorted by robot or kit, and language.
        • By Robot or Kit
          • ActivityBot
          • SumoBot WX
          • Boe-Bot
          • Shield-Bot
          • cyber:bot
          • Badge WX
          • ELEV-8
          • ARLO
        • By Language
        • By Language

          • Propeller C
          • Arduino
          • BlocklyProp
          • PBASIC
          • Python
          • MakeCode
          • View All Tutorials »
  • Educators
  • Reference
  • Downloads
  • Home
  • All Courses

ELEV-8 v3 Quadcopter Assembly Guide

Curriculum

  • 1 Section
  • 40 Lessons
  • Lifetime
Expand all sectionsCollapse all sections
  • ELEV-8 v3 Quadcopter Assembly Guide
    40
    • 1.0
      Step 1: Do I Need to Loctite® the Set Screws?
    • 1.1
      Step 2: Attach Motors to Motor Mounts
    • 1.2
      Step 3: Feed Motor Wires Through Booms
    • 1.3
      Step 4: Bolt Motor Mount and Landing Gear to Booms
    • 1.4
      Step 5: Insert Tube Plugs
    • 1.5
      Step 6: Prepare the Top Chassis Plate
    • 1.6
      Step 7: Connect Booms to Top Chassis Plate
    • 1.7
      Step 8: Attach the Bottom Chassis Plate
    • 1.8
      Step 9: Attach Battery Straps and Foam Pads
    • 1.9
      Step 10: Connect the ESCs to the Motors
    • 1.10
      Step 11: Label ESC Signal Cables
    • 1.11
      Step 12: Route ESC Signal Cables through Chassis
    • 1.12
      Step 13: Bolt Standoffs to Isolation Plate
    • 1.13
      Step 14: Mount the Flight Controller and PDB
    • 1.14
      Step 15: Install the FC Power Cable
    • 1.15
      Step 16: Shield Sensors and Install FC Cover
    • 1.16
      Step 17: Attach the Isolation Assembly
    • 1.17
      Step 18: Connect the ESCs to the PDB and FC
    • 1.18
      Step 19: Connect and Mount Your Radio Receiver
    • 1.19
      Step 20: Connect PDB Power Cable and Secure Battery
    • 1.20
      Step 21: Configure the Transmitter and Bind to Receiver
    • 1.21
      Step 22: Install Software
    • 1.22
      Step 23: Install or Update Firmware
    • 1.23
      Step 24: Configure Flight Controller
    • 1.24
      Step 25: Calibrate the ESC Throttle Range
    • 1.25
      Step 26: Configure Motor Spin Direction
    • 1.26
      Step 27: Mount ESCs to Booms
    • 1.27
      Step 28: Full Systems Check
    • 1.28
      Step 29: Fasten Propeller Adapters
    • 1.29
      Step 30: Attach Propellers
    • 1.30
      Section 1: Assemble the Booms
    • 1.31
      Section 2: Assemble the Chassis
    • 1.32
      Section 3: Connect the ESCs
    • 1.33
      Section 4: Make the Isolation Assembly
    • 1.34
      Section 5: Install the Electronics
    • 1.35
      Section 6: Software and Firmware
    • 1.36
      Section 7: Configure the ESCs
    • 1.37
      Section 8: Final Testing
    • 1.38
      Step 19b: Spektrum AR610 and AR8000 Receivers
    • 1.39
      Step 19a: Spektrum SPMAR620 Receiver

Step 7: Connect Booms to Top Chassis Plate

Now you will carefuly lay out the booms to ensure the colors are placed in the corrrect orientation. The clear anodized (appear silver in color) booms will be at the front, and the blue anodized booms will be at the rear.

Parts Needed:

  • 4 – Motor/Boom Assemblies, prepared inStep 5
  • 1 – Top Chassis Plate, prepared in Step 6

Instructions:

  1. Take a silver boom and carefully slide it over the front right pair of screws, so that the landing gear is pointing upwards.

  1. Repeat with the other silver boom over the front left pair of screws.

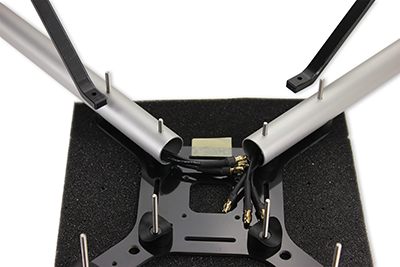
  1. Put the remaining two blue booms over the back two pairs of screws.


Printer-friendly version
Step 6: Prepare the Top Chassis Plate
Prev
Step 8: Attach the Bottom Chassis Plate
Next

DISCUSSION FORUMS | PARALLAX INC. STORE

About | Terms of Use | Feedback: learn@parallax.com | Copyright©Parallax Inc. 2024

© 2026 Parallax Learn • Built with GeneratePress