This third page in the SPI Example tutorial starts with some backround on bitwise operators, and then uses them with coding techniques to improve the original example program.
Did You Know?
More About OR
An OR operation applied to two binary values works like this:
0 OR 0 = 0
0 OR 1 = 1
1 OR 0 = 1
1 OR 1 = 1
Notice that only 0 OR 0 gives a result of 0.
Bitwise OR applies the OR operation to every pair of bits corresponding by position in two different values. The two Bit 0 values are OR’ed together, the two Bit 1 values get OR’d, and so on, to form a result value. Because of the way OR and bitwise OR work, you can use it create a bit mask to make sure particular bits in the result value are set to 1. Any bit in the mask that is 0 will allow the binary digit in the other value to be unchanged in the result. But, any bit in the mask that is a 1 will cause that bit in the result to store a 1.
Imagine your code has values named MCTL, writeMask, and cmd. If writeMask has just its 6th bit set to 1, the illustration below shows the effect that MCTL OR writeMask will have on the final result stored in cmd. Notice that cmd bits 5…0 are all the same as MCTL, but bit 6 changed from 0 to 1 because writeMask’s bit 6 is 1. You can see how the 0’s in the mask let the original bits fall through to the result, but 1’s in the mask block them, and always put a 1 in the result.
         Bit# 6543210

              |||||||

MCTL      = 0b0010110

writeMask = 0b1000000 (OR)

--------------------------

cmd       = 0b1010110
Also note that if MCTL bit 6 were already a 1, the OR operation would still have put a 1 in cmd bit 6, because 1 OR 1 is 1. So, this operation would be useful for setting a particular bit in the result to 1 even if we do not know whether the bit is a 0 or 1 in the original value.
A C language shortcut for writing 0b1000000 is 1 << 6. You can use it to initialize a bit mask value like this:
writeMask = 1 << 6;
This statement takes a 1 (0b0000001), and shifts it left by 6 digit positions (0b1000000).
A C language operator for bitwise OR is the pipe symbol: |
cmd = MCTL | writeMaskA Bit About AND
An AND operation applied to two binary values works like this:
0 AND 0 = 0
0 AND 1 = 0
1 AND 0 = 0
1 AND 1 = 1
Notice that only 1 AND 1 gives a result of 1.
Similar to Bitwise OR, Bitwise AND can be used to perform an AND operation between corresponding pairs of bits in two values, to form a result value. In a bit mask, Bitwise AND can be used to make sure particular bits in the result value are set to 0. The trick is to put a 1 in the mask for any bit you do not want changed in the result, and a 0 in the mask for any bit that you want to make sure is a 0 in the result.
In the illustration below, we have a ZOUT8 address with bit 6 set to 1, but we need to set it to 0. By using the mask 0b0111111 (named readMask this time) ith bitwise AND, the cmd result looks just like ZOUT8 with only bit 6 changed to 0.
         Bit# 6543210

              |||||||

ZOUT8     = 0b1001000

readMask  = 0b0111111 (AND)

---------------------------

cmd       = 0b0001000
Again, note that if ZOUT8 bit 6 had been 0 in the first place and did not need to be changed, the Bitwise AND operation would still have put a 0 in cmd bit 6, since 0 AND 0 is 0. So, this technique can set a particular bit in the result to 0 even if we do not know whether it’s a 0 or 1 in the original value.
A C language shortcut for creating a mask with all 1s and a zero in bit 6 would be:
readMask = ~(1 << 6);
The value 0b1000000 gets created in the parentheses. Then, the bitwise NOT operator ~ is applied, making the result 0b0111111.
NOT 0 = 1
NOT 1 = 0
The bitwise AND is the ampersand symbol: &, and a C language example for applying this mask is:
cmd = ZOUT8 & readMaskTry This
The MMA7455 datasheet supplies register addresses as hexadecimal values. Let’s assign those values hex values to constants. Then, we can use the print formatter %07b to view them as binary numbers. We can also use the bit mask techniques from the Did You Know section above to set bit 6 in these values to a 1 or 0, as they would need to be for read or write operations to communicate with the accelerometer.

- Click the New Project button, name it Test Masks.side, and save it in in …Documents\SimpleIDE\My Projects.
- Copy the code below and paste into SimpleIDE.
- Click the Run with Terminal button.
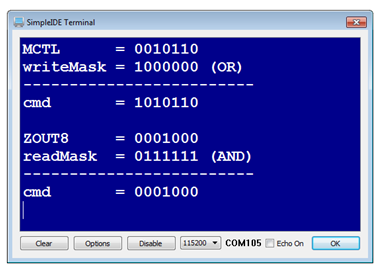
- Verify the result.
#include "simpletools.h"                          // Include simpletools header

const int MCTL  = 0x16;        // = 0b0100101     // Control register address
const int ZOUT8 = 0x08;        // = 0b0001000     // 8-bit z register address


const int writeMask  = 1 << 6;                    // Write mask for setting bit 6
const int readMask   = ~(1 << 6);                 // Read mask for clearing bit 6

signed char z;                                    // Z-axis

int cmd;                                          // Variable for storing command

int main()                                        // Main function
{
  print("MCTL      = %07b \n", MCTL);             // Display binary MCTL address
  print("writeMask = %07b (OR)\n", writeMask);    // Display binary writeMask

  cmd = MCTL | writeMask;                         // MCTL OR writeMask to cmd

  print("-------------------------\n");           // Draw line
  print("cmd       = %07b \n\n", cmd);            // Display cmd result
  print("ZOUT8     = %07b \n", ZOUT8);            // Display binary ZOUT address
  print("readMask  = %07b (AND)\n",               // Display binary readMask
        readMask & 0b1111111);                    // Bits 31...7 -> 0 for display

  cmd = ZOUT8 & readMask;                         // ZOUT8 AND readMask to cmd

  print("-------------------------\n");           // Draw line
  print("cmd       = %07b \n", cmd);              // Display cmd result
}
Why is & 0b1111111 added to the statement that prints readMask? The %07 flag only prints 7 digits if all the digits to the left are zero. Without the mask, it would have printed 11111111111111111111111110111111. Performing an AND operation with 0b00000000000000000000000001111111 changes all those leading ones to zeroes so that only 7 digits in readMask get printed.
Your Turn
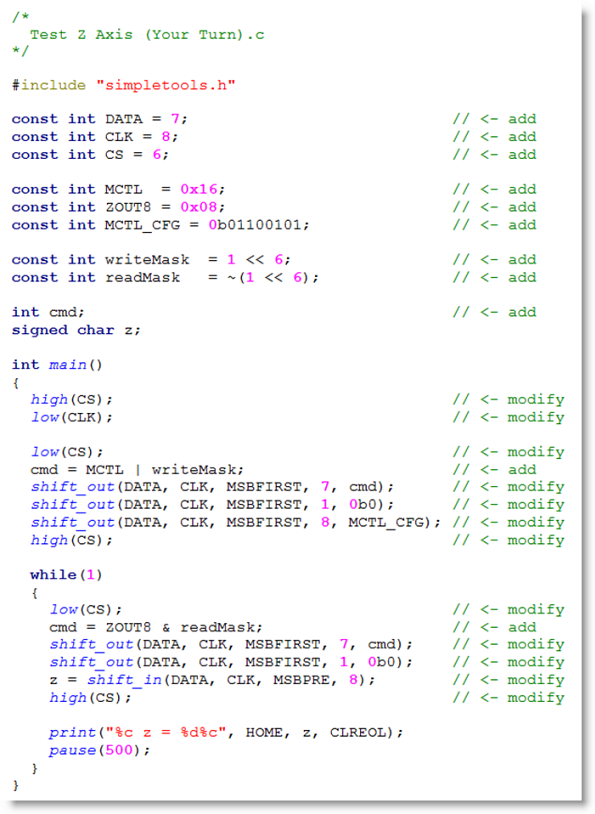
Let’s use what we’ve learned to update our SPI code example. This version declares a constant for the address of each MMA7455 register used so far. It also declares constants writeMask and readMask for setting or clearing bit 6 of the register values. Then there will be no need to manually convert from hexadecimal to binary for the shift_out and shift_in value parameters (hooray!). The modified example also uses names in place of numbers for the I/O pins. This makes a driver much easier to re-use in a different project.
Why are we encouraging you to do all this? Because these are techniques you are likely to see (or use yourself) in other SPI drivers.
- Use the Save Project As button to save a copy of your project in …Documents\SimleIDE\My Projects.
- Modify as shown below.
- Run the program and verify that the output is still the same.

Project Idea
- Look up the XOUT8 and YOUT8 register addresses in the datasheet, and expand this example program to read and display all three axis values.
