Check Pushbuttons
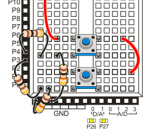 Set up a circuit to monitor pushbuttons, and use them to control LED lights with this Propeller C - Simple Circuits tutorial.
Set up a circuit to monitor pushbuttons, and use them to control LED lights with this Propeller C - Simple Circuits tutorial.
 Drive your ActivityBot remotely using a Joystick mounted on an Activity Board! This is a simple and fun C-language project you can complete in less than two hours.
The image below shows the schematic for the Boe-Bot with the accelerometer circuit. The servo and piezo speaker connections are from Robotics with the Boe-Bot (#28125). The connections for the accelerometer are featured in Chapter 3 of Smart Sensors and Applications.
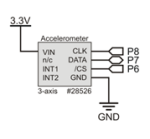 SPI is a communication protocol used to exchange data between IC's and computing tools like microcontrollers. This tutorial uses the MMA7455 3-Axis Accelerometer to go in-depth about the CLK, DATA, and /CS pins used frequently in SPI communcation, and how to develop your own test code from information found on the product's datasheet.
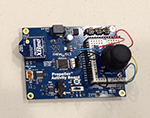
There is no need to build circuits on the breadboard for this project. Instead, it takes advantage of the Activity Board WX's 3-pin headers for the servos, and its D/A socket to drive the magnetic speaker.
Propeller I/O pin connections
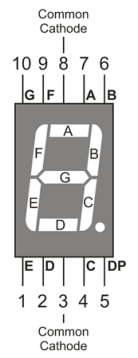
A 7-segment LED is a great way to display numbers using your Propeller microcontroller. They are made up of eight LEDs in one case. Seven bar-shaped LEDs form the segments of the digit, labelled A through G in the picture below. The eighth one is the decimal point.
 Learn first how to make noise and then how to make music with your Propeller board and a simple Piezo speaker in this Propeller C - Simple Circuits tutorial.
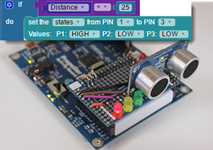 Need help parking in just the right spot to clear the garage door without tapping the front bumper? Use the PING))) Ultrasonic Distance Sensor to measure the distance to your car, with indicator lights to tell you when to stop. This little project uses the parts in the BlocklyProp Starter Kit.
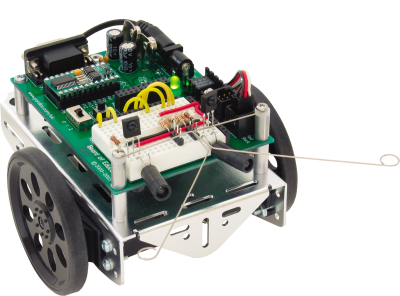
Have you ever stumbled around in complete darkness, to the point where you stretch your hands out in front of you to avoid tripping over something you can’t see? Well, right now your Boe-Bot is completely blind. We can’t give him eyes just yet, but we can give him a simple form of touch with what we call “whiskers”.