How the led_brightnesses Script Works
Remember from the Connect and Blink a Light activity’s On-Off Signals section that a blinking light has a period, frequency, and duty cycle. The period is the total on/off time for a single blink, abbreviated T and measured in s. The frequency is the blinks per second, abbreviated f and measured in Hz. The duty cycle is the percent of the period that the light is on.
The write_analog() method makes the light blink at 50 times per second (f = 50 Hz). That’s faster than the eye can see, but the eye does detect the high time of each blink as brightness. If the light is on for ½ the time, it appears to be half as bright. On for ¼ of the time -¼ as bright, and so on…
Remember that the period is 1/f. In the case of write_analog, the micro:bit sets the light's blink period to T = 1/50 Hz = 20 ms. You have 1024 options for how long the light stays on during the 20 ms period — from 0/1024ths to 1023/1024ths of the time. For 50% duty cycle (and 50% brightness), use pin14.write_analog(512). That’ll give you 512/1024ths of on time, which is 50%.
Example: Set the brightness to 25%.
Solution: For 25% brightness, we need 25% duty cycle. 0.25 x 1024 = 256, so use 256 in write_analog, like this: pin14.write_analog(256).
Try This: Brightness Fade-in
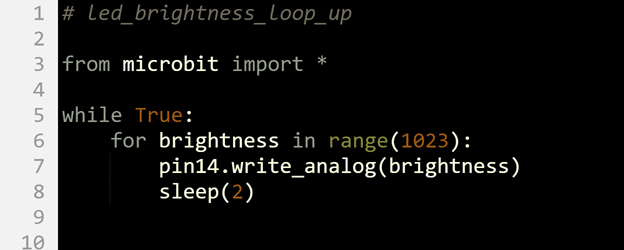
Here is an example that uses a for loop inside a while loop to repeatedly fade-in brightness from 0 to max (1023).
- Change the project name to led_brightnesses_loop_up.
- Update your script to match the one below, then click Save.
- Click Send to micro:bit.
- Watch the LED gradually go from completely off to fully on.

