Did You Know: About D/A Converters
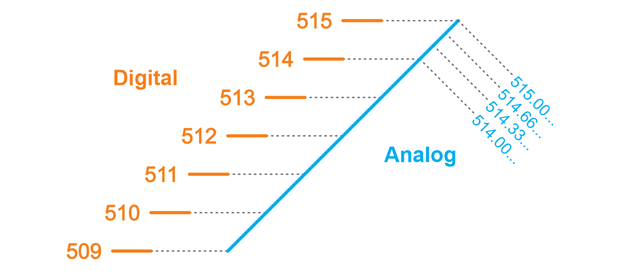
In the physical world, analog quantities like light intensity and audio volume are continuously variable. Think of “continuously variable” as having an infinite number of increments in any range. Like the blue analog line in the diagram. It’ll have values like 514.00... and 515.00..., but between those two levels, there’s an infinite number of other levels. Two examples include 514.33… and 514.66…

In electronics, analog quantities are represented by digital steps, like the orange 509 through 515 integer steps in the diagram. Many electronic devices store digital step values and use them to synthesize analog values. In addition to the light intensity example we are working with, music and video streaming use digitized audio and video data. But, the steps in the digitized values are so close together that we cannot hear/see the difference.
In the case of the micro:bit, it can set the LED to 1024 different brightnesses (including off). If it increases by one increment at a time, it looks like it varies continuously, but it’s actually stepping from one brightness to the next. Even so, it is commonly called an “analog” setting, and the process of converting a number in the 0 to 1023 range to an LED brightness is a form of “digital to analog conversion”.
Digital to analog conversion devices normally have a number of steps that is some power of two. For example, 1024 is 210. The power of 2 is actually a memory size, measured in “bits” which are memory elements that can store binary digits: 1 or 0. In the case of the micro:bit D/A converter, it’s called a 10-bit digital to analog converter. With 10 bits or memory (10 binary 1/0 digits), you can count from 0 through 1023:
Decimal Binary (10-bit)
1 0000000001
2 0000000010
3 0000000011
4 0000000100
5 0000000101
6 0000000110
7 0000000111
...
509 0111111101
510 0111111110
511 0111111111
512 1000000000
513 1000000001
514 1000000010
515 1000000011
...
1021 1111111101
1022 1111111110
1023 1111111111
Small Code Tests before Using Larger Values
Sometimes, it’s helpful to test a small loop to figure out what a larger one will really do. For example, you could use this script to quickly see what the result of a for...in range() loop with one argument will be. Since it prints 0, 1, 2, and 3, it can help verify that it counts from 0 up to, but not including, the value in the parentheses.
for n in range(4):
    print(n)
Another approach would be to look it up in the Python language documentation. For example, the answer is on this page too: 4. More Control Flow Tools. It’s part of the Python 3 Documentation, which is what the MicroPython for the micro:bit is based on.
One way to make the brightness fade in and then fade back out would be to have a loop that counts up, like the one you just tried, followed by a loop that counts back down. Counting down with range needs a start, stop, and negative step value. For example, this for loop counts 5, 4, 3, 2, 1:
for n in range(5, 0, -1):
    print(n)
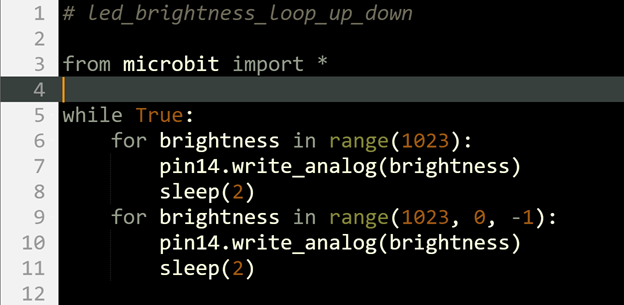
Extending that to the for brightness loop, you could use for brightness in range(1023, 0, -1). This would start at maximum brightness and count down to a brightness of 1. That loop following the fade-in loop would fade the brightness back out.
Your Turn -Brightness Fade-in Fade-out
Let’s try the fade-in, fade-out effect explained in the try Did You Know section above.
- Change the project name to led_brightnesses_loop_up_loop_down.
- Update your script to match the one below, then click Save.
- Click Send to micro:bit.
- Verify that the LED brightness repeatedly increases and decreases.

