Is your ActivityBot having trouble?
This page lists some of the most common problems encountered when calibrating the ActivityBot, or programming it to drive for the first time.
If you don't find your specific problem here, or need more help, contact Parallax Technical Support by email (support@parallax.com), or by phone 916 -624-8333 (toll-free: 888 99-STAMP within USA only). You can also post a question in the Learn Forum to get help from the community.
Issue: The ActivityBot is on and receiving power, but will not move when programmed, or resets itself while running.
Solution: First, if the servos do not turn at all, make sure the power switch is in Position 2 (which powers the servo headers), and not Position 1. If that doesn't help, check the batteries. Low batteries or batteries that are placed in backward will not provide enough power to the ActivityBot to run all of its components effectively. This can result in slower speeds, resets, or loss of functionality.
Issue: The ActivityBot is on and receiving power (with new batteries), but it will not move at all or moves slowly in a twitchy manner.
Solution: First, if the servos do not turn at all, make sure the power switch is in Position 2 (which powers the servo headers), and not Position 1. If that doesn't help, check the servo port jumper positions. The jumper for P12 and P13 should be set to VIN — if it is set to 5V the servos will not receive enough power. Follow the Electrical Connections page instructions for moving the jumper, and then run the calibration again.
DO NOT MOVE THE JUMPER WHILE POWER PLUG OR USB CABLE IS CONNECTED TO THE BOARD.
Issue: The ActivityBot's servos and encoders are powered when the 3-position switch is in position 1.
Solution: Potentially, a short-circuit has damaged your Activity Board (original or WX version). Position 1 on the 3-position switch should not power the 3-pin headers above the breadboard that the servos and encoders are plugged into. This problem can often be caused if the shunt jumper for P12 & P13 was moved while the Activity Board (original or WX version) was receiving power from the USB port or barrel jack. Unfortunately, there is no solution for this problem once it has occurred, please contact technical support (see contact information at the top of this page).
Issue: When the ActivityBot is connected to the computer via USB cable, no COM port registers for it and/or the computer displays an error (no board detected, or board may not be working properly).
Solution: Check the USB connection on the Activity Board (original or WX version). The USB connection port on the ActivityBot is designed to fit tightly to the Mini B connector. Even though it may feel secure, sometimes the cable may not be inserted fully into the port, and this will cause your computer not to recognize the connection or give an error.
Issue: The ActivityBot moves in the opposite direction from what it was programmed to do.
Solution: Check your servo cables. A common mistake is to accidently switch the cables for left and right servos, which causes the ActivityBot to go backwards when it should go forward, left when it should go right, etc. Check to make sure the left and right connections match the Electrical Connections page instructions, and then run the calibration again.
Issue: The ActivityBot moves correctly during calibration, but then doesn't move when trying any other tutorial activity.
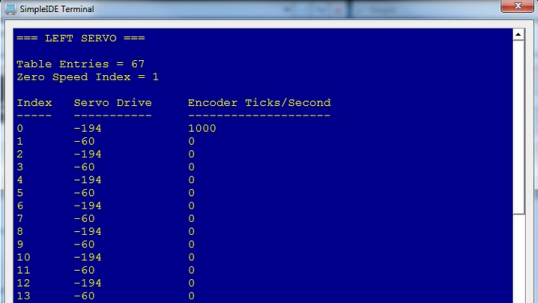
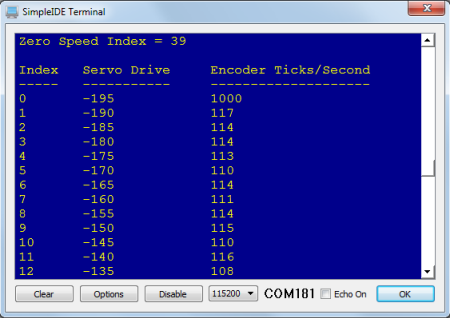
Solution: The right and left encoder cables may be swapped. This prevents the ActivityBot from correctly calibrating or using information from the encoders. A way to check if this is the problem is to look at the calibration table or try the test program here. A successful calibration table shows columns of ascending and descending values, like the one on the Calibrate Your ActivityBot page. If the encoder cables are swapped, there will be long sequences of identical numbers instead, like in the image below. Reconnect the encoder cables following the Electrical Connections page instructions, and then run the calibration again.

Issue: During calibration, the ActivityBot sits still for an unusually long time, and one or both of its wheels do not start turning.
Solution: Check that you don't have a servo and encoder cable swapped (to quickly test this, try the test program here). If so, your Interpolation table will look similar to the one below (the image is for a left servo for left encoder switch). If the left wheel doesn't turn, your left servo and encoder cables might be switched. If the right wheel doesn't turn, your right servo and encoder cables might be switched. If no wheel turns, you might have both right and left swapped. Recheck your connections using the Electrical Connections page and try the calibration again.
Issue: The ActivityBot calibration routine went fine, but instead of driving straight, it drives in a jerky, wavy line.
Solution: You may need to adjust the servo or servo bracket. Check the position of the servo inside its hole in the chassis.
Notice that there is a little bit of space around the servo. If the servo is tight against the top edge of the hole close to the encoder, with a gap left below the servo, the beam of infrared light coming from the encoder sensor might be missing the wheel spokes and hitting the solid ring below them instead.
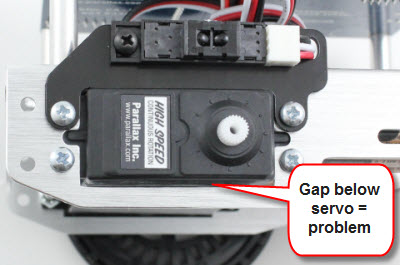
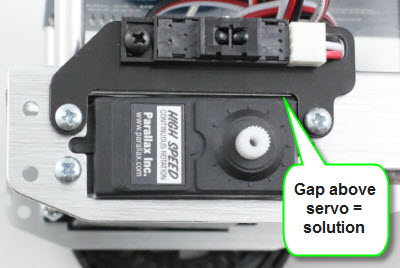
To fix this, loosen the servo's locknuts and then reposition the servo so the gap is between the servo and the encoder. This should ensure that the encoder sees only spokes and holes. Make sure that the servo doesn't shift position when you retighten the locknuts.
(Note: the encoder bracket was redesigned in October 2013 to mitigate this issue.)
Issue: The calibration table display shows null values, or values that alternate from high numbers to low numbers quickly (repeating 161 - 0, for example).
Solution: The encoder IR sensor may not be functioning correctly. Check the encoder cable plug on both ends to make sure it is seated properly. Re-run the calibration a second time and check the interpolation table again using the Display Calibration program. If there is no change, please get in touch with Technical Support using the contact information above. There is no fix for a malfunctioning encoder; it may need to be replaced.
Issue: The ActivityBot appears to run the calibration routine, but it takes a long time. When I tried to look at the calibration with ActivityBot Calibration Display.side, the SimpleIDE terminal was blank.
Solution: First, check to make sure the resistors connecting P14 and P15 to 3.3 V are marked red-black-orange (20 k-ohm). Next, check to make sure your encoder cables are not plugged into the 3-pin headers upside down. White wire should be near the top edge of the board, black wire should be near the 5V labels.
Issue: My ActivityBot completed the calibration, but seemed to move very slowly. The interpolation table's highest values were more like the table below than the expected output shown in Calibrate Your ActivityBot.
Solution: Check your jumper settings for the servos. They should be set to VIN, not 5V. If they are set to 5V, disconnect all power (barrel jack AND USB must be unplugged, power switch set to 0) to the board and move the jumper to VIN as shown on the Electrical Connections page. Once this is completed, re-run the calibration.
Issue: My ActivityBot completed the calibration, but one or both wheels continue to turn when it is supposed to be stopped.
Solution: Your servos may be manually uncentered beyond what the calibration program can compensate for. Try running the following code (by opening a new project), and using a small screwdriver to very gently turn the potentiometer in the small hole in the back of your affected servo until the wheel stops spinning. You must re-run the calibration program once you perform manual calibration – do not forget to do this!
/*
ActivityBot Servo Centering.c
*/
#include "simpletools.h"                      // Include simpletools
#include "servo.h"

int main()                                    // Main function
{
  servo_set(12, 1500);
  servo_set(13, 1500);
}