It’s important to test the whisker contacts before programming your robot to navigate with them. That way, you can be sure the whiskers are sending the right messages. Otherwise, they might be telling the Propeller that they detect something even though they didn't, or vice-versa.
- Make sure the robot's battery pack is plugged into the board.
- Set the PWR switch to 1.
- Click SimpleIDE’s Open Project button.
- Navigate to and open Test Whiskers with Terminal.side.
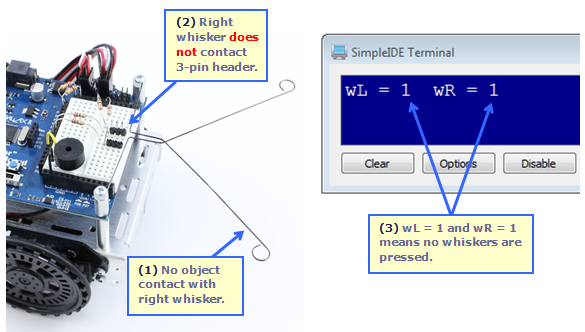
- Click the Run with Terminal button. Without pressing any whiskers, it should display wL = 1 wR = 1.
If either of the numbers are zeros, or if either of them flicker between 1 and 0, there's probably a circuit error.
- If you have a circuit error, go back and double check to make sure all of your connections are correct.
Next, let's check to make sure the Propeller chip detects when the right whisker is pressed or makes contact with an obstacle.
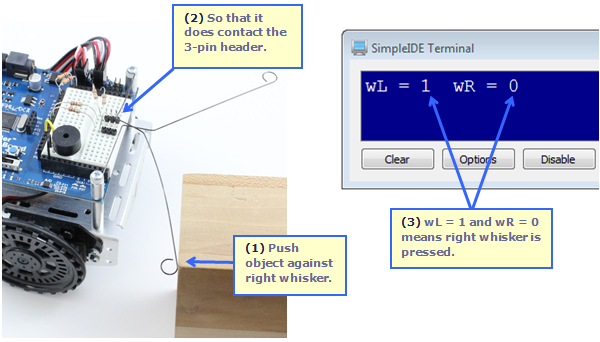
- Press the right whisker so that it makes contact with the 3-pin header's front post (see 2 in the picture).
- Verify that the SimpleIDE Terminal displays wL = 1 wR = 0, which means that the right whisker is pressed.
- If the SimpleIDE Terminal displays anything other than a steady wL = 1 wR = 0 while you have the right whisker pressed, find and fix your circuit error.
- Repeat for the left whisker. You'll want to see wL = 0 wR = 1 in the Parallax Serial Terminal. Make sure it displays that way. If it doesn't, find and fix any circuit errors.
- If you press and hold both whiskers against posts, the Parallax Serial Terminal should display wL = 0 wR = 0. Try that too.
How it Works
The main function starts with our now-familiar reset indicator code: freqout(4, 2000, 3000) makes the speaker connected to P4 beep for 2 seconds at a frequency of 3 kHz.
After that, the program enters a while(1) loop that repeats endlessly. Inside that loop, int wL = input(7) copies the value that input(7) returns into an int variable named wL (short for whisker-Left). The input(7) call might return a 1, which would indicate that the left whisker is not pressed. Or, it might return a 0, indicating that it is pressed. In either case, that 1 or 0 value gets copied to the wL variable. The int wR = input(8) statement works roughly the same way, except that it stores the 1 or 0 value for the right whisker circuit, which is connected to P8, into a variable named wR (short for whisker-Right).
/*
  Test Whiskers with Terminal.c

  Display whisker states in terminal.  1 = not pressed, 0 = pressed.

*/

#include "simpletools.h"                      // Include simpletools header

int main()                                    // main function
{
  freqout(4, 2000, 3000);                     // Speaker tone: P4, 2 s, 3 kHz
  while(1)                                    // Endless loop
  {
    int wL = input(7);                        // Left whisker -> wL variable
    int wR = input(8);                        // Right whisker -> wR variable
    print("%c", HOME);                        // Terminal cursor home (top-left)
    print("wL = %d  wR = %d", wL, wR);        // Display whisker variables
    pause(50);                                // Pause 50 ms before repeat
  }
}
After storing the whisker states in the wL and wR variables, print("%c", HOME) sends the cursor to the home position. The %c format string tells the print function to send the value of a char variable. HOME is the number 1, and when print sends that value to the SimpleIDE Terminal, the terminal moves its cursor to the top-left “home” position. After that, print("wL = %d wR = %d", wL, wR) displays the values of the wL and wR variables. This time, the %d format string made the print function display values as decimal characters, in this case, either 1 or 0 for the whisker states.
Did You Know?
The simpletools library has 16 control characters you can use to do things like clear the screen and position the cursor.
| Name | Value | Description |
| HOME | 1 | Send cursor to the top-left (home) position |
| CRSRXY | 2 | Position the cursor. Follow with x and y values. Example places cursor 10 spaces in and 5 lines down: print("%c%c%c ", CRSRXY, 10, 5); |
| CRSRLF | 3 | Move cursor one space to the left |
| CRSRRT | 4 | Move cursor one space to the right |
| CRSRUP | 5 | Move cursor one line up |
| CRSRDN | 6 | Move cursor one line down |
| BEEP | 7 | Make the host computer beep |
| BKSP | 8 | Backspace |
| TAB | 9 | Tab |
| NL | 10 | Send cursor to next line |
| CLREOL | 11 | Clear text to right of cursor |
| CLRDN | 12 | Clear text below cursor |
| CR | 13 | Carriage return |
| CRSRX | 14 | Position cursor x spaces to the right |
| CRSRY | 15 | Position cursor y lines down |
| CLS | 16 | Clear the display |
Try This
Here is a program you can try that positions the cursor at 10 spaces over and 5 lines down before printing the whisker states.

- Click the Save As Project button.
- Name the project Display Whiskers with CRSRXY and save it to the ActivityBot Tutorial folder.
- Update the main function so that it matches the one above.
- Click the Run with Terminal button and examine the table the SimpleIDE Terminal displays.
Your Turn
- Write a for loop with a print call that uses CRSRXY create this output.
