The Parking Assistant lets you know when you’ve pulled into the garage far enough to shut the door, without running into anything! The PING))) Ultrasonic Distance Sensor checks how far away your car bumper is. The green, yellow, and red LEDs let you know if you are still far away, getting closer, and when it is time to stop.
Build It
Parts List
These items are all in the BlocklyProp Starter Kit (#32520)
- (1) Propeller Activity Board
- (1) PING))) Ultrasonic Distance Sensor
- (1) Red LED
- (1) Yellow LED
- (1) Green LED
- (3) 220 ohm resistors
- (1) 2 k-ohm resistor
- (misc) jumper wires
- (1) piezospeaker - optional, for the Try This section
Propeller I/O Pin Connections
- P1: Red LED, via 220 ohm resistor
- P2: Yellow LED, via 220 ohm resistor
- P3: Green LED, via 220 ohm resistor
- P15: PING))) Distance Sensor’s SIG pin, via 2 k-ohm resistor
Use the schematics and pictures below to build the Parking Assistant. Options for using the breadboard or Circuit Overlay Board are shown below. In these examples, the LED leads are trimmed so the cases stay flat on the board - this is just an example and not necessary!


Program It
- Go to your account at blockly.parallax.com and build the project shown below.
- Download the code to EEPROM.
- Step in front of the Ping))) sensor, then back away until no LEDs are on. Then slowly step forward.
The green LED should light up first, when you are within 150 cm of the sensor. As you reach 75 cm, the yellow LED should light up instead, warning you are getting closer. When the red LED lights up, you are within 25 cm of the sensor and it is time to stop!

How it Works
Most of the program is inside of a repeat forever block (loop), but there is one important bit of setup beforehand. The first set multiple pins block sets the direction of the LED I/O pins to output. Propeller I/O pins are set to input by default. So, without setting the direction to output first, using the set multiple pins block to make the pin states HIGH or LOW would have no effect on the LEDs!
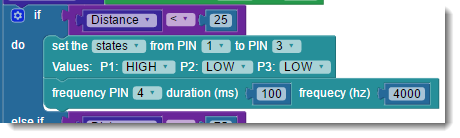
Inside the loop is a big if...do block with three different conditions. Each one tests the distance measured by the Ping))) sensor, and sets the LEDs' pin states in a different pattern: green for keep going, yellow for getting closer, and red for time to stop!
Instead of checking whether a distance is between two measurements, the first conditon starts by just checking if the distance less than (<) the closest range we care about. If not, then it can check the next larger range measurement, and then the largest range measurement. (If you think it would work by checking the ranges in reverse order, try it and see what happens!)
A pause block just outside the if...do block slows the loop down just a little bit. It may not be needed here, but it can be a good practice to put a pause in a loop. Sometimes if a looping program is behaving oddly, slowing it down just a little bit can help, such as when one block tries to use the value of a variable before another block has a chance to take a measurement and update it.
Did You Know?
When triggered by a start pulse from the Propeller microcontroller, the Ping))) sensor chirps at 40 kilohertz—a frequency higher than human ears can hear—and then listens for the echo. Much like a bat! The Ping))) sensor sends back an echo time pulse representing how long it waits for the echo to bounce off an object and return to its receiver. BlocklyProp's Ping))) distance block measures this pulse and calculates the distance to the object, using the speed of sound in air.
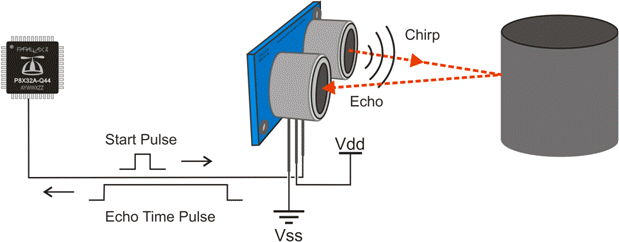
You can't hear the Ping))) sensor working, but you can see it: there is a small green LED right on its printed circuit board, above and between the cylinders. If the sensor's ground and power connections are correct, and it is receiving start pulse signals from a Propeller I/O pin, this LED will light up.
Try This
Try adding sound to your project that you actually CAN hear!
- Add a piezospeaker to the board. Connect its (+) lead pin to P4, and the other lead to GND.
- Add a frequency out block to each condition in the if...do block, four in all.
- In each frequency out block, use durations of 100 ms, but a different frequency in each one, up to 4000 Hz when the distance is shortest.
- Remove the pause block at the end of the loop. (The durations will take the place of pause.)
Your Turn
- Adjust the values in each if...do condition to adapt the project to your actual garage, or some other situation where the tool you just created might be useful!
To try this project just for fun, build it on the breadboard and power it via USB. For a permanent project to use in the garage or elsewhere, consider soldering the parts onto a Circuit Overlay Board and powering it with a wall-mount power supply.