Skip to content
Parallax Learn

Parallax Learn

  • Welcome
  • Tutorials
        • Tutorial Series head tag

          Tutorial Series
        • Tutorial Series

          The special, classroom-ready series pages are organized collections of tutorials for our most popular hardware and/or languages. The tutorials for each topic are conveniently accessible from a single page, shown in the order it is recommended that they be completed.
        • Robotics Series Head tag

          Robotics Series
        • Robotics Series

          • Artificial Intelligence
          • Cybersecurity: Radio Data tutorialCybersecurity
          • cyber:bot + Python
          • cyber:bot + MakeCode
          • Boe-Bot Tutorial SeriesBoe-Bot
          • Arduino Shield-Bot
          • ActivityBot with C TutorialsActivityBot + C
          • ActivityBot with BlocklyProp Tutorial SeriesActivityBot + BlocklyProp
          • Scribbler 3 Tutorial SeriesScribbler 3
        • Electronics & Programming Series Head tag

          Electronics & Programming Series
          • BS2 Board of Education Tutorial SeriesBS2 Board of Education
          • Propeller C-Language BasicsPropeller C Basics
          • FLiP Try-It Kit C Tutorial SeriesFLiP Try-It Kit + C
          • FLiP Try-It Kit BlocklyProp TutorialsFLiP Try-It Kit + BlocklyProp
          • Badge WX Tutorial SeriesBadge WX
          • Propeller BlocklyProp Basics and ProjectsPropeller BlocklyProp Basics
          • View All Tutorial Series »
        • Browse Tutorials
        • Browse Tutorials

          Individual tutorials sorted by robot or kit, and language.
        • By Robot or Kit
          • ActivityBot
          • SumoBot WX
          • Boe-Bot
          • Shield-Bot
          • cyber:bot
          • Badge WX
          • ELEV-8
          • ARLO
        • By Language
        • By Language

          • Propeller C
          • Arduino
          • BlocklyProp
          • PBASIC
          • Python
          • MakeCode
          • View All Tutorials »
  • Educators
  • Reference
  • Downloads
  • Home
  • All Courses

Build your SumoBot WX

Curriculum

  • 1 Section
  • 9 Lessons
  • Lifetime
Expand all sectionsCollapse all sections
  • Build your SumoBot WX
    9
    • 1.1
      Check the Parts
    • 1.2
      Plug In the FLiP Module
    • 1.3
      Attach Battery Holder – Gently!
    • 1.4
      Install the Servos
    • 1.5
      Attach the Board
    • 1.6
      Attach the Wheels
    • 1.7
      Attach the Scoop
    • 1.8
      Servo Connections
    • 1.9
      Install the Batteries

Attach the Board

This step adds hardware to secure the SumoBot WX board to the chassis now, and also to hold QTI line sensors in the future.

Parts Required for each robot

  • SumoBot WX PCB with FLiP module (not shown)
  • SumoBot chassis, partly assembled (not shown)
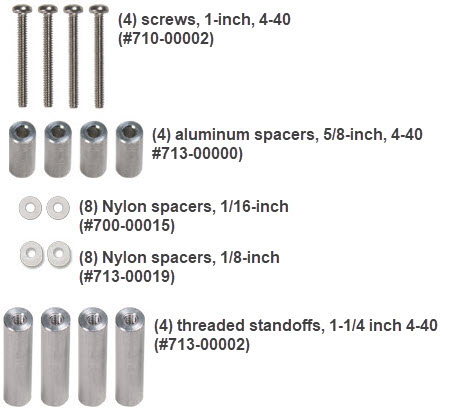
  • (4) Screws, 1-inch, 4-40
  • (4) Aluminum spacers, 5/8 inch
  • (2) 1/16″ Nylon spacers
  • (2) 1/8″ Nylon spacers
  • (4) 1 1/4-inch threaded standoffs


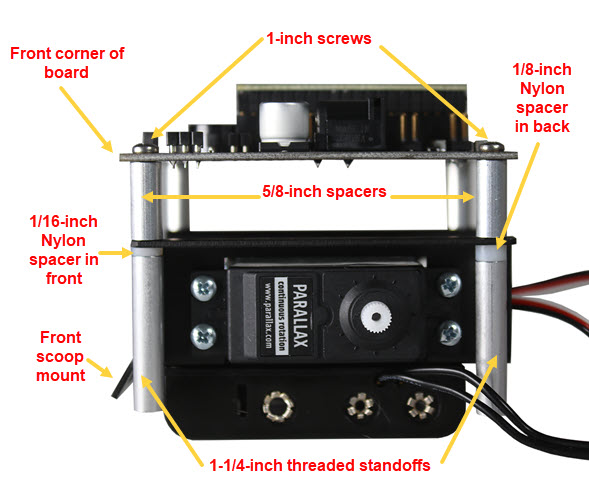
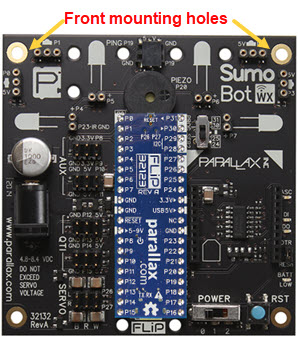
  • Locate the SumoBot WX board’s front mounting holes.


  • Thread a 1-inch screw through each of the SumoBot WX board’s front corners, from the top side.
  • Slide a 5/8″ aluminum spacer over each screw.
  • Position the PCB over the chassis so that the front corners are over the front scoop mount, and the FLiP module is towards the back.
  • Thread the screws through the front mounting holes in the chassis.
  • Slide a  1/16″ nylon washer over each screw.
  • Tighten a 1 1/4″ threaded aluminum standoff onto each screw.
  • Repeat for the rear mounting holes, but using a 1/8″ Nylon spacer.


Printer-friendly version
Install the Servos
Prev
Attach the Wheels
Next

DISCUSSION FORUMS | PARALLAX INC. STORE

About | Terms of Use | Feedback: learn@parallax.com | Copyright©Parallax Inc. 2024

© 2026 Parallax Learn • Built with GeneratePress