Skip to content
Parallax Learn

Parallax Learn

  • Welcome
  • Tutorials
        • Tutorial Series head tag

          Tutorial Series
        • Tutorial Series

          The special, classroom-ready series pages are organized collections of tutorials for our most popular hardware and/or languages. The tutorials for each topic are conveniently accessible from a single page, shown in the order it is recommended that they be completed.
        • Robotics Series Head tag

          Robotics Series
        • Robotics Series

          • Artificial Intelligence
          • Cybersecurity: Radio Data tutorialCybersecurity
          • cyber:bot + Python
          • cyber:bot + MakeCode
          • Boe-Bot Tutorial SeriesBoe-Bot
          • Arduino Shield-Bot
          • ActivityBot with C TutorialsActivityBot + C
          • ActivityBot with BlocklyProp Tutorial SeriesActivityBot + BlocklyProp
          • Scribbler 3 Tutorial SeriesScribbler 3
        • Electronics & Programming Series Head tag

          Electronics & Programming Series
          • BS2 Board of Education Tutorial SeriesBS2 Board of Education
          • Propeller C-Language BasicsPropeller C Basics
          • FLiP Try-It Kit C Tutorial SeriesFLiP Try-It Kit + C
          • FLiP Try-It Kit BlocklyProp TutorialsFLiP Try-It Kit + BlocklyProp
          • Badge WX Tutorial SeriesBadge WX
          • Propeller BlocklyProp Basics and ProjectsPropeller BlocklyProp Basics
          • View All Tutorial Series »
        • Browse Tutorials
        • Browse Tutorials

          Individual tutorials sorted by robot or kit, and language.
        • By Robot or Kit
          • ActivityBot
          • SumoBot WX
          • Boe-Bot
          • Shield-Bot
          • cyber:bot
          • Badge WX
          • ELEV-8
          • ARLO
        • By Language
        • By Language

          • Propeller C
          • Arduino
          • BlocklyProp
          • PBASIC
          • Python
          • MakeCode
          • View All Tutorials »
  • Educators
  • Reference
  • Downloads
  • Home
  • All Courses

Build your SumoBot WX

Curriculum

  • 1 Section
  • 9 Lessons
  • Lifetime
Expand all sectionsCollapse all sections
  • Build your SumoBot WX
    9
    • 1.1
      Check the Parts
    • 1.2
      Plug In the FLiP Module
    • 1.3
      Attach Battery Holder – Gently!
    • 1.4
      Install the Servos
    • 1.5
      Attach the Board
    • 1.6
      Attach the Wheels
    • 1.7
      Attach the Scoop
    • 1.8
      Servo Connections
    • 1.9
      Install the Batteries

Install the Batteries

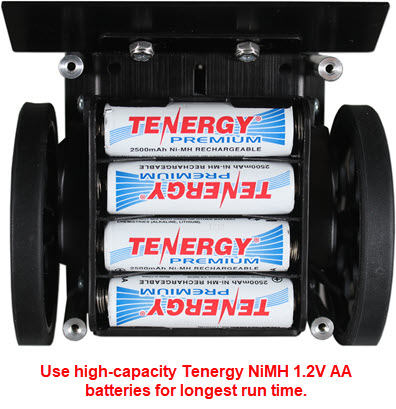
High-capacity Tenergy 1.2 V AA NiMH batteries are strongly recommended for the SumoBot WX robots. These rechargeable batteries give a very long run time, up to 120 minutes.  Regular 1.5V alkaline batteries may also be used, but the run time is much shorter, about 30 minutes.

Parts required for each robot

  • Fully assembled SumoBot WX
  • (4) AA batteries (do not mix different types):
    • 1.2V NiMH recommended, Tenergy brand gives a long run time ~ 120 minutes
      — or —
    • 1.5V Alkaline, not preferred, gives a short run time  ~ 30 minutes

Install the batteries

  • Make sure the 3-position switch is set to 0.
  • Load the batteries into the battery holder as shown here.

Test the Power

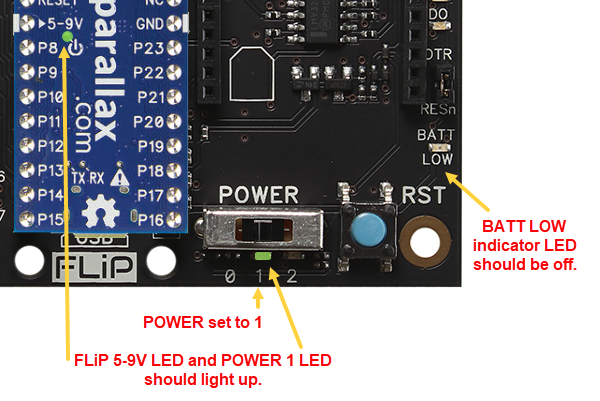
  • Set the 3-position switch to 1, and verify that the light above the switch’s 1 label turns on.
  • If it does not turn on or is really dim, immediately set the switch back to 0 and remove the batteries.  Make sure your FLiP module and servo connections are correct, and that your batteries are installed the right way.
  • The red BATT LOW light might flicker for an instant as you slide the switch to different positions.  That’s normal, so long as it stays off the rest of the time.  If it says on or flashes, it’s probably trying to tell you that your batteries are low.
  • Verify that the green light in the FLiP betlow the 5-9V label also turned on.

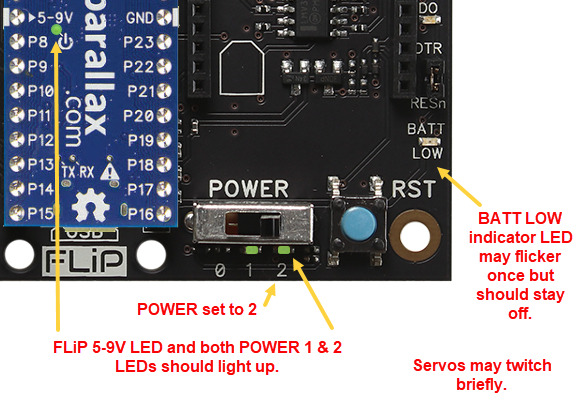
  • Set the 3-position switch to 2, and verify that the servos twitch when you did so.
  • Verify that both LEDs below the power switch are on now. 
  • Verify that the green light in the FLiP betlow the 5-9V label is still on.

  • Set the 3-position switch to 0, and verify that the lights all turn off.
  • Congratulations!  You are now ready to continue to the next chapter where you will adjust the servos and write a simple navigation program with BlocklyProp.


Printer-friendly version
Servo Connections
Prev

DISCUSSION FORUMS | PARALLAX INC. STORE

About | Terms of Use | Feedback: learn@parallax.com | Copyright©Parallax Inc. 2024

© 2026 Parallax Learn • Built with GeneratePress