Curriculum
- 9 Sections
- 148 Lessons
- Lifetime
Expand all sectionsCollapse all sections
- About This Tutorial3
- Chapter 1. Your Shield-Bot's Brain25
- 3.1Chapter 1. Your Shield-Bot’s Brain
- 3.2Hardware and Software Options
- 3.3Shield-Bot Chassis Parts
- 3.4Shield-Bot Hardware
- 3.5Shield-Bot Electronics Parts
- 3.6Activity 1: Download and Install the Software
- 3.7Activity 2: Write a Simple “Hello!” Sketch
- 3.8Codebender Hello Sketch
- 3.9How the Hello Sketch Code Works
- 3.10Modify the Sketch to Repeat
- 3.11Hello Messages on New Lines
- 3.12Open the Arduino Reference
- 3.13Activity 3: Store and Retrieve Values
- 3.14Global vs.Local Variables
- 3.15Activity 4: Solve Math Problems
- 3.16Try Floating Point Math
- 3.17Activity 5: Make Decisions
- 3.18More Decisions with if… else if
- 3.19Activity 6: Count and Control Repetitions
- 3.20How the for Loop Works
- 3.21Adjust Initialization, Condition, and Increment
- 3.22Activity 7: Constants and Comments
- 3.23Chapter 1 Summary
- 3.24Chapter 1 Challenges
- 3.25Chapter 1 Solutions
- Chapter 2. Shield, Lights, Servo Motors23
- 4.0Chapter 2. Shield, Lights, Servo Motors
- 4.1Activity 1: Board of Education Shield Setup
- 4.2Activity 2: Build and Test LED Indicator Lights
- 4.3Introducing the Resistor
- 4.4Introducing the LED
- 4.5Introducing the Prototyping Area
- 4.6LED Test Circuit
- 4.7How a Sketch Makes the LED Turn On and Off
- 4.8Introducing the Timing Diagram
- 4.9Activity 3: LED Servo Signal Monitors
- 4.10How to Use the Arduino Servo Library
- 4.11Activity 4: Connect Servo Motors and Batteries
- 4.12Connect the Servos to the BOE Shield
- 4.13Connect the Battery Pack to the BOE Shield
- 4.145-cell Pack Setup
- 4.154-cell Pack + Boe-Boost Setup
- 4.16Activity 5: Centering the Servos
- 4.17Activity 6: Testing the Servos
- 4.18Controlling Servo Speed and Direction
- 4.19How To Control Servo Run Time
- 4.20Chapter 2 Summary
- 4.21Chapter 2 Challenges
- 4.22Chapter 2 Solutions
- Chapter 3. Assemble and Test your BOE Shield-Bot22
- 5.0Chapter 3. Assemble and Test your BOE Shield-Bot
- 5.1Activity 1: Assembling the BOE-Shield-Bot
- 5.2Mount the Topside Hardware
- 5.3Remove the Servo Horns
- 5.4Mount the Servos on the Chassis
- 5.5Mount the Battery Pack
- 5.6Mount the Wheels
- 5.7Attach the BOE Shield to the Chassis
- 5.8Activity 2: Re-test the Servos
- 5.9Testing the Left and Right Wheels
- 5.10Servo Troubleshooting
- 5.11Activity 3: Start-Reset Indicator
- 5.12Build the Piezospeaker Circuit
- 5.13Programming the Start-Reset Indicator
- 5.14Example Sketch: StartResetIndicator
- 5.15Activity 4: Test Speed Control
- 5.16Example Sketch: Test Servo Speed
- 5.17How TestServoSpeed Works
- 5.18Optional: Record Your Own Transfer Curve Data
- 5.19Chapter 3 Summary
- 5.20Chapter 3 Challenges
- 5.21Chapter 3 Solutions
- Chapter 4. BOE Shield-Bot Navigation19
- 6.0Chapter 4. BOE Shield-Bot Navigation
- 6.1Activity 1: Basic BOE Shield-Bot Maneuvers
- 6.2How ForwardThreeSeconds Works
- 6.3Moving Backward, Rotating, and Pivoting
- 6.4Activity 2: Tuning the Basic Maneuvers
- 6.5Tuning the Turns
- 6.6Activity 3: Calculating Distances
- 6.7Activity 4: Ramping Maneuvers
- 6.8Activity 5: Simplify Navigation with Functions
- 6.9Function Call with Parameters
- 6.10Put Maneuvers Into Functions
- 6.11Activity 6: Custom Maneuver Function
- 6.12Activity 7: Maneuver Sequences with Arrays
- 6.13Using Array Elements
- 6.14Navigation with Arrays
- 6.15Character Arrays and switch-case
- 6.16Chapter 4 Summary
- 6.17Chapter 4 Challenges
- 6.18Chapter 4 Solutions
- Chapter 5. Tactile Navigation with Whiskers13
- 7.0Chapter 5. Tactile Navigation with Whiskers
- 7.1Activity 1: Build and Test the Whiskers
- 7.2How Whisker Switches Work
- 7.3Testing the Whiskers
- 7.4How DisplayWhiskerStates Works
- 7.5Activity 2: Field-Test the Whiskers
- 7.6Activity 3: Navigation with Whiskers
- 7.7How RoamingWithWhiskers Works
- 7.8Activity 4: Artificial Intelligence for Escaping Corners
- 7.9How Escaping Corners Works
- 7.10Chapter 5 Summary
- 7.11Chapter 5 Challenges
- 7.12Chapter 5 Solutions
- Chapter 6. Light-Sensitive Navigation with Phototransistors18
- 8.0Chapter 6. Light-Sensitive Navigation with Phototransistors
- 8.1Introducing the Phototransistor
- 8.2Activity 1: Simple Light to Voltage Sensor
- 8.3Example Sketch: PhototransistorVoltage
- 8.4Halt Under the Bright Light
- 8.5How the Phototransistor Circuit Works
- 8.6Ohm’s Law
- 8.7Activity 2: Measure Light Levels Over a Larger Range
- 8.8Building the Photosensitive Eyes
- 8.9Test the Phototransistor Circuit
- 8.10rcTime and Voltage Decay
- 8.11Activity 3: Light Measurements for Roaming
- 8.12Light Measurement Graphic Display
- 8.13Activity 4: Test a Light-Roaming Routine
- 8.14Activity 5: Shield-Bot Navigating by Light
- 8.15Chapter 6 Summary
- 8.16Chapter 6 Challenges
- 8.17Chapter 6 Solutions
- Chapter 7. Navigating with Infrared Headlights14
- 9.0Chapter 7. Navigating with Infrared Headlights
- 9.1Infrared Light Signals
- 9.2Activity 1: Build and Test the Object Detectors
- 9.3Object Detection Test Code
- 9.4Activity 2: Field Testing
- 9.5Sniffing for IR Interference
- 9.6Activty 3: Detection Range Adjustments
- 9.7Activity 4: Object Detection and Avoidance
- 9.8Activity 5: High-performance IR Navigation
- 9.9Activity 6: Drop-off Detector
- 9.10Example Sketch: AvoidTableEdge
- 9.11Chapter 7 Summary
- 9.12Chapter 7 Challenges
- 9.13Chapter 7 Solutions
- Chapter 8. Robot Control with Distance Detection11
- 10.0Chapter 8. Robot Control with Distance Detection
- 10.1Activity 1: Testing the Frequency Sweep
- 10.2Displaying Both Distances
- 10.3Activity 2: BOE Shield-Bot Shadow Vehicle
- 10.4A Look Inside Proportional Control
- 10.5Example Sketch: FollowingShieldBot
- 10.6Follow the Leader
- 10.7Activity 3: What’s Next?
- 10.8Chapter 8 Summary
- 10.9Chapter 8 Challenges
- 10.10Chapter 8 Solutions
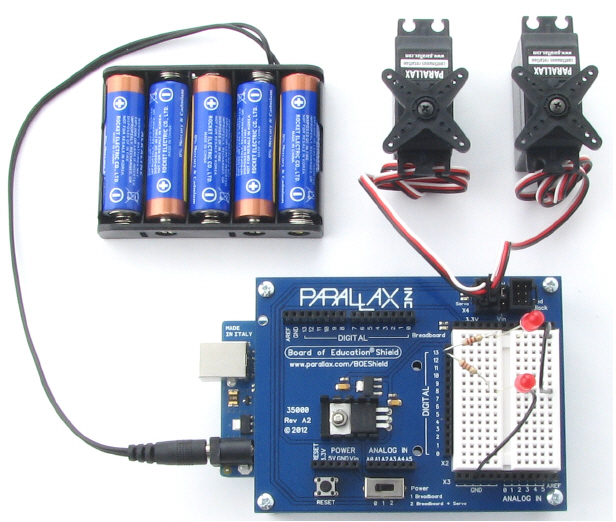
5-cell Pack Setup
Parts List
(5) AA alkaline batteries
(1) 5-cell battery pack
- Load the batteries into the battery pack.
- Plug the battery pack into the Arduino’s power jack. When you are done, it should resemble the picture below.
- Skip to Centering the Servos.