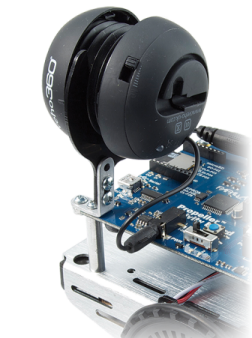
You will need to add the veho360 speaker and its mounting bracket, the whisker circuits, and one IR receiver circuit to your ActivityBot. You will also need to configure your IR remote for Sony protocol.
First Things First
- Charge your veho360 or Portable Mini Hamburger Speaker (if it is not charged yet) while you complete the rest of the building steps. It comes with a USB charging cable. (Note: the speaker's cable doesn’t work for programming the ActivityBot; for that you must use the cable that came with the robot kit).
- Make sure you are using the latest SimpleIDE software, and the latest Learn Libraries and ActivityBot Libraries.
- Make sure your robot has been calibrated recently. If it hasn't, follow these directions to calibrate your ActivityBot.
Prepare the Gadgets
- Make sure your IR remote has fresh batteries!
- Configure your IR remote for Sony protocol (if it is not already configured) following its manufacturer instructions. (For the Brightstar brand remote available from Parallax, press and hold the Setup button until the light near it turns on. Then, press 6-0-5.)
- Follow the directions in the ActivityBot Speaker Mount product guide to attach the bracket to the robot chassis, and mount the charged veho360 or Portable Mini Hamburger speaker.
Build and Test the Sensor Circuits
You will need to build and test three sensor circuits on your ActivityBot breadboard: two for whiskers, and one for the Infrared Receiver. When you are done, your board will look something like the one below.
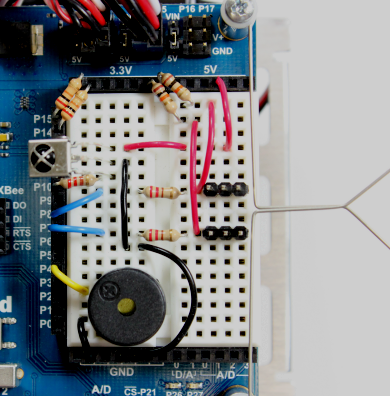
- Follow the directions on the Build the Whiskers page from the ActivityBot tutorial . You can use the component placement shown in the photo below, or follow the wiring diagram in the Build the Whiskers page. Either is fine!
- Test the whisker circuits to make sure they are working.
- Build and test the IR Receiver circuit, following the Infrared Receiver and Remote tutorial.
- Gently bend the IR receiver legs so the dome on the sensor is facing upwards. This will help it to receive IR signals from the remote, no matter which way it is traveling.
- If you like, add a piezo speaker circuit to I/O pin 4. The application code will use it as a low-battery reset indicator at the start of the main routine.