Radio transmitters come with an overwhelming array of settings. This step will guide you through configuring your transmitter so that it can properly control your ELEV-8 v3. Below is a table of transmitter setting recommendations for flying the ELEV-8 v3, regardless of transmitter selection. You will also bind your transmitter to your receiver, which enables your particular transmitter to control your particular receiver for the ELEV-8 v3.
Parts Needed:
- ELEV-8 v3 Assembly w/ LiPo Battery, prepared in Section 5
- Fully Charged RC Radio Transmitter (not included)
- RC Receiver Bind Plug (not included)
- SD Card & SD Card Reader (optional)
Transmitter Settings
| Box Model Type | ACRO (Plane Mode) |
|---|---|
| End Point (Travel) Adjustment | Spektrum: 125% for all channels Others: Unknown (let us know what works for you!) |
| Channel Reverse | Spektrum: Aileron, Rudder, Gear, Aux 1 Others: Unknown (let us know what works for you!) |
| Trims & Sub-Trims | Centered |
| Dual-Rates (D/R) | 100% (Disabled) |
| Exponential | None |
| Gear Channel Control | 3-Position Switch |
Configuration Instructions
We’ll guide you through making these settings on a Spektrum DXe, DX6, & DX7 in the following instructions.
To get started, choose the your transmitter type from the list below. Once you have finished configuring your transmitter, scroll down the page to find the receiver binding instructions.
For other transmitters/receivers, refer to the literature provided by the manufacturer. If you are new to radio control, many of these terms may be foreign to you. For the sake of brevity we won’t go into those terms now, but we do strongly recommend that you take the time to research any term or concept that is unfamiliar. Please remember to read and abide by your RC transmitter’s instruction manual, as every system is different.
Instructions and Important Notes for Spektrum DXe
If your transmitter has never been used, proceed directly to the binding instructions. If your transmitter has been used, make sure that all settings are set to their default value and all trims are centered, then proceed to the binding instructions.
Notice that the DXe has a Dual Rate ("D/R") Switch, which changes the sensitivity of the joysticks. You will want to keep this switch in the "Hi" at all times, including during GroundStation transmitter calibration. Failure to do so may cause unexpected behavior and inhibit your ability to arm/disarm the ELEV-8. If you have the DXe Programming cable, we recommend you disable this feature.
Instructions for Spektrum DX6/DX7 w/ SD card
- Connect the SD card to your computer with the SD card reader
- Download the settings file from the download page on parallax.com
- Transfer the settings file to the root level of your SD card and then eject it from your computer
- With your transmitter off, insert the SD card.
- Press the roller while turning on the transmitter. When “System Setup” appears, release the roller
- Scroll down to “Transfer SD Card”
- Scroll right to “Select Option”, and click. Scroll right until “Import Model” appears and click again.
- Scroll to select the “001~ELEV-8 v3.SPM” file on the SD card. When prompted, scroll then click to select “Import.” This will import all configuration settings.
- Turn off the transmitter (& remove SD card if desired) and proceed to binding instructions
Instructions for Spektrum DX6i, DX6, & DX7 Configuration
- Press the roller while turning on the transmitter. When “System Setup” appears, release the roller.
- (Optional) If you wish to disable or alter the transmitter sounds, scroll right until “System Settings” is highlighted and click once. Scroll right until “Next” is highlighted and click once. Scroll right until the “Select” next to “Volume Controls” is highlighted, and click again. Use the scroller to select the volume setting and the adjust them as you desire. To return to the “System Setup” menu, scroll left to “List” and click once, then click again.
- Rotate the roller to “Model Select” and click once. Scroll to the first unused model and click once. When prompted “do you want to create a new model”, select “Create”.
- Rotate the roller to “Model Type” and click once. Select “Acro” by rotating the roller to highlight it and click once. When prompted "Data will be reset", select "Yes".
- Scroll to “Model Name” and click once. Use the roller to name your model (we suggest “ELEV-8 v3”); scroll until the cursor is under the character you wish to edit, then click once; scroll until the character you want appears, then click again to save. Scroll to move the cursor to the next character and repeat. Once done, scroll to "Back" in the upper-right corner and click.
- Scroll down to “Channel Assign” and click once. Scroll right to “Next” and click again. Scroll right until a box appears next to “5 Gear” and click again. Scroll right until “D” appears in the box and click again. Once done, scroll to "List" in the upper-right corner and click.
- Scroll to "Main" in the upper-right hand corner and click once.
- With the transmitter powered on and in the main screen, press and release the roller to enter the “Function List" ["Adjust List" in DX6i]. Rotate the roller to the right until “Servo Setup” ["Travel Adj" in DX6i] is highlighted and click once.
- With the throttle stick all the way down, scroll right until a flashing box appears above "THR" then click again. Scroll right until "125" is displayed in the flashing box, then move the throttle stick all the way up (so that the top number above “THR” is now boxed), scroll right until “125” is displayed, and then click again. [For DX6i...]
- Scroll right until a flashing box appears above "AIL" then click again. Scroll right until "125 125" is displayed in the flashing box, then click again.
- Scroll right until a flashing box appears above "ELE" then click again. Scroll right until "125 125" is displayed in the flashing box, then click again.
- Scroll right until a flashing box appears above "RUD" then click again. Scroll right until "125 125" is displayed in the flashing box, then click again.
- Scroll right until a flashing box appears above "GER" then click again. Scroll right until "125" is displayed in the flashing box. Locate the "D" switch on the top left of the unit and switch it. The box on screen should now highlight the other "100"; scroll right until "125" is displayed in the flashing box, then click again.
- Scroll left until “Travel” is boxed, and click to select. Scroll right until “Reverse” appears, and click again.
- Scroll right until the flashing box surrounds “AIL”, and click to reverse the channel
- Scroll right until the flashing box surrounds “RUD”, and click to reverse the channel
- Scroll right until the flashing box surrounds “GER”, and click to reverse the channel;
- Scroll right until the flashing box surrounds “AX1”, and click to reverse the channel
- Scroll left until “List” is highlighted, then click. Scroll left until “Main” is highlighted, and click again. Your DX6/7 transmitter should now be fully configured.
Binding Instructions
General Instructions for Binding your Transmitter and Receiver
- Insert the bind plug supplied with your receiver into the bind (BND/DAT) jack on your receiver.
- Connect the battery to the PDB Power Cable to provide power to the ELEV-8 and RC Receiver
- Follow the binding instructions supplied with your transmitter or receiver.
Instructions for Binding a Spektrum Transmitter and AR610 or AR8000 Receiver
- Insert the bind plug supplied with your receiver into the bind (BND/DAT) jack on your receiver.
- Make sure your transmitter is switched off and the throttle is all the way down.
- Connect the battery to the PDB Power Cable to provide power to the ELEV-8. The LED in the receiver should be flashing rapidly.
- Locate the "Trainer/Bind" switch/button on your transmitter. Hold the switch in the "1" position / depress the button while turning on the transmitter. Continue holding until the LED on the receiver stops flashing. (You may need to be at least 6 feet (2m) away from the receiver).
- Unplug the battery, remove the bind plug, and turn off your transmitter.
Instructions for Binding a Spektrum Transmitter with the SPMAR620 Receiver
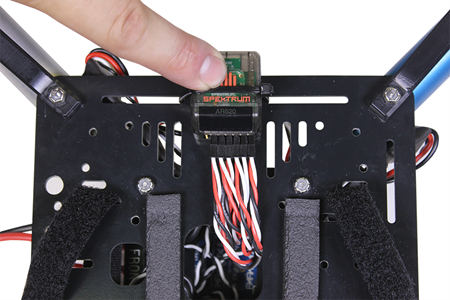
- Make sure your transmitter is switched off and the throttle is all the way down.
- Press and hold the Spektrum logo button on your receiver.
- Connect the battery to the PDB Power Cable to provide power to the ELEV-8. The LED in the receiver should be flashing rapidly.
- Locate the "Trainer/Bind" switch/button on your transmitter. Hold the switch in the "1" position / depress the button while turning on the transmitter. Continue holding until the LED on the receiver stops flashing. (You may need to be at least 6 feet (2m) away from the receiver).
- Unplug the battery, release the bind button, and turn off your transmitter.