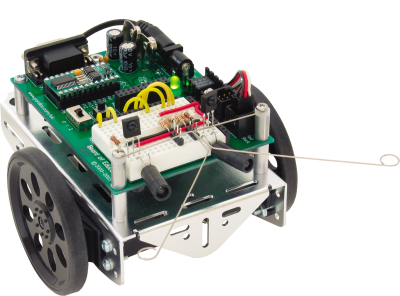
Have you ever stumbled around in complete darkness, to the point where you stretch your hands out in front of you to avoid tripping over something you can’t see? Well, right now your Boe-Bot is completely blind. We can’t give him eyes just yet, but we can give him a simple form of touch with what we call “whiskers”.
Building the Whiskers
This is a schematic diagram of the circuit that we’re going to build. It shows the electrical connections between the individual components. Don’t panic! It’s not as difficult as it looks.
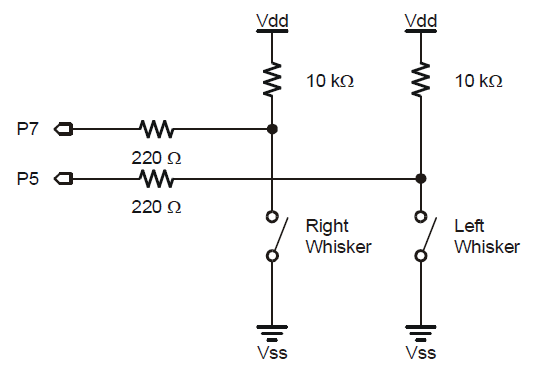
It would be good practice to draw this schematic in your Notebook because you may wish to alter some of the connections later. Note that the dots indicate that there is an electrical connection at that juncture. If two lines cross — with no dot — they are not electrically connected.
Here are the components that we’ll be using to build it:
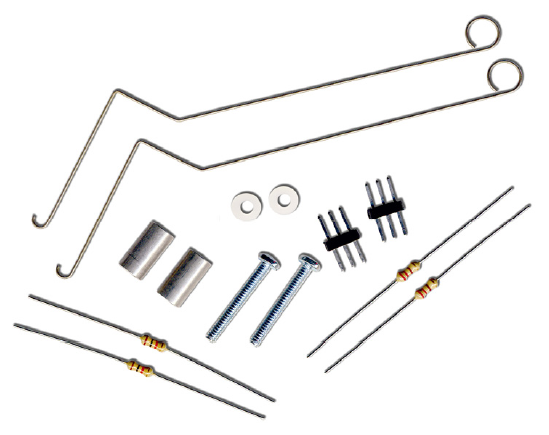
The resistors (the components with the color bands on them) are as follows:
- (2) 220 ohms (the color bands are “red, red, brown”)
- (2) 10 k-ohms (the color bands are “brown, black, orange”)
- Mount the whiskers on the Boe-Bot, like this:
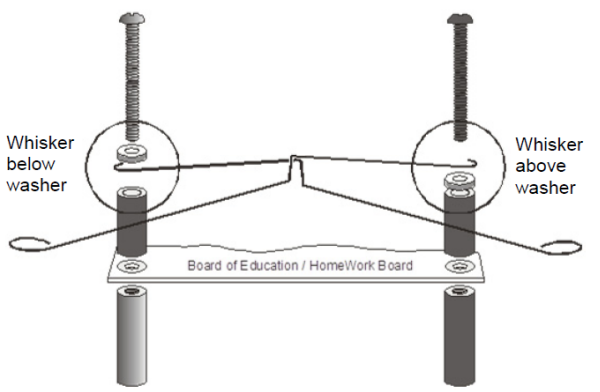
- Then, build the circuit on the breadboard, like this:
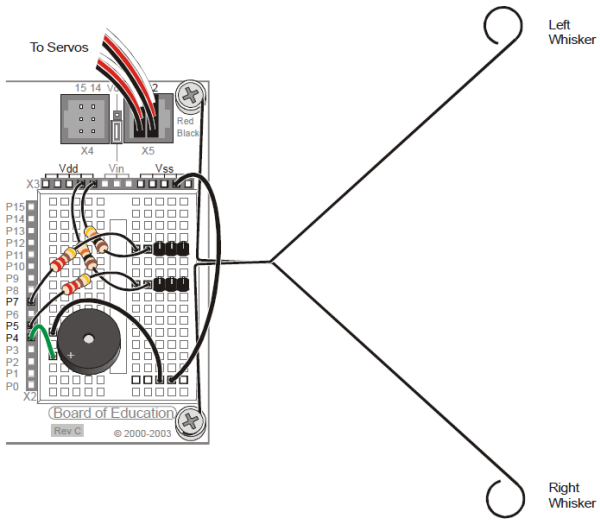
Each of those wires extending out past the Boe-Bot's body act as the contact switches (labeled Right Whisker and Left Whisker).
- Download Test Whiskers.bs2
- Load the “Test Whiskers” program into the BASIC Stamp Editor, and click the Run icon.
A Debug Terminal should open up, like this:
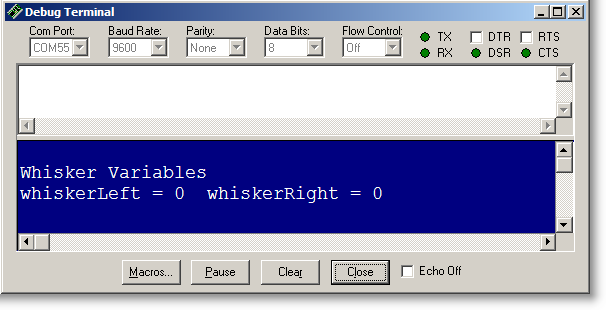
- Gently push in on each of the Whiskers so that they come in contact with their corresponding (3-pin) connectors. If your circuit is built correctly, you should see the “0’s” change (on your screen) to a “1” each time you press on the appropriate whisker.
So what’s going on? Plenty!
You’ve downloaded a program into the microcontroller. The program (inside the microcontroller) is constantly checking to see if the whiskers have touched anything. If not, the display simply shows “zeros”. If they do touch something then the microcontroller sends a signal from the robot, through the cable, and into the window showing us (on the screen) a “1” signal from either of the two whisker “sensors”.
This simple exercise shows how a “real world” collision can be detected by your robot.
The trick now is to give your Boe-Bot the ability to not only detect the whisker’s touch, but to also give it the ability to take “evasive” action.
This is simple intelligence. You’re giving your robot the ability to make a decision.
- Download Whisker Press Bot.bs2
- Next, load the “Whisker Press Bot” program into the BASIC Stamp Editor and click the Run icon.
What happens just after you press Run?
What happens when you press the whisker enough to cause it to touch the 3-pin connector on the breadboard?
- Write your observations and results in your Engineering Notebook.
Let’s take look at the program:
DO

  GOSUB Check_Whiskers

  IF whiskerLeft = 1  THEN speedLeft  = -30 ELSE speedLeft = 0
  IF whiskerRight = 1 THEN speedRight = -30 ELSE speedRight = 0
  time = 20

  GOSUB Wheel_Speeds

LOOP
Here we have another “DO…LOOP”, so the program is going to DO something and then it’s going to LOOP back and DO it again.
“GOSUB Check_Whiskers” is where the program jumps to another part of the code (not shown on our screen) to check whether either one of the whiskers is touching something. If one of the whiskers detects a collision, then it will show up as a “1”. Conversely, if there is no contact, it will show up as a “0”.
Therefore, the line of code…
IF whiskerLeft = 1 THEN speedLeft = -30 ELSE speedLeft = 0
…is executed as follows:
“If the Left whisker touches something then the speed of the left wheel will be turned on (backward), at a speed of -30. Else (otherwise), if the Left whisker doesn’t touch anything, the servo remains off”.
And then of course, “whiskerRight” should react the same for the right wheel.
Your Boe-Bot is sitting there, waiting for something to touch its whiskers. When something (or someone) does, the Boe-Bot backs away from the offender.
Challenge #3: "Make Contact and Avoid”
Right now, your Boe-Bot is just sitting there waiting to have one of its whiskers touched. And once a whisker is touched, the machine wants to back away from whatever is touching it.
- Alter the program such that the robot is constantly moving forward. Then, when either of the whiskers runs into something, the Boe-Bot immediately backs away from the obstacle and changes direction, and then continues on, looking for more things to run into!
This is a classic "detect and avoid" application where the robot can roam freely about, and hopefully! never get stuck!
- Write your program in your Engineering Notebook. Include some of your “thinking” processes as well – in other words – note the “why” of what you’re doing – not just the code itself.
Challenge #4
Thankfully, all three librarians are safe after their grueling, seven hour ordeal.
Early reports reveal that they were in the process of re-stocking shelves, when they inadvertently wandered into the Reference Section. It seems that the day shift was unable to finish re-shelving their books and left some on the floor. Oddly, each of the books was stood on edge. This presented a navigational challenge for the librarians – they got disoriented and were stuck in that aisle until help arrived, many hours later.
You’ve been hired to prevent this from ever happening again. The Librarians must have a “rescue bot” that can be deployed to show them the way out, should this situation ever happen again.
- Program your Boe-Bot in such a way that it can find a way through a small maze of books. The design of the book-maze is up to you; however it should include at least five obstacles (books, boxes, etc. (Hint: see Chapters 4 and 5 of Robotics with the Boe-Bot).
- Write your program in your Engineering Notebook, and also make a sketch of the maze you designed. Again, include some of your “thinking” processes.
Collaborative Design Challenge B
- Discuss (with your Counselor) and define a Challenge that you’ll need to accomplish. At a minimum, it should include making the Boe-Bot move forward and backward with the ability to detect obstacles, and then navigate appropriately. Document this Challenge as well as its solution in your Notebook.
Keep track of things that didn’t work too. Sometimes there’s a “happy accident” — a solution that happens by virtue of a mistake. At the very least, you’ll be able to keep track of methods that don’t work, but sometimes mistakes can end up “shining the light” on a whole new solution.
- Extra Credit: Include an explanation in your Notebook about what you’ve learned about a robotic system, and what you now know about robots that you didn’t know before you started.
How about trying to see how straight you can make the robot go. What can you do to the program that would make it go completely straight?
- Discuss with your Counselor:
- What types of sensors could be used on the robot? Are there sensors that can see, hear, or touch?
- How could you improve the programs that you’ve written?
- How could the robot’s hardware be improved?
- What types of robots are currently in use today?
Going Further
We've only scratched the surface of what robots are capable of. You are encouraged to “dive deeper” by going through Robotics with the Boe-Bot in its entirety. Doing so will open you mind to what is possible in the world of robots. Also, don’t think that a “little robot” is just a “toy”. The only thing different between a Boe-Bot and a human-sized robot (like in the movies) is the scale.
The Hardware, Software, and programming concepts are the same. What you've learned on a small scale is directly applicable to a large scale.
As always, document everything you do - Use your Engineering Notebook! From the idea stage, through the design, prototype, and testing stages - you never know when an unintended "accident" may become a "really cool feature" for you robot's capabilities.
