Is your ActivityBot having trouble?
This page lists some of the most common problems encountered when calibrating the ActivityBot, or programming it to drive for the first time.
- The Calibrating the ActivityBot lesson has a diagnostic program that can help find common ActivityBot servo motor/encoder/power connection mistakes and problems. If you have not already done so, follow the instructions in that activity.
- If you came here after the ActivityBot failed the test program in the Try This section of Calibrating the ActivityBot, find the Details that match what the Terminal reported in the list below and then follow the checklist instructions.
- If you followed the instructions, but are getting the same message, then check the Other Symptoms section. It starts part way down this page.
If you do not find your specific problem here or need more help, contact Parallax Technical Support by email (support@parallax.com), or by phone 916 -624-8333 (toll-free: 888 99-STAMP within the USA only). You can also post a question in the Learn Forum to get help from the Parallax community.
Calibrating the ActivityBot - Details from the ActivityBot display (calibration results)
Match the Details from the calibration results against messages below.
Battery Messages
If the Details from calibration results has one of these messages:
- The ActivityBot's batteries are too low. Try a new set of 5 alkaline batteries, or recharge your 6.5 to 8 V power pack.
- The ActivityBot's batteries are either dead, or the P13/P12 PWR select jumper is still at the 5V setting. It should be at the VIN setting.
- The ActivityBot's batteries are either dead, or one of the cells is in the battery holder backward. A short circuit in the prototyping area could also explain the slow-moving behavior.
- Yikes! Servo speeds indicate your ActivityBot may have a power pack that's more than 8.5 V. Use an appropriate power source to avoid servo damage.
Try This
- Important: For any of these options, after you have adjusted the batteries, make sure to repeat the Calibrating the ActivityBot activity.
- If the batteries are "too low," try a new set of alkaline batteries.
- If the batteries are "either dead or P13/P12 PWR select is still at the 5 V setting," first check the jumper tab to the left of the P12/P13 ports. For details on setting it to VIN, go to the Electrical Connections page. If the jumper settings are already correct, try a new set of alkaline batteries.
- If the batteries are "either dead or one of the cells in the battery holder is in backward," check the cells to make sure that each negative terminal is connected to a spring in the battery pack. If all the cells were correct, try a new set of alkaline batteries.
- If you got the "Yikes!" message, the servos were measured as turning too fast, indicating the battery voltage is too high and outside of the specification.
Swapped Cables
If the Details from Calibration Results has this message:
- Either your ActivityBot's servo cables or its encoder cables are swapped.
Try This
- Go to the Test Encoder Connections page and run the program.
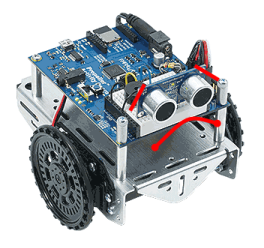
- Gently turn the wheel shown in the picture and see which light blinks.
- If the P27 light blinks, then the servo cables are swapped. That means that the cable that is supposed to connect to P12 is connected to P13 and vice-versa.
- Unplug the P12 and P13 cables.
- Plug the cable that was connected to P12 into P13, and connect the cable that used to be connected to P13 into P12.
- If the P27 light blinks, then the encoder cables are swapped. That means that the cable that is supposed to be connected to P14 is connected to P15 and vice-versa.
- Unplug the P14 and P15 cables.
- Plug the cable that was connected to P14 into P15, and connect the cable that used to be connected to P15 into P14.
- If the P27 light blinks, then the servo cables are swapped. That means that the cable that is supposed to connect to P12 is connected to P13 and vice-versa.
- After you have fixed this, go back to Calibrating the ActivityBot and rerun the calibration and calibration test programs.
Encoder Signals Not Detected
If the Details from Calibration Results has one of these messages:
- The Propeller cannot detect either of the ActivityBot's encoder signals.
- The Propeller cannot detect the ActivityBot's right encoder signal(s).
- The Propeller cannot detect the ActivityBot's left encoder signal(s).
Try This
- Go to the Prepare Encoders page. See how the cables are connected? Make sure the cables are firmly plugged into the encoders.
(You do not need to take your ActivityBot apart for this. Just press the encoder plugs firmly into the encoder sensors.) - Go to the Electrical Connections page, and verify that each instruction was completed correctly.
- Go to the Test Encoder Connections page, run the program, and carefully follow the instructions on that page.
- After you have fixed this, go back to Calibrating the ActivityBot and rerun the calibration and calibration test programs.
Servo(s) Need Mechanical Calibration
If the Details from Calibration Results has one of these messages:
- The servo on both of the ActivityBot's sides needs mechanical calibration.
- The servo on the ActivityBot's left side needs mechanical calibration.
- The servo on the ActivityBot's right side needs mechanical calibration.
Try This
You will need a Phillips #1 point screwdriver with a 1/8″ (3.18 mm) or smaller shaft.

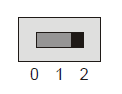
- Set the Activity Board's power switch to 0.
- Remove batteries from the ActivityBot's battery pack.
- Unscrew the battery pack and separate it from the chassis to allow the screwdriver to get to the access holes for adjusting the servos.
- Load the batteries back into the battery pack and make sure it is plugged into the Activity Board.
- Set the Activity Board's power switch to 2, providing power to the servos.
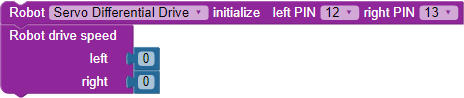
- Run this BlocklyProp program using the Load and run (save code to EEPROM) button. It should cause the wheel(s) reported in the details section to turn very rapidly.
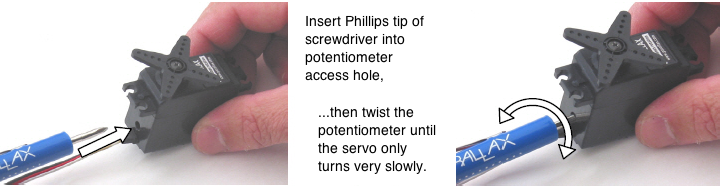
- Use a screwdriver to gently adjust the potentiometer in the servo, as shown below. Don’t push too hard! Adjust the potentiometer slightly until you find the setting that makes the servo turn slowly (4 seconds or more per full turn).
- Reattach the battery pack to the chassis.
- After you have fixed this, go back to Calibrating the ActivityBot and rerun the calibration and calibration test programs.
Other Symptoms
Symptom: The ActivityBot is on and receiving power (with new batteries), but it will not move at all or moves slowly in a twitchy manner.
Try this: First, if the servos do not turn at all, make sure the power switch is in position 2 (which powers the servo headers), and not position 1. If that doesn't help, check the servo port jumper positions. The jumper for P12 and P13 should be set to VIN. If it is set to 5V, the servos will not receive enough power. Follow the Electrical Connections page instructions for moving the jumper, and then run the calibration again.
DO NOT MOVE THE JUMPER WHILE POWER PLUG OR USB CABLE IS CONNECTED TO THE BOARD.
Symptom: The ActivityBot's servos and encoders are powered when the 3-position switch is in position 1.
Try this: Potentially, a short circuit has damaged your Activity Board (original or WX version). Position 1 on the 3-position switch should not power the 3-pin headers above the breadboard where the servos and encoders are plugged in. This problem can often be caused if the shunt jumper for P12 & P13 was moved while the Activity Board (original or WX version) was receiving power from the USB port or barrel jack. Unfortunately, there is no solution for this problem once it has occurred, please contact technical support (see contact information at the top of this page).
Symptom: When the ActivityBot is connected to the computer via USB cable, no COM port registers for it and/or the computer displays an error (no board detected, or board may not be working properly).
Try this: Check the USB connection on the Activity Board (original or WX version). The USB connection port on the ActivityBot is designed to fit tightly to the Mini B connector. Even though it may feel secure, sometimes the cable may not be inserted fully into the port, and this will cause your computer not to recognize the connection or to give an error.
Symptom: The ActivityBot moves in the opposite direction from what it was programmed to do.
Try this:
This may mean that both the servo and encoder cables are swapped. Unplug P14 and P15, and plug the cable into P15 that was plugged into P14 and vice-versa. Also, unplug the P12 and P13 cables, and plug the cable that was plugged into P13 into P12 and vice-versa. Check to make sure the left and right connections match the Electrical Connections page instructions and then run the calibration again. A common mistake is to switch the cables for left and right servos accidently, which causes the ActivityBot to go backward when it should go forward, left when it should go right, etc.
Issue: The ActivityBot calibration routine went fine, but instead of driving straight, it drives in a jerky, wavy line.
Solution: You may need to adjust the servo or servo bracket. Check the position of the servo inside its hole in the chassis.
Notice that there is a little bit of space around the servo. If the servo is tight against the top edge of the hole close to the encoder, with a gap left below the servo, then the beam of infrared light coming from the encoder sensor might be missing the wheel spokes and hitting the solid ring below them instead.
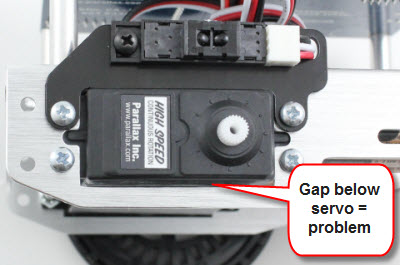
To fix this, loosen the servo's locknuts and then reposition the servo, so the gap is between the servo and the encoder. Doing this should ensure that the encoder sees only spokes and holes. Make sure that the servo doesn't shift position when you retighten the locknuts.
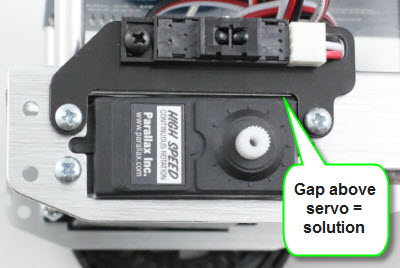
(Note: the encoder bracket was redesigned in October 2013 to mitigate this issue.)