The first breadboard circuit we'll build for the ActivityBot is a simple piezo speaker. Many devices in our daily lives use beeps to communicate with us, such as microwave ovens, car locks, smoke detectors, forklifts driving in reverse—can you think of more examples? Likewise, it is useful to equip your ActivityBot to communicate with you via sound.
Circuit
Inside the piezo speaker is a thin piece of material called a piezoelectric element that deforms when voltage is applied to it, and returns to its original shape afterwards. When voltage is switched on/off rapidly, the vibration emits a tone. The faster the switching frequency, the higher the tone produced. A Propeller I/O pin can provide this rapidly toggling voltage at specific rates.

Parts
(1) Piezo speaker (#900-00001)
(2) Jumper wires
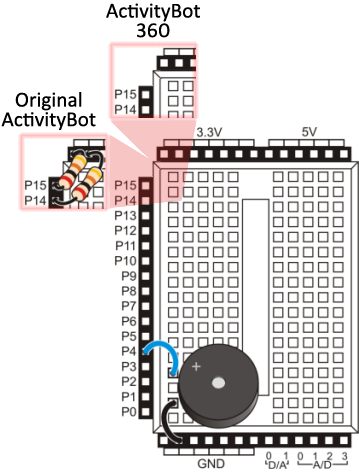
- Build the piezo speaker circuit in the exact position on your ActivityBot's breadboard, as shown below. This will leave room to add a variety of sensor circuits later on.
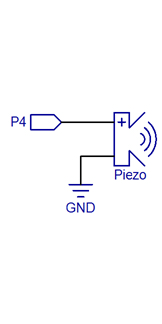
- Make sure the piezo speaker pin under the (+) sign on the case goes into the same breadboard row as the jumper wire connected to the P4 socket.
- Make sure the other speaker pin is in a different row, with a jumper wire connected to GND.
Test Code
The Audio > Frequency out block can make piezospeaker beep.
- Log into your BlocklyProp account, and make a new project for your board.
- From the Audio menu, select the Frequency out block.
- Set the block's fields as shown below.

- Click Run Once (Load to RAM), and verify that the speaker made a one-second beep.
How it Works
The Frequency out block has three fields to set. PIN specifies the Propeller I/O pin connected to the piezospeaker, 4 in our circuit. The duration field sets how long the beep will last, 1000 ms (1 second) in this example. The frequency (Hz) field sets the pitch of the beep, 3000 Hz in this example. To generate this frequency, the Propeller sets P4 to an output and rapidy toggles it between 0 V to 3.3 V, causing the piezoelectric element inside the speaker to vibrate 3000 times per second. The result is a high-pitched tone.
Did You Know?
Know when you are low — A brownout indicator signals to you, the roboticist, when your ActivityBot's batteries are running low. If the battery voltage drops too low, the Propeller microcontroller will reset and restart the program. This can look like a programming or circuit error if you don't know it is happening! So, you will see this block at the beginning of any ActivityBot example program that is meant to make the robot move. A low-battery beep will help you troubleshoot your ActivityBot projects by ruling out low battery power as the culprit.
What is a brownout? - You may be familiar with the word blackout; a blackout is when power dies comepletely, like when the power goes out in your home. A brownout means that there is still power, just not enough to make everything work.
Try This
The Frequency out block's duration (ms) and frequency (Hz) fields can accept use variable blocks and even Operators > Numbers category blocks, as well as the default number value blocks. Sometimes it is fun or useful to have a tone vary in correlation to some sensor's input values, so you can know what the ActivityBot is sensing. For now let's just play with the idea using a variable that's counting loops in a repeat item block.
- Modify your project to match the one below, and save it.
- Click Run Once (Load to RAM), and you should hear 10 increasingly higher-pitched tones.

Your Turn
- Modify your project so that the duration of each tone changes each time through the loop, becoming shorter as the frequency increases.