Now that you've learned how to make the robot react to its whiskers it's time to expand on that. Let's free your ActivityBot to roam around on its own, and navigate away from obstacles using its whiskers.
To roam, the ActivityBot needs to go forward until it bumps into something. When that happens, it needs to back up, turn away from the obstacle, and then go forward again.
While the robot is going forward, it should repeatedly check its whiskers with minimal delays between checks. That way, it can know right away when it has encountered an obstacle.
Roaming with Whiskers Example Code
- Log into your BlocklyProp account, and run and connect the BlocklyProp client on your computer.
- Start a new project for the Activity Board.
- Build and save the project shown below.
- Be sure to set the Robot initialize block's dropdown to your particular robot: ActivityBot or ActivityBot 360°.
- Connect your ActivityBot to your computer, and put the power switch in position 1.
- Click Load and run (save code to EEPROM).
- Disconnect the cable and set the robot on the ground in an area with a few obstacles high enough for the whiskers to bump.
- Press and hold the Reset button while you move the power switch to 2.
- Observe its roaming behavior.
How it Works
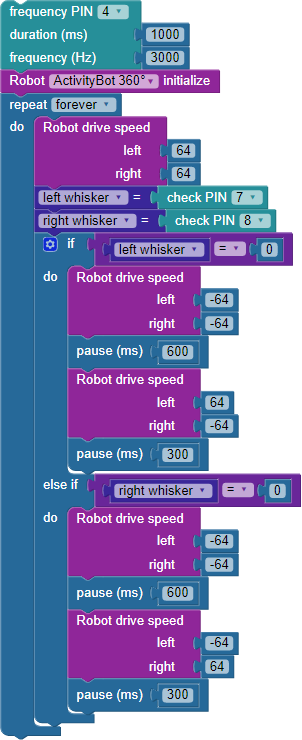
After the frequency out block that serves as a brownout indicator, and the required Robot ActivityBot initialize block, the rest of the code is inside a single repeat forever loop.
First comes a Robot drive speed block that sets left and right wheels to 64 ticks per second, which is approximately 50% of the ActivityBot's top controlled speed. After that, check PIN blocks store the input states of the whisker circuits in the variables left whisker and right whisker. Immediately after that, the if...do...else...if block evaluates those variables to see if there is a detected obstacle. Since there are no pauses between these blocks, the ActivityBot can respond very quickly to sensor input.
The if...do...else...if block first checks to see if the left whisker equals zero, which indicates the left whisker circuit is closed by hitting an obstacle. If this is true, Robot drive speed -64, -64 makes the ActivityBot drive backward while the pause (ms) 600 block executes. Then the next Robot drive speed block uses left 64 and right -64 to turn the wheels in opposite directions at the same speed. This setting makes the ActivityBot rotate right, away from the side which detected the obstacle. The rotation maneuver lasts as long as it takes for pause (ms) 300 to execute.
But, if left whisker = 0 is false, those maneuvers are skipped and the else...if condition checks to see if right whisker = 0 is true. If it is, then an obstacle on the right has been detected, and the code executes the Robot drive speed and pause (ms) blocks right below, this time backing up and using left -64 and right 64 to rotate left, away from the obstacle on the right.
If neither variable is equal to zero, then no evasive actions inside the if...do...else...if loop is executed. The code will return to the top of the repeat forever loop, where Robot drive speed 64, 64 propels the ActivityBot forward a bit more before checking the whisker states all over again.
Did You Know?
Iteration — According to Merriam Webster, one definition of iteration is "a procedure in which repetition of a sequence of operations yields results successively closer to a desired result." Iterative testing and tuning is an integral part of developing robotics applications.
Try This
The example program uses the default Robot drive speed value of 64 (and also -64). That's at 50% of the speed the ActivityBot can go when using encoders. Since there is no Robot set acceleration used, the default value of 600 ticks per second squared is in use. These moderate default values work together well. They are an excellent choice while developing a basic sensor navigation routine, so the ActivityBot doesn't zip away unexpectedly. Now that your whisker system is working let's speed things up a little at a time and tune the maneuvers along the way.
- Save a copy of your project as Whiskers Roaming Try This.
- Try increasing the numbers (and decreasing the negative numbers) attached to the Robot drive speed blocks to +/-96 to make the ActivityBot navigate faster.
- Save the project, load it to EEPROM, and test-drive the modified code.
How far does the ActivityBot back up after detecting an object? And then how many degrees does it rotate?
- Try adjusting and test-driving values in the pause (ms) blocks until your ActivityBot does not back up unnecessarily far, and still rotates just 90 degrees.
- Now, try increasing the speed values to +/-128, and test drive your changes again.
- Adjust and test-drive pause (ms) block values until the ActivityBot is navigating at top speed, but still backs up about the original distance and rotates just 90 degrees after detecting an object.
Your Turn
You have probably noticed that as you increased the ActivityBot's speed, its response seems increasingly sluggish. At top speed, the ActivityBot might even hit the wall before it responds to the whisker switches and backs up. It may have also knocked the 3-pin header out of its sockets a bit, preventing further whisker-switch contact. What do you think is causing that?
- Add a Robot set acceleration block under the Robot initialize block.
- Try reducing the acceleration setting and re-test.
- Try reducing the speed, and re-test.
- Experiment with different drive speeds and acceleration settings until the ActivityBot can respond to whisker presses without hitting the obstacle, but doesn't move so abruptly that it does a nose-wheelie.
- Make a note of the best speed and acceleration combinations for your particular robot.