Understanding Your Depth Perception
Set up your flight area to include cones or other markers spaced every 25 feet (or every 5 or 10 meters - an even number). You will use these markers as a guide to help you visually understand distances a you fly your sUAV. Make sure your indoor or outdoor flying area is properly set up and that you have taken all necessary precautions as outlined earlier in this guide.
Remember that if something goes wrong, THROTTLE DOWN and let your multirotor fall before it damages something or causes injury.
This exercise is as important for the Spotter as it is for you, the operator.
- Ensure that your flying area is properly set up and that the area is clear of any hazards.
- Set up markers or cones at even intervals such as 25 feet or 10 meters.
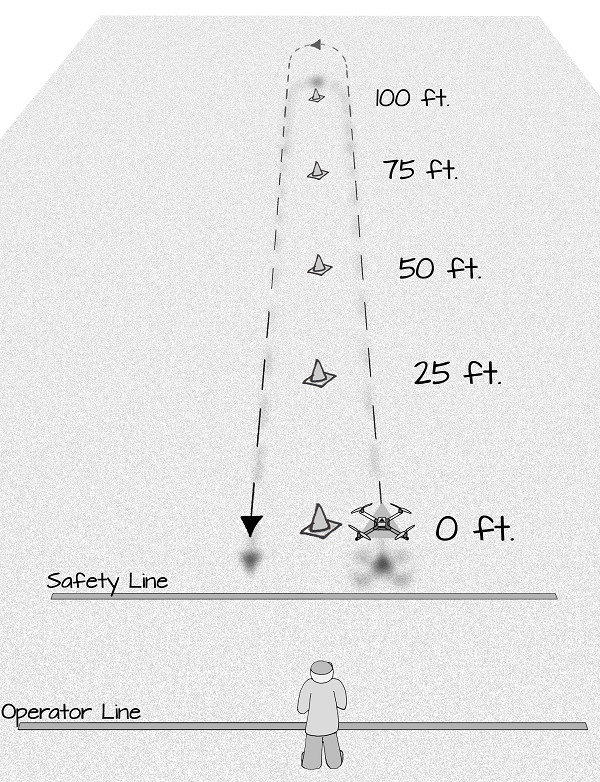
- Take off and hover approximately 5 feet (1.5 m) off of the ground.
- Fly slowly out to the first marker, taking note of how small your sUAV appears to be at that distance.
- Then fly to each of the next markers, again taking note of how small your sUAV appears to be at that distance.
- Repeat the flight several times until you are able to visually determine how far away your sUAV is from you.
Flying Higher and Landing Gently
Once you are able to estimate distances visually, you a ready to begin estimating your distance vertically. There two ways, with the help of a spotter) to directly measure the altitude (height) of your sUAV when flying: using the Parallax GroundStation (if your ELEV-8 v3 is equipped with an XBee Radio for telemetry), or with an inclinometer. But, with a little bit of knowledge and some practice, you should be able to reasonably estimate the height of your sUAV when you are flying. Estimating your Altitude is especially important because if you are flying outdoors, it is against the law to fly over 400 feet (122 m) Above Ground Level (AGL).
To practice estimating altitude, you will set up a marker or cone exactly 50 ft (15 m) away from you. During the practice, you will take off and land from that marker, and you will only fly straight up and straight down taking care to keep your sUAV directly over the marker.
Look carefully at the following image. It shows the angle you would be looking up for various altitudes:
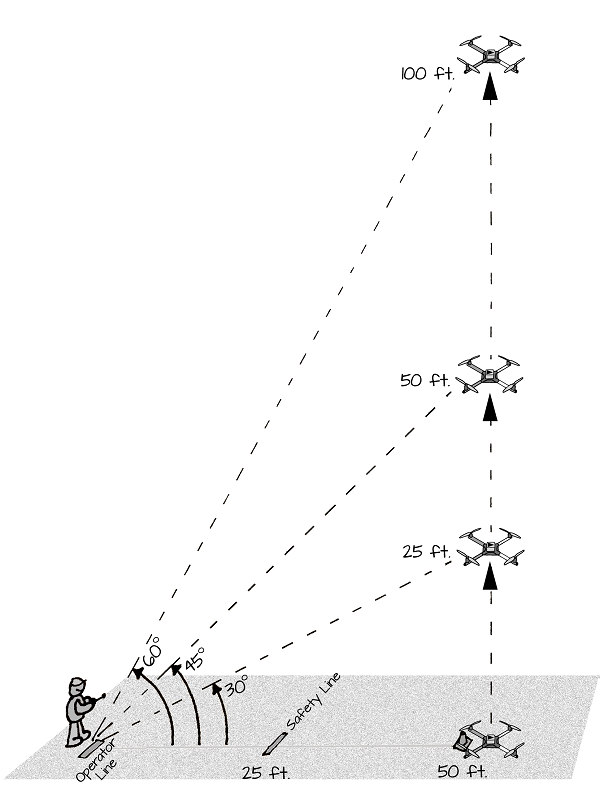
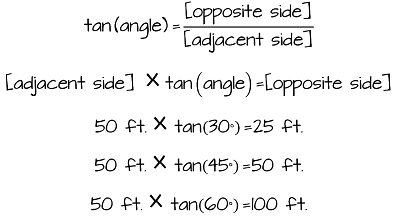
The angle you are looking up at will help you determine the height of your sUAV. When you are looking up 30 degrees from the ground, the height of the object you are looking at is half as high as it's ground distance from you - if it's 50 feet (15 m) away, then it's 25 (7.6 m) feet high. When you are looking up at a 45 degree angle, an object's height is the same as it's ground distance, so if it started 50 feet (15 m) away from you and flew up 50 feet (15 m), you would be looking at a 45 degree angle. If you are looking up at a 60 degree angle, it's height is double the ground distance - if it started 50 feet (15 m) away and flew up to where you are looking up 60 degrees, it is 100 feet (30 m) high.
Where do these numbers come from?
Notice that in the drawing above the operator and the sUAV make up the bottom side of a right triangle. Because it is a right triangle, we can use tangents to calculate distances from the angles we know. The tangent (tan for short) of an angle describes the relationship between the adjacent side of the triangle (how far it is from the operator to the sUAV on the ground) and the opposite side of the triangle:
Again, If you have a Spotter, fellow student or friend with you, they can use an inclinometer (a very simple tool to build) or the sensors tab on the Parallax GroundStation (if your ELEV-8 v3 is equipped with XBees) to call out your altitude and help you know exactly how high your sUAV is as you practice.
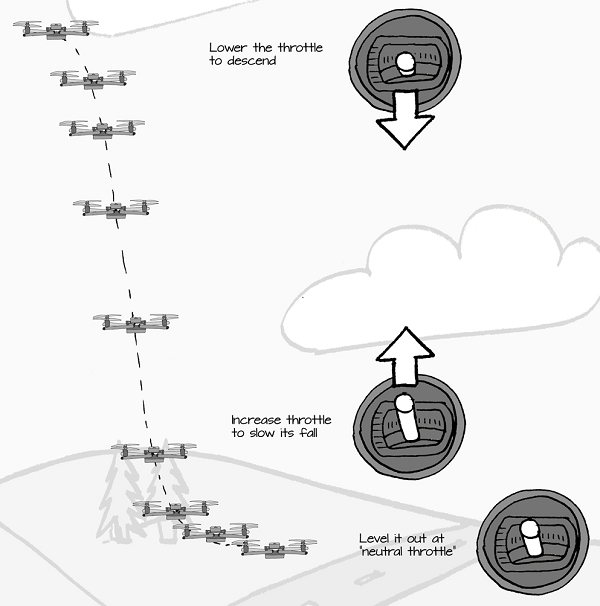
Because you will also be descending and landing from higher altitudes, these exercises are also a good opportunity to practice your landing skills. Remember that as your sUAV descends, it gains momentum, and it will take increased throttle before you land to slow and stop its fall:
To practice estimating your altitude:
- Before you do any flying, practice looking up at 30, 45, and 60 degree angles - it's helpful to have a friend or Spotter observe you from the side to verify the angle you are looking up at.
- Ensure that your flying area is properly set up as described earlier in this guide and that the area is clear of any hazards.
- Set up a marker or cone 50 feet (15 m) away.
- With your sUAV at the marker, take off straight up and ascend to the height where you are looking up at 30 degrees. This is approximately 25 feet (7.5 m) high.
- Begin descending and carefully land your sUAV - remember to throttle up to stop its fall right before it lands.
- Repeat the flight several times at 30, 45, and 60 degrees until you are comfortable estimating height and landing gently.
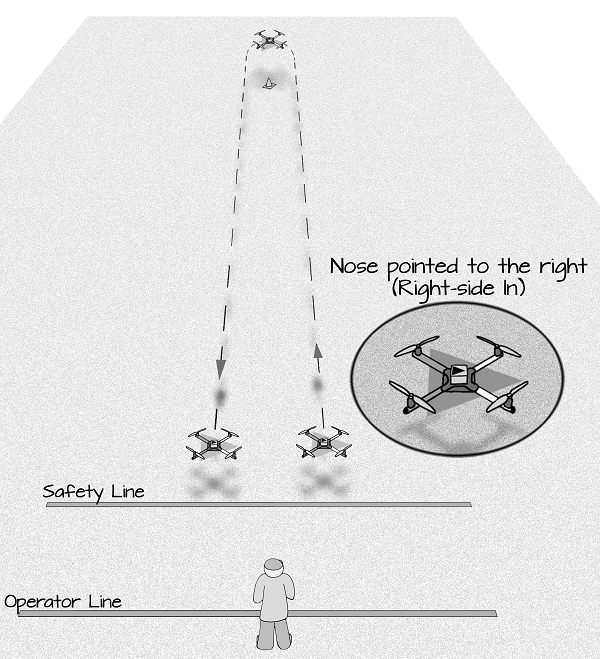
Flying Right- and Left- Side In
Once you have spent several hours practicing nose-out flight, you are ready to begin practicing flight with the multirotor in different orientations. You will begin by making short, simple flights with your multirotor oriented left-side in. Make sure your flying area is properly set up and that you have taken all necessary safety precautions as outlined earlier in this guide. Remember that if something goes wrong, THROTTLE DOWN and let your multirotor fall before it damages something or causes injury.
- Ensure that your flying area is properly set up as described earlier in this guide and that the area is clear of any hazards
- Place your sUAV at least 25 feet (7.6 m) past the safety line with the sUAV's Right Side In (with it's nose pointing to your right)
- Carefully throttle up and maintain a 5-8 ft. (1.5-2.5 m) hover
- Use the right stick to fly the sUAV out away from you, and then slowly back
- Repeat this maneuver - slowly increasing the sUAV's speed on each run
- Once you are comfortable flying back and forth with the Right Side In, turn your sUAV around and fly Left Side In, repeating the same practice routine as before