This is a tall box with a vertically mounted LED strip that represents a high striker game, like you'd see at many carnivals. There is a pressure sensor on the top of the box that measures how hard it is struck, and so the LED strip can then visually display how hard the sensor was hit. The box is "won" when the user illuminates the lights above the differently colored LED near the top of the strip. Upon victory, another digit for the secret passcode is displayed on the 7-segment LED.

Build it:
- Attach an LED strip to a cardboard box, oriented vertically.
- Cut a slit in the top of the box for the FlexiForce sensor
- Slide the sensor through the hole and tape it down so that it lays flush on the top of the box
- Make a hot glue bead on a 1x1 inch piece of cardboard and let cool. This will focus the full impact to the center of the FlexiForce sensor.
- Tape the cardboard piece centered above the FlexiForce sensor.
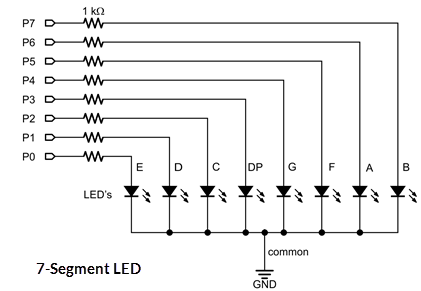
- Cut a hole in the box that is the size and shape of a 7 segment LED and glue it in.
Wire it:
- You will be using the High Striker SVG file for this part of the project. It was included in the code download at the beginning of this megaproject.
I/O Pin Connections:
- P0-P7: 7-Segment LED
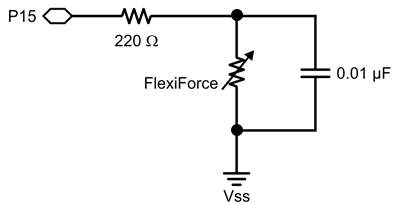
- P15: FlexiForce (see Sense Light tutorial, the RCtime circuit is the same)
- P17: LED Strip (follow connection instructions for your specific LED strip)
Note: It is best to run projects from a battery pack or wall supply, Do not try to run them off of the USB cable.
- The high striker is played by hitting the piece of cardboard on top of the sensor. Getting the lights to light up past the threshold that is visible on the led strip causes a victory.
- You may need to change the control of the 7-segment LEDs because of wiring differences. Refer to the 7-Segment tutorial on how to wire this circuit. This LED needs to display the number 2.