Many devices beep to get your attention. Microwave ovens let you know your food is ready, alarm system keypads respond when you press a number key, and smoke alarms warn you something is burning. These devices often use piezospeakers because they are inexpensive, yet make clear, audible tones. If you make a project that needs to beep to get someone’s attention, consider using a piezospeaker.
Circuit
Ever notice how a guitar string has to vibrate to make sound? The same applies to the element in a piezospeaker (short for piezoelectric speaker). The piezoelectric element in the speaker bends when voltage is applied to it. If you turn the voltage on and off rapidly, it will vibrate rapidly and make a sound.
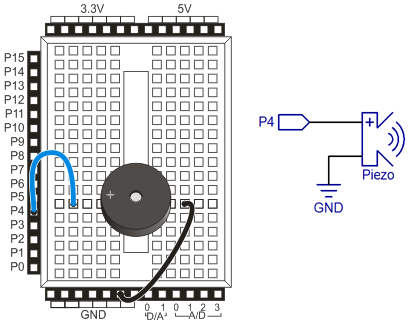
It's easy to program the Propeller to make an I/O pin turn on/off rapidly. Let's connect a piezospeaker's positive (+) terminal to P4, and its unmarked negative terminal to GND.
Parts
(1) Piezo speaker (#900-00001)
(2) Jumper wires
- Build the circuit shown in the schematic.
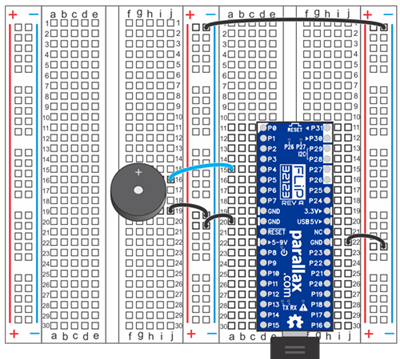
- Plug your piezospeaker into the board so that its two pins are NOT in the same 5-socket row. Wiring diagrams for the Activity Board and Propeller FLiP module are included below for reference.
- Make sure that when you plug in the wires they go into the same rows with the piezospeaker pins.
- Check that the speaker pin closest to the plus (+) symbol on its case connects to the Propeller I/O pin.


Test Code
The Audio > Frequency out block can make piezospeaker beep.
- In BlocklyProp Solo, make a new project for your board.
- From the Audio menu, select the Frequency out block.
- Set the block's fields as shown below.

- Click Run Once, and verify that the speaker made a one-second beep.
How it Works
The frequency out block has three fields to set. PIN specifies the Propeller I/O pin connected to the piezospeaker, 4 in our circuit. The duration field sets how long the beep will last, 1000 ms (1 second) in this example. The frequency (Hz) field sets the pitch of the beep, 3000 Hz in this example. To generate this frequency, the Propeller sets P4 to an output and rapidy toggles it between 0 V to 3.3 V, causing the piezoelectric element inside the speaker to vibrate 3000 times per second. The result is a high-pitched tone.
Did You Know?
- Frequency is a measure of how many times something happens in a second, and it is measured in hertz (Hz).
- kilo — k is an exmaple of a metric or SI prefix. This one abbreviates kilo, which means 1000.
- kHz — In the case of our piezospeaker, it received an on/off signal that repeated 3000 times per second, so that’s 3000 Hz, or 3 kHz.
- Human-audible sound vibrations range from around 20 Hz (very low pitch) to 20 kHz (very high pitch).
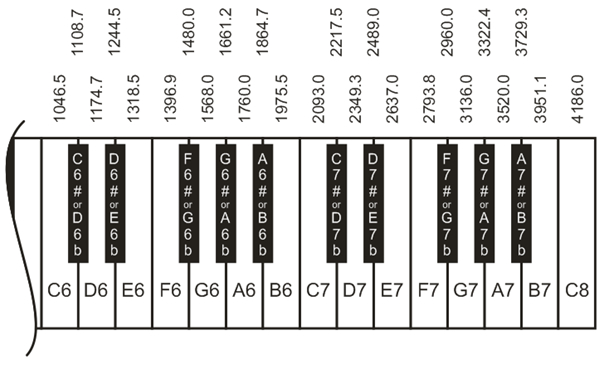
- Familiar frequencies — Pressing a piano key makes a small hammer strike a tightly pulled wire, causing it to vibrate at a certain frequency. Here are the frequencies from some right-side keys on a piano keyboard:

Try This
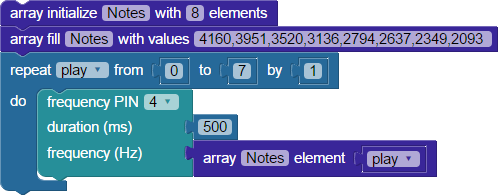
To play a tune, you could use a stack of frequency out blocks, one block per note played. This works, but makes for a very long program that is cumbersome to edit. This next example stores a whole list of frequency values in an array, which are then accessed and played in order using a repeat item loop.
- Build the project shown below, and save it.
- Run the program. You should hear eight notes play, from C8 to C7 in descending order.

How it Works
First, the array initialize block sets an array we named Notes, with 8 elements. The next block fills the Notes array with eight values. These are the frequencies for notes C8 to C7, taken from the keyboard chart above. Each value can be retrieved from the array later, by its index number. With arrays, index counting starts at zero, going from left to right. So, this eight-element array has an index range of 0 to 7, with the 0th element being 4160, and the 7th element being 2093.
Next comes a repeat item loop, with a variable named play to keep track of the trips thorugh the loop. The value of play starts at zero and increases by one each time up through trip 7, for a total of eight repetitions.
Inside the loop, the frequency out block is using PIN 4, and a duration of 500 ms. But instead of a number value block, the frequency (Hz) field has an array get element block attached: array Notes element play. This means "from the Notes array, use the element at the index position play."
The first time through the loop, play equals 0. The 0th element in the Notes array is 4160 (since counting starts at zero). So, the piezospeaker emits a 4186 Hz frequency. The next time through the loop, play increments by one, so the frequency at index position 1 is used: 3951 Hz. In this manner, the loop plays each frequency in the array until play equals 7, and you hear the last frequency of 2093 Hz.
Your Turn
The last example program, each note played for the same length of time, 500 ms. You can make it more interesting by playing notes for different durations. Just set up a second array to hold duration values, and use a second get array get element block for the
- Save a copy of your project under a new name.
- Initialize a second array, named time, with 8 elements, one for each element in the Notes array.
- Using an array fill block, give the time array 8 duration values in milliseconds. Each element will determine how long to play the corresponding frequency in the Notes array.
- In the frequency out block, use an array time element play block for the duration (ms) field instead of the value 500.
- Save the project, and click the Run once button. How does it sound? Can you vary the time elements to play a familiar tune?
- Experiment with more tunes, changing the arrays of frequencies and durations as you like. Just be sure to use the same number of elements in each array.
