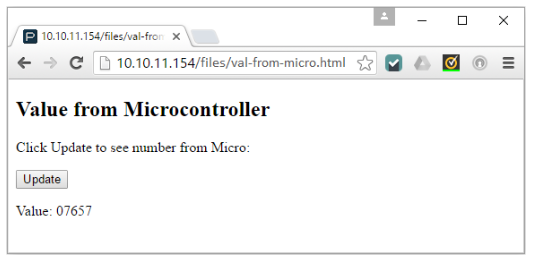
Up to this point, your page has been sending information to the microcontroller host with HTTP POST requests. There’s also a way for the page to ask the microcontroller for information with HTTP GET requests. Here is an example where each time you click the Update button, the page asks for, gets, and displays a new value from the BASIC Stamp 2.
Reminder: If you followed the instructions in the Join Another Wi-Fi Network section, you’ll have to replace 192.168.4.1 with your IP address.
- Go to your Wi-Fi module’s Files page at http://192.168.4.1/update-ffs.html.
- Use the Choose file button to upload val-from-micro.html to your Wi-Fi module.
- In your web browser, open 192.168.4.1/files/val-from-micro.html.
- Use your BASIC Stamp programming software to open Val from Micro Host.bs2.
- Connect your BOE + BS2 to power and your computer, and set PWR to 2.
- Run Val from Micro Host.bs2.
- Click the web page’s update button and check the number by value.
- Wait a few seconds and click Update again.
Since the BASIC Stamp program counts upwards at several times per second, the number should be higher each time you click the button.
Try This - Automatic
Don’t want to have to click the button to see the value updated? The page can do it automatically. Here’s an example that updates every 3 seconds.
- Add this line line to the script: var myTimer = setInterval(getFromMcu, 3000).
- Upload the modified page to the Wi-Fi module
- Refresh 192.168.4.1/files/val-from-micro.html in your browser.
Note: it’s probably not a good idea to try to see how fast you can make this go, because it can end up making the application unresponsive. We have websockets (introduced soon) to establish a communication line that’s much more streamlined than HTTP requests.
How it Works
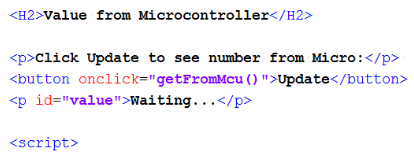
The HTML has a button with an onclick event to call a function in the JavaScript called getFromMCU. The JavaScript updates the paragraph with the value ID as soon as it gets the reply from the microcontroller.
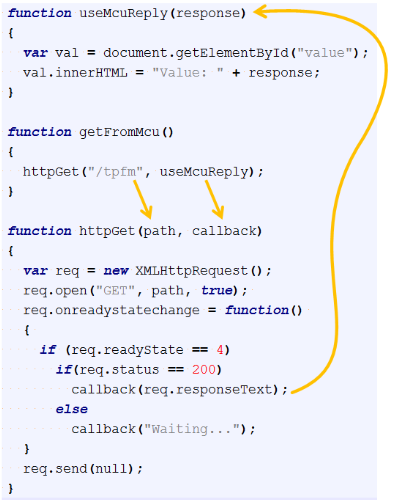
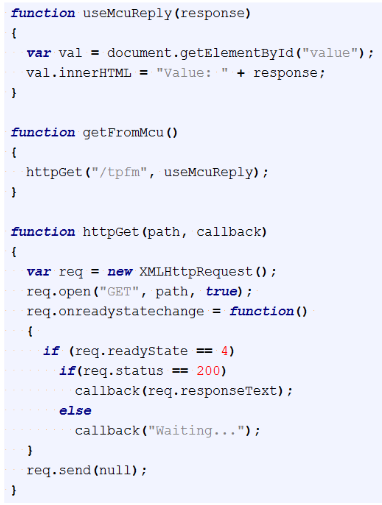
Using this JavaScript is pretty easy. In getFromMcu, you give it the path, “/tpfm” in this case, which is an abbreviation of “to page from microcontroller. The reply from the BASIC Stamp will appear inside the response parameter of useMcuReply(response) when it’s ready. The “when it’s ready” part depends on network traffic and also how long the BS2 takes to get around to answering. For more info on how this code works, there’s an Advanced Topic after an explanation of the BASIC Stamp 2 code.
Since the page we have here isn’t making any HTTP POST requests, #define POSTS has been set to 0. Conversely, since the page is making HTTP GET requests, #define GETS has been set to 1 to add the GET subroutines to the application. Aside from that, setting up a listener for GET requests is the the same process as setting it up for POST requests. The only difference is that there’s no key string accompanying GET requests.
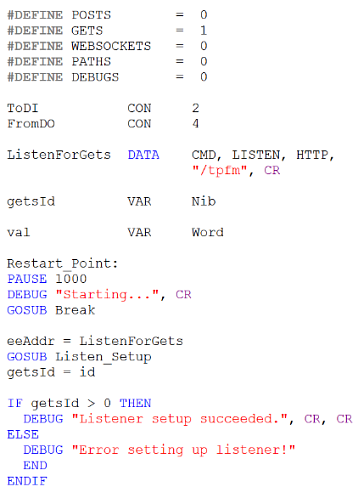
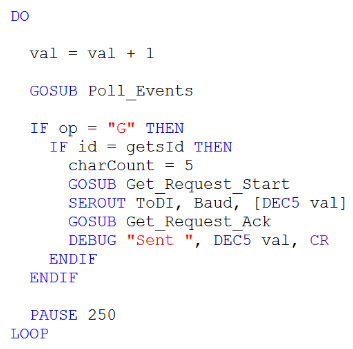
Inside the main loop, the code is adds 1 to a variable named val ever ¼ second and then checking for a “G” in the op variable after a call to Poll_Events. If the op variable does contain a “G”, it means the Wi-Fi module has received an HTTP GET request from one if its listener IDs. Just like there’s a Post_Request_Start and Post_Request_Ack for handling POST requests, there’s also a Get_Request_Start and Get_Request_Ack for handling GET requests. The difference is that instead of POSTing information to the server (our BASIC Stamp 2), this page is GETting information. Before calling Get_Request_Start it’s important to set charCount to the number of characters the reply to the GET request will contain. Then, between Get_Request_Start and Get_Request_Ack, SEROUT ToDi, Baud, [DEC5 val]. Note that the because charCount was 5, the SEROUT sends DEC5 val.
Advanced Topic: What’s Really Happening in That JavaScript?
The true inside req.open(“GET, path, true) means that the request will get processed asynchronously. Asynchronously means that the the httpGet function won’t wait till everything is ready because other things and scripts in a given web page might need attention in the meantime. So, the main thread actually executes everything inside the httpGet function right away and returns. However, after the httpGet function is done, req.onreadystatechange contains a function that gets run each time the readyState property advances through its five states.
According to AJAX - The onreadystatechange Event, the readyState property advances through five states: (0) request not yet initialized, (1) server connection established, (2) request received, (3) processing request, (4) request finished and response ready. There’s also a status property that’s 200 for “OK” or 404 for “page not found”.
The important thing to keep in mind is that each time the readyState changes, the function inside onreadystatechange automatically executes, checking if readyState has reached 4 and status is 200. When both of those are true, the response is ready.
When the response IS finally ready, the callback parameter contains useMcuReply. That’s the function the httpGet(“/tpfm”, useMcuReply) passed when it called httpGet, with the understanding that it would “call back” that usMcuReply function at some later time (when readyState is 4 and status is 200). At that point, callback(req.responseText) becomes useMcuReply(req.responseText).
If the BASIC Stamp replied with “42”, that’s what req.responseText will contain, and also what gets passed to the useMcuReply function’s response parameter. Inside useMcuReply, there’s JavaScript that would display “Value: 42” in the paragraph with the value label.
