Now that you can use a program to modify and display information to a page, you can also modify and send information to the BASIC Stamp.

- Go to your Wi-Fi module’s Files page http://192.168.4.1/update-ffs.html.
- Remember, if you followed the instructions in the Join Another Wi-Fi Network section, you’ll have to replace 192.168.4.1 with the Wi-Fi module’s station IP address.
- Use the Choose file button to upload text-page-to-micro.html to your Wi-Fi module.
This is going to be similar to what you did in the Load a Test Page into the Module section.
- In your web browser, open 192.168.4.1/files/text-page-to-micro.html.
- Again, if your Wi-Fi module has joined another network, use the IP address you noted instead of 192.168.4.1.
- Use your BASIC Stamp programming software to open Text Page to Micro Host.bs2.
- Connect your BOE + BS2 to power and your computer, and set PWR to 2.
- Run Text Page to Micro Host.bs2.
- Verify that the Starting… and Listener setup succeeded messages are shown.
- Type some characters (5 or fewer) into the web page’s text input and then click the Enter button.
- Verify that the BASIC Stamp Debug Terminal displays textStr = followed by the characters you typed.
Try This
Want to use the Enter key as a shortcut to clicking Send? Change this line:
<input type = "text" id = "textField" maxlength = "5">
...to:
<input type = "text" id = "textField" maxlength = "5" onchange = "changeText()">
How it Works - The JavaScript
One way that a web page can transmit information like button clicks and text to a server is through an HTTP POST request. An example of this you might be familiar with is if you type into a search field, and ?search=WhatYouTyped appears after the .html in the web address. In some pages do not show that in response to a search because they’ll send the text invisibly through a part of the HTTP POST called the post body, which is what this example does.
Most of the html and JavaScript works the same way that it did in the section you just finished (06-text-enter-display from the Relay Information with JavaScript section). One of the parts that changed is that now, if you type “Hi!” and click the button, the changeText function:
- Creates a variable named name that stores the string “txt”.
- Creates another variable named val that stores the value you typed “Hi!” for our example.
- Creates a third variable named msg that combines name, “=” and val. In this example, the string it builds is “txt=Hi!”.
This is a name-value pair that the BASIC Stamp program is expecting in an HTTP POST request that contains the path “/fptm”. So, the line with httpPost(“/fptm”, msg); passes “/fptm” and the msg variable, which is currently storing “txt=Hi!”. The httpPost function receives that path and parameter, and sends them to the Parallax Wi-Fi module web server as a post request.
The text highlighting in this code example is provided by Notepad++, available from notepad++.org. 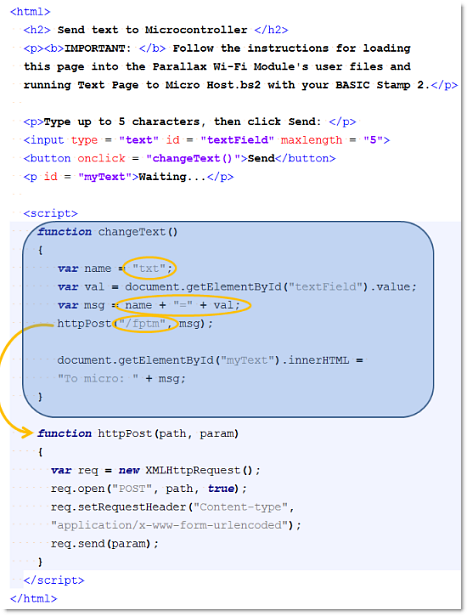
How it Works - The PBASIC
There are three important pieces of this JavaScript you’ll need for your BS2:
- This is an HTTP POST request.
- The path component is “/fptm”
- The string sent is going to contain “txt=” + msg, where message is the characters you typed.
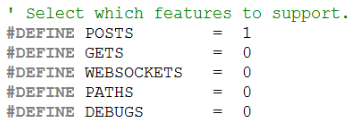
1) Inside your BASIC Stamp Code, you’ll need to set #DEFINE POSTS = 1, which adds the variables and subroutines your program will need to support post requests.
2) The Listen_Setup subroutine will need the address of a string command (CMD) that tells the Wi-Fi module to LISTEN for HTTP requests with the path /fptm, which is short for from page to microcontroller. A carriage return is required to complete a serial command to the Wi-Fi module.
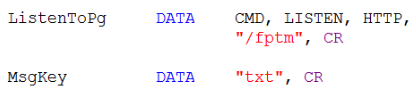
3) The Wi-Fi module can filter out the “txt=” part of the POST request so that your BASIC Stamp just receives “hello”, “bye” and other things you typed.
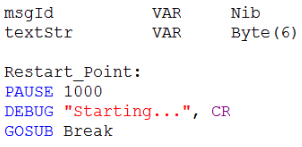
Path can be /fptm* to allow for different types of information delivered on different paths. Since the string comparisons for this take more code and memory, we’ll examine it more closely later.Your PBASIC code will need to store a listener ID, and 6 characters for a string of up to 5. The PAUSE 1000 prevents certain operating systems from thinking a serial plug and play device is trying to connect. GOSUB Break sends a Break condition to the Wi-Fi Module to tell it to communicate serially with a microcontroller.
The Listen_Setup subroutine takes care of sending the ListenToPg DATA to the Wi-Fi module. Just set eeAddr to ListenToPg, then call the Listen_Setup subroutine. It will place a value in a variable named id. Copy this value to msgId for use at various places in the program. Up to 4 ID values are available, from 1 to 4. If id stores 0, it means that something went wrong, so the program doesn’t continue.
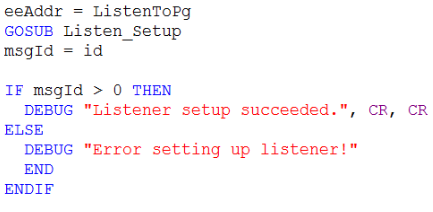
If Listen_Setup contained a valid id, the program continues to the main loop, which repeatedly calls the Poll_Events subroutine and conditionally executes other code depending on the values of op, id, and handle. Since only POSTS are supported in this program, Poll_Events can only return “P” for POST, “N” for nothing, or “E” for ERROR. If op is equal to “P”, it’s a POST request, and if the id variable is equal to the msgId variable (from GOSUB Listen_Setup), then, the program knows it came though on the /fptm path, and it’s time to start processing it.
For a full list of possible responses, see the “Serial Protocol” section of the Parallax Wi-Fi Module API document.
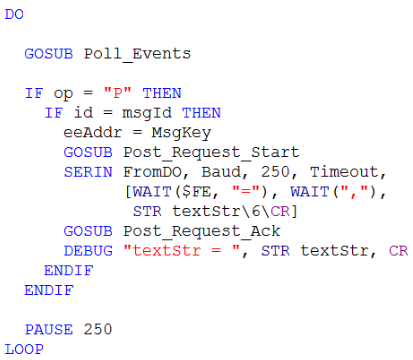
To process the post request, set eeAddr to MsgKey (that’s “txt”), and then call GOSUB Post_Request_Start. Next, use a SERIN command to capture the HTTP POST request’s value that corresponds to the “txt” key. Examples of value would be “hello”, “bye”, andy anything else (up to 5 characters) that you type into the page’s field and then click the Enter button. SERIN FromDo, Baud, 250, Timeout, [Wait($FE, “=”), WAIT(“,”), STR textStr\6\CR] waits for up to .25 seconds for a reply that starts with 0xFE’,’. Then, it waits for a comma, and loads up to the next six characters received into textStr, but terminates early if a CR is received.
Below the loop, you will find a collection of constants, variables, and subroutines that allow your code to focus on the basics, like sending a break, setting up a listener, and polling for and processing events.
Inside Communication with the Wi-Fi Module
The information below shows the the transmitter (BS2 or WX) along with a brief description of the message, the actual base-16 hexadecimal values, and the constant names in the PBASIC program. To find out more about each of the serial values and what they mean, check the Parallax Wi-Fi Module Serial API.
Message: BS2: Break condition
Hex: [0][0][0][0][0]
Constants: [0][0][0][0][0]
Message: BS2: Listen for /fptm path ; WX: Success, listener ID 1
Hex: [fe][e7][f7]/fptm[0d] ; [fe]=S,1[0d]
Constants: [CMD][LISTEN][HTTP]/fptm[CR] ; [CMD]=S,1[CR]
Message: BS2: Poll listener IDs ; WX: No requests
Hex: [fe][ec][0d] ; [fe]=N,0,0[0d]
Constants: [CMD][POLL][CR] ; [CMD]=N,0,0[CR]
Message: BS2: Poll listener IDs ; WX: POST request handle 5, ID 1
Hex: [fe][ec][0d] ; [fe]=P,5,1[0d] ; [fe][e6]5,txt[0d]
Constants: [CMD][POLL][CR] ; [CMD]=P,5,1[CR] ; [CMD][ARG]5,txt[CR]
Message: BS2: Ask for txt in name ; WX: Success, txt=Hi!
Hex: [fe]=S,Hi![0d] ; [fe][e5]5,200,2[0d]OK ; [fe]=S,0[0d]
Constants: [CMD]=S,Hi![CR] ; [CMD][REPLY]5,200,2[CR]OK ; [CMD]=S,0[CR]
Message: BS2: Handle 5 200 OK (success)* ; WX: Success reply processed
Hex: [fe][ec][0d] ; [fe]=S,5,0[0d]
Constants: [CMD][POLL][CR] ; [CMD]=S,5,0[CR]
Message: BS2: Poll listener IDs ; WX: Success, handle 5 confirmed
Hex: [fe][ec][0d] ; [fe]=N,0,0[0d]
Constants: [CMD][POLL][CR] ; [CMD]=N,0,0[CR]
Message: BS2: Poll listener IDs ; WX: No requests
Hex: N/A
Constants: N/A
* Reply to handle 5 with the value 200 (success) and 2 characters of text “OK” which can be displayed in the web page’s developer console.