Intermediate Hack, Continued
Once you have edited the firmware to support adding a servo to the Flight Controller, you are ready to plug in the servo.
MAKE SURE the propellers have been removed from your ELEV-8 v3 and the battery is unplugged before proceeding!
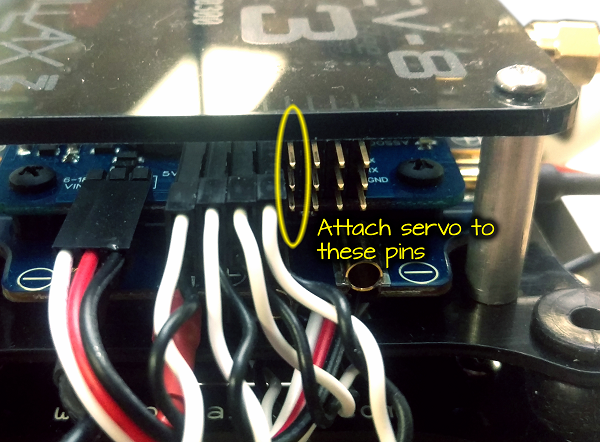
- Connect the servo the port on the flight controller shown below, making sure the white wire is on top:
- Turn on your transmitter and plug in the quadcopter's battery to turn it on.
- Wait for the ELEV-8 v3 to start up completely.
- Turn the knob or flip the switch you assigned to channel 6/Aux 1 - your servo should move accordingly.
To download the template file (AXD, DXF, and PDF) for the drop-rig mechanism, click here:
How the code works
The Parallax Flight Controller's firmware contains a servo driver that generates the pulses necessary to drive the servo. Although the driver has a high resolution and it supports high update rates, its range is limited.
You may have noticed the following code in the elev8-main.cpp file:
  Servo32_Init( 400 );
  for( int i=0; i<4; i++ ) {
    Servo32_AddFastPin( MotorPin[i] );
    Servo32_Set( MotorPin[i], Prefs.MinThrottle );
  }
  Servo32_Start();
This code tells the servo drivers to create high-speed servo instances on each of the first 4 pins on the right side of the Flight Controller (labeled ESC/AUX). This is where the ESCs that drive the motors for flight are attached. They use the same signals as servos, except that their pulses are sent 400 times per second instead of 50 times per second for standard servos. The drawing below shows the pin and how they are referenced in the firmware:
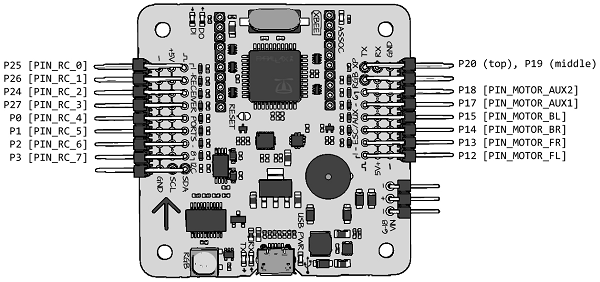
The code you added sets up a standard ("slow") servo instance on the next pin header, where you plugged in your additional servo:
  Servo32_AddSlowPin( PIN_MOTOR_AUX1 );
  Servo32_Set( PIN_MOTOR_AUX1, servoPosition );
The next line you added tells the servo to start sending pulses that are exactly 1000 μs (1.0 ms) wide. You may have noticed that the variable (servoPosition) that tells the servo driver to send 1000 μs pulses contains the number 8000 - this is because the servo driver has a resolution of ⅛th of a microsecond. 8 times 1000 = 8000.
Since the driver supports an output range from 1000 μs to 2000 μs, you can give it any value from 8000 to 16000.
The next lines of code read the value send by the receiver to the Flight Controller. These values range from -1024 to +1024. In fact, you can see these values next to the sticks at the bottom of the window when your Flight Controller is connected to the Parallax GroundStation software on your computer:

  if( Radio.Aux1 > 512  ) servoPosition = servoPosition + 12;
  if( Radio.Aux1 < -512 ) servoPosition = servoPosition - 12;
The next line of code ensures that you don't send any number lower than 8000 or higher than 16000 to the servo driver. In fact, sending a number outside of that range will cause the servo driver to lock up, and if that happens in flight, your ELEV-8 v3 will likely crash:
servoPosition = clamp( servoPosition , 8000, 16000);
And finally, the servo is set to the position specified by servoPosition:
Servo32_Set( PIN_MOTOR_AUX1, servoPosition);
Always use the clamp() function to make sure you do not send values outside of the 8000 to 16000 range to the servo driver!
To make the servo travel faster, you simply need to change how much is added or subtracted during each cycle. If you use servoPosition = servoPosition + 24, the servo will move twice as fast.
Try This
Use a different channel to drive the servo.
- Change Radio.Aux1 shown the code above to Radio.Rudd or Radio.Thro (Rudder and Throttle, respectively).
Radio.Elev, Radio.Aile and Radio.Aux2 are also available, and each has a range from -1024 to +1024.
Instead of using the transmitter to tell the servo to go clockwise or go counter clockwise, you can set it's position directly.
- Change this code:
  if( Radio.Aux1 > 512  ) servoPosition = servoPosition + 12;
  if( Radio.Aux1 < -512 ) servoPosition = servoPosition - 12;
- To this:
servoPosition = 12000 + ( Radio.Aux1 * 4 );
The code above multiplies Radio.Aux by 4, so it's range goes from -4096 to +4096. It then adds it to 12000, meaning that the range goes from 7904 to 16096. It is then run through the clamp() function to make sure that it stays between 8000 and 16000.
- Once you have made changes, Click "Save" and then "Upload to EEPROM" to try them out.
DO NOT Fly your ELEV-8 v3 with modified firmware or hardware until you have read how to test it safely on the last page of this tutorial!