The Propeller chip has eight processors, called cores or cogs, numbered 0 through 7. In all of our example programs, the main function automatically launches into cog 0. Many Propeller C libraries automatically launch other cogs to handle tasks for you, behind the scenes. You can also write your own function and launch it to run in another cog using cog_run.
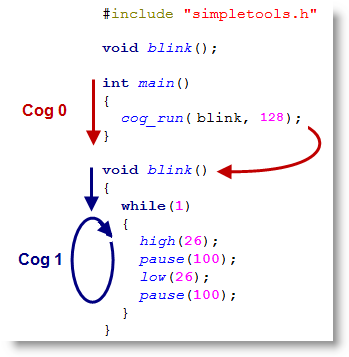
The example below shows the simplest use of the cog_run function. Here, the main routine running in cog 0 executes the cog_run function call, causing the blink function to run in cog 1.
Rules for cog_run:
The cog_run function itself needs two parameters:
- function, which is the address of the function you want to launch (blink in this example)
- stackSize, a value to set aside additional memory called stack space for the cog to perform its computations.
While learning or prototyping in multicore you should always set more stack space aside than you think you will be using. In this example we use a stackSize of 128, but our small program doesn't actually use it. This way, we have room to grow our code without worrying about running out of memory.
A function launched with cog_run:
- Can not require parameters passed to it
- Can not return a value
- Should have all its instructions inside a while(1) loop, unless your program is also going to deliberately stop the cog (which we'll do next in the Stopping Cogs lesson)
- Should not contain a print, scan, or other function call that uses the SimpleIDE Terminal, unless your program is going to specifically manage that with additional functions (which we'll do in the Print from a Different Cog lesson)
So, let's try it!
Circuit
We'll use the Activity Board's (original or WX version) built-in LEDs on P26 and P27. See the Blink a Light tutorial for a schematic if you are using a different board.
Test Code
- Click SimpleIDE’s Open Project button.
- Open Cog Run Example from Learn\Examples\Multicore
- Click SimpleIDE’s Load RAM & Run button.
- Verify that the Activity Board's (original or WX version) P26 LED starts blinking.
How it Works
After including the simpletools.h library, there is a forward declaration for the blink function. Since the blink function definition is below the main function, this lets the compiler know to expect it.
#include "simpletools.h"                // Library include

void blink();                           // Forward declaration
Inside the main routine is just one statement: cog_run(blink, 128). This launches the function defined at address blink. It also provides a stack space of 128 32-bit memory locations used for performing calculations while executing the instructions in the blink code block.
int main()                              // Main function
{
  cog_run(blink, 128);                  // Run blink in other cog
}
Below the main routine is the blink function itself, written to be launched into another cog without any fuss. Note that it has an empty parameter list and void return type. Its code block is entirely inside a while(1) loop, so it will keep on blinking that P26 LED until the power shuts off. If those four instructions were not in a loop, they would execute just once and the cog would shut down, but without releasing its resources. This would make the cog and its stack space unavailable for other uses afterward.
void blink()                            // Blink function for other cog
{
  while(1)                              // Endless loop for other cog
  {
    high(26);                           // P26 LED on
    pause(100);                         // ...for 0.1 seconds
    low(26);                            // P26 LED off
    pause(100);                         // ...for 0.1 seconds
  }
}
Did you Know?
Stack Size - how much? 10 is the bare minimum value you would want to use for the stackSize parameter. If you were to add more instructions to the blink function's code block, you would need to increase it. Add 1 for every local variable used, 2 for each function called, and 1 for each parameter and each return value used by the functions called.
Print from one cog at a time, please! Print, scan and other functions that interact with the SimpleIDE Terminal can only run in one cog at a time. Usually, it is most convenient to call print and other such functions from the main routine, even if they need to print values updated by other cogs, as we do in this example. But, if you want to, you can Print from a Different Cog as well, as that lesson will show you.
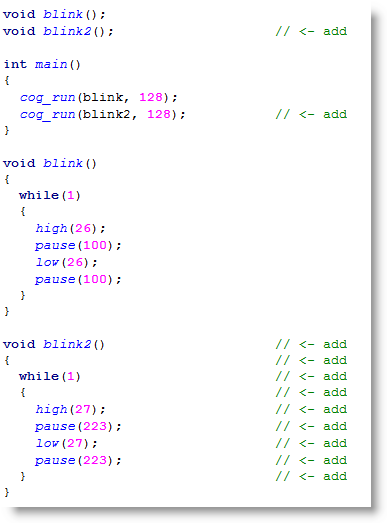
Try This – Add Another Function, Run it in Another Cog
Let’s expand the example program so that it blinks the P27 LED at a different rate, using another cog. The process is fairly simple: just add a second function and pass it to cog_run. You will need a second forward declaration for that function, and also a second cog pointer for shutting the cog back down.
- Click SimpleIDE’s Save Project As button, re-name the project and save it to your My Projects folder.
- Enter the code below into SimpleIDE.
- Click SimpleIDE’s Load EEPROM & Run button and verify that the P26 and P27 LEDs blink at different rates for 3 seconds.
Okay, so blinking two LEDs doesn't seem so amazing. Yet, notice that one LED blinks on/off every 100 ms, and the other blinks on/off every 223 ms. Now, can you imagine writing code to do that from a single processor? Imagine that the on times were different from the off times for each LED. And then imagine adding six more LEDs, each with unique on and off times. The math would get complicated very quickly. This example is simple, but it shows how multi-processing can make a group of timing-sensitive tasks easier to do.
Your Turn
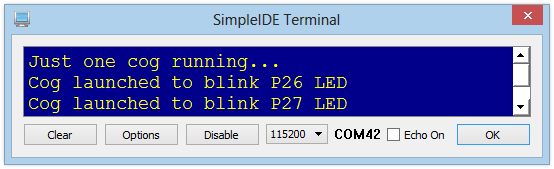
Just to prove that three cogs are really running different processes at the same time, let's have the original cog do something more than launch the other two cogs.
- In the main routine, add three print statements: one before, one between, and one after the cog_run function calls, with the phrases shown below.
- Click Run with Terminal to make sure your code works as expected. (Did you remember the \n newline formatter?)